This is a short tutorial so you can learn to leverage Razor Blade to generate short teaser text, no matter what the source is.
Why Teaser-Texts are so Hard
So the goal is, that you can show a shortened text on a list page or similar, to indicate what is behind the link. The challenges usually are:
- We need a short text of a certain length. Maybe the user had entered something in the data for this (but the length could still be off) or we should auto-generate it.
- If the text is longer than the allowed length, it should show an ellipsis (...), otherwise not
- We should probably check various fields (Teaser, Body) based on a priority, to check which one to show.
- If there is no teaser-text, we should auto-generate it from the body, but cut off at the right place - ideally not in the middle of the word
- The body is probably HTML, so it contains tags which mess up the character count, and could result mismatched tags if we cut it off
- HTML-text can also contain entities (things like & or umlauts like ö) which can be cut off by accident
- If we strip the html, there are various cases where a text could have multiple spaces or combinations of enters and spaces, resulting in bad character-count
- New-line characters, tabs etc. will mess up our character count
There are a few more challenges, but these are the most common.
Razor Blade to the Rescue
Razor Blade is a helper library for Razor developers. It solves many challenges like the one above - to learn more about it, read the release-blog or the documentation on Github. You can also find a tutorial app which will help you see real code.
Note that the following examples assume you have Razor Blade installed (either as a DNN module, or because you have 2sxc 9.40+) and that your CSHTML file contains the @using Connect.Razor.Blade;
Generating Clean Text from HTML
Do this using the var teaser = Tags.Strip(teaserWithHtml) command. It will remove all the html-tags from the string, and replace them with spaces. It will then scan the resulting text and shrink all the spaces together, so multiple white-spaces incl. new-lines and tabs are reduced to a single space. Here's a short screenshot from the tutorial-app:

Now repeat this for the body, and we're ready for the next step.
Picking the right Text
Let's say you used Tags.Strip(...) to clean both the teaser and the body. Now you want to take the teaser if it has something, but you don't want to use it if it just had a space - or now has a space because the wysiwyg had an empty <p> tag, which is now reduced to a space. You also don't want to use it, if it only has an . So let's use var finalTeaser = Text.First(teaser, body, "no description"). This will take the teaser, if it really has something (so more than whitespaces, etc., otherwise it will take the body, and if that doesn't work, it will take the default text "no description".
Properly Cropping and Adding Ellipsis
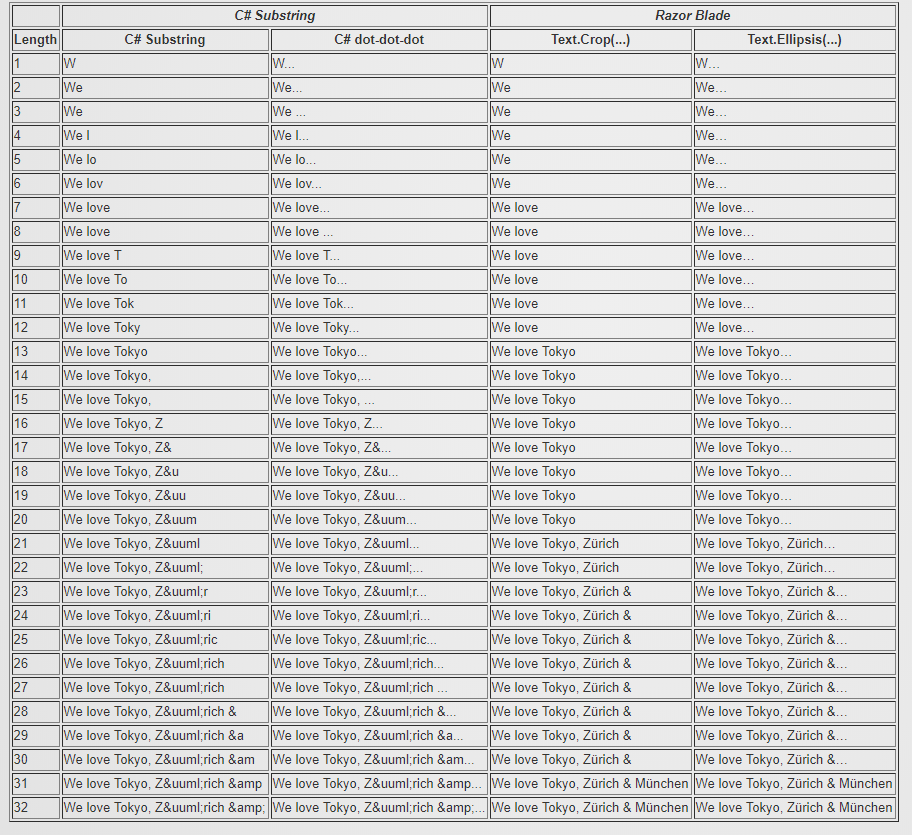
Now for the cropping. We don't want to split words or html-entities (&, " etc.), and if the text really has more characters, we want to add an ellipsis (…) - ideally as the … (…) character, not three dots (...). This is done using Text.Ellipsis(finalTeaser). Below you'll see a screenshot where we ran Ellipsis on various lengths of tricky strings, comparing it to basic Crop and other methods:

That's All :)
So that was it - painless, simple, and you'll save yourself so many complaints because "it didn't work again". I recommend you download the tutorial app and mess around with it to get started.
Love from Switzerland,
Daniel