 This is part 3 of my
first series about beautiful content, in which I explain a basic content/template separation and the user experience with 2sxc.
What came before
In the previous
sections (1.1 Introduction to Beautiful Content and 1.2 Separating Content from Beautiful Templates) we reviewed our goals, what we need to achieve it and various tools. If you have not read it, I recommend you start
there.
In this section
we'll look at a very simple example with 2sxc to understand the concept better and to see
the UX (user experience) the end user will have.
Preparations to experience this yourself
The example in this
blog is part of the default installation of 2sxc. So to try this yourself, all
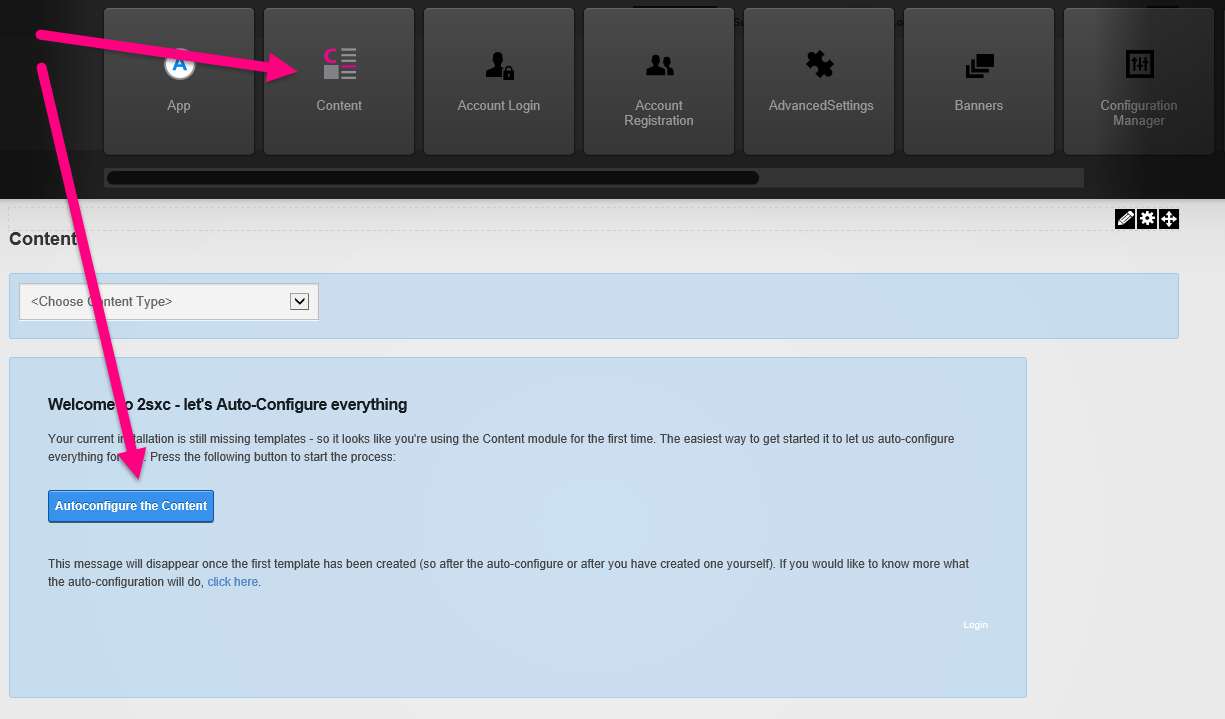
you have to do is install 2sxc (see demo-video) and when you insert the content module, press
the large button to install the default templates (see screenshot below).

The Content-Type in this Example
The content-type is the what. It could be a person, an image, a
reference, video or anything. Each content-type has its own set of fields and
usually its own templates. So a Person
might have Name, Surname, Phone, Photo, etc. and templates shoeing it as a
Employee-profile or as a Google-Map. To really understand what we're talking
about, let's assume a very trivial example called Simple
Content with these 3 fields:
- Title (text, single-line)
- Content (text, wysiwyg -
reduced to bullets, bold/italic, etc.)
- Image (a link or a DNN-file
reference like "File:17")
The User Experience for the Content Editor
When the user wants
to add or edit content, he will first choose what type of content he wants to
add. In this case, he'll choose "Simple Content" - like this:

Now that 2sxc knows
what content is to be added, it will automatically provide a layout for this -
usually prefilled with demo-content. This could look as follows:

Now the user can try
other layouts to satisfy his needs. The previews all load as AJAX (using WebAPI), so it's blazingly fast. Thanks to
the demo-content, it's easy to see what his content will look like. Note that the
user can change layouts later on as well - so it's not really important which
initial layout she chooses. Such layouts can look as follows:

Editing the Content
Most templates will
have floating edit buttons, so when the mouse hovers over the content,
edit-buttons will appear like this:

When the user clicks
it, it will open the automatically generated edit UI. The fields will be empty
(or contain a predefined default value). So the demo-data is only for the
preview (otherwise the user would have to remember to remove all unwanted
content).

Saving and Publishing
The user will
usually then save the content, and he can optionally choose to not publish it
yet (default is to publish changes).

If unpublished, then
normal users will still see the previous content, while users with
edit-permissions will see the modified content. The edit button will have a
special sign to show that this is the unpublished version:

The Templates / Views
To finish off this
simple example I want to show you the templates (also known as views) which
create the designed output. These basic templates you see in these examples
just use Tokens. These are simple placeholders using square brackets like
[Content:Title]. This is the first template, which will place the chosen image
on top:

Summing Up
That was the brief introduction to 2sxc. In the next parts, we'll look at all the specials in this simple template (like dynamic paths, thumbnailers, etc.) and how you can adapt the existing templates to your design and how to create new templates - using Token-placeholders which look like [Content:Title] and Razor-Views which look like @Content.Title.
Stay sexy,
Daniel
 Daniel Mettler grew up in the jungles of Indonesia and is founder and CEO of 2sic internet solutions in
Switzerland and Liechtenstein, an 20-head web specialist with over 600
DNN projects since 1999. He is also chief architect of 2sxc (2SexyContent - see forge), an open source module for creating attractive content and DNN Apps.