As indicated in the previous blog entry on Modern Module Development we are opting to use modern development techniques in our module as much as possible. In this blog entry we will walk through building out our web service class for our tasks module. By the end of this blog we will be able to see data listed out at our web service’s end point.
Adding in New References
We started off using Chris Hammond’s module development template because it saves us a great deal of time when creating a module. The template has all the necessary references for normal module development already configured. However, Chris’s template doesn’t currently have the references we need to work with the DNN’s Web API Services Framework. It’s possible that Chris will update the template to include this at some point in the future, but for now we need to update it a little.
We need to add in 4 additional references and they are:
- System.Net.Http.dll
- System.Net.Http.Formatting.dll
- System.Web.Http.dll
- DotNetNuke.Web
In order to add the necessary references just right click on the “References” node and click “Add Reference”
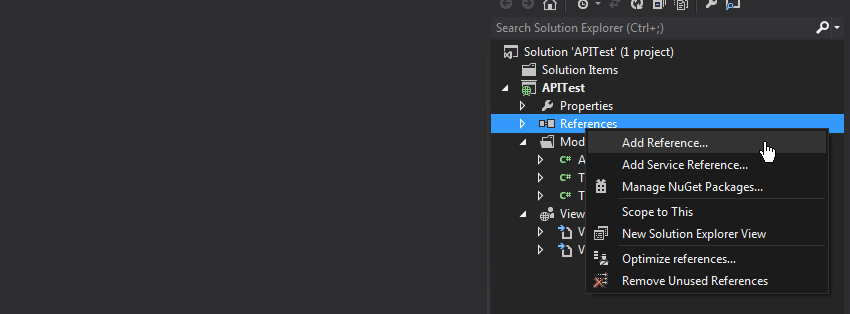
Once you click to “Add a Reference” you will be presented with a pop-up window. In the bottom right hand of that window you will see a “Browse” button. Click the browse button. When you click the browse button you will most likely see the bin folder for your site. Regardless of what folder and files you initially see you need to ensure that you’re looking in the “Bin” folder of your site. For me that’s browsing to C:\inetpub\wwwroot\ModDev2\bin. This “Bin” folder is where all of the dll’s (dynamic link libraries) that we need to reference in our module reside. Once you see the .dll files that we need to add then just select them one by one or multi-select them all and then add the references. When you’ve got all 4 new .dll’s added then click “Ok”.
Creating the Web Service Class
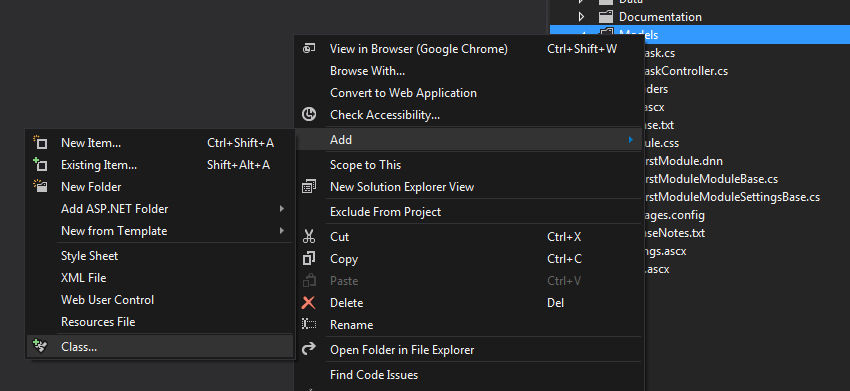
With the proper .dll’s referenced we now need to create our webservice class. Creating the class for our Webservice is the same process for creating any other class. Right click on the “Models” folder then hover over “Add” then “Class”. Here again you can name the class whatever you’d like to name it. I’ll name mine “Webservices.cs”.
Just as we did with the TaskController class, we first added some additional “using” statements at the top. Again we do this so that we can leverage functionality built into other parts of the DNN API. Having these "using" statements will also give us really good intellisense as we code, which will make it easier for us to create the necessary code.
At the top add in these using statements:
using System.Net;
using System.Net.Http;
using System.Web.Http;
using DotNetNuke.Common.Utilities;
using DotNetNuke.Entities.Users;
using DotNetNuke.Web.Api;
Now we should have all the proper references in our project and all necessary using statements and we can get into some code. By default Visual Studio creates a “stubbed out” class of public class Webservices, but in order to work with DNN’s Web API service framework all classes using web services must end in the word “Controller” and they must inherit from the “DnnAPIController” class. So what does that look like? Just update the public class Webservices to read:
public class ModuleTaskController : DnnApiController
{
}
Looking at the above code the ModuleTaskController is the name of this class. You can name it whatever you want so long as it ends with “Controller”. Without the word “Controller” at the end of the class name it will not work with DNN’s implementation of Web API. The class name is followed by a colon and then “DnnApiController” and the colon indicates that this class we’re creating of ModuleTaskController inherits from the DnnApiController class. We inherit from this class so that we can have access to all the DNN goodness like authentication, security, and access to portal settings.
Our Hello World Web Service
Before we get too crazy here, in honor of developer tradition, let’s conduct a simple “Hello World” here with our first web service. I mean it’s almost like we’re breaking an unwritten rule if we don’t do a “Hello World” at some point right? So let’s make our first service return the text “Hello World” for good measure.
Inside the code block of our ModuleTaskController webservice class we need to update the code to look like the below:
public class ModuleTaskController : DnnApiController
{
[AllowAnonymous]
[HttpGet]
public HttpResponseMessage HelloWorld()
{
return Request.CreateResponse(HttpStatusCode.OK, "Hello World!");
}
}
Breaking Down the Controller
Now let’s discuss this code so we can understand what’s going on here. At the top of the code we see 2 attributes… the [AllowAnonymous] and [HttpGet].
[AllowAnonymous]
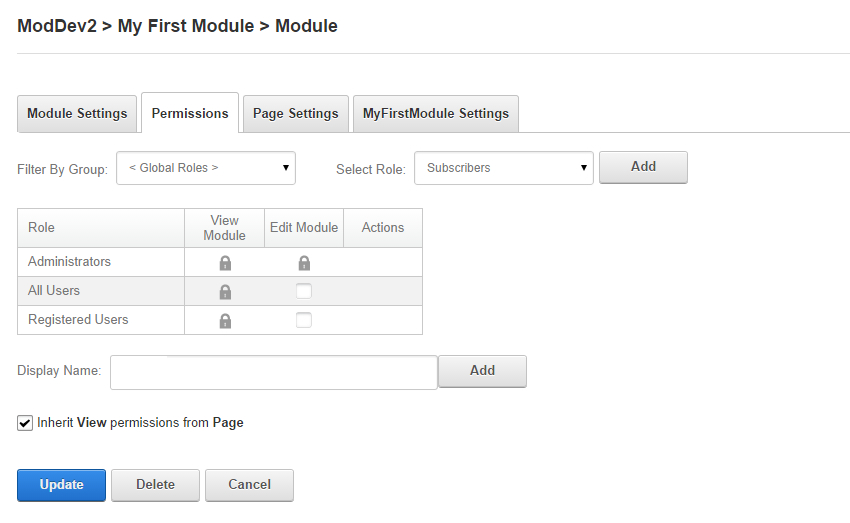
The [AllowAnonymous] attribute is related to security and essentially means that we are allowing anyone (anonymous users) to access the data exposed on this web service end point. We could update this attribute to other levels of permissions such as [RequireHost] which would mean that only host users could access this method. We can also enter in some code to let DNN’s security model handle it. In that case we could enter [DnnModuleAuthorize(AccessLevel = SecurityAccessLevel.Edit)]. When done this way this tells the service to let DNN’s security model determine if the user has access or is privileged enough to see the data returned from the method. If you can remember the permissions tab that we previously referenced in the first video this is what dictates the security access level.
[HttpGet]
The [HttpGet] simply indicates that this method is able to be accessed from “Get” requests (more on that in the next blog entry). Just beneath the attributes we see “public HttpResponseMessage HelloWorld()” and that method returns a response message of “Hello World” along with an HttpStatusCode of “ok”. This is simply the response that we are returning which will make the text of “Hello World” appear on the screen.
We Need a RouteMapper!
With our web service created the only thing left to do now is set up the route which will make the HelloWorld method route to a specific URL. Creating the route configures the location in which (the URL) the methods on our controller to be accessible on the web. We could indeed include this routing code in this class, but to be in order to keep things organized we’ll place this routing code in a different class.
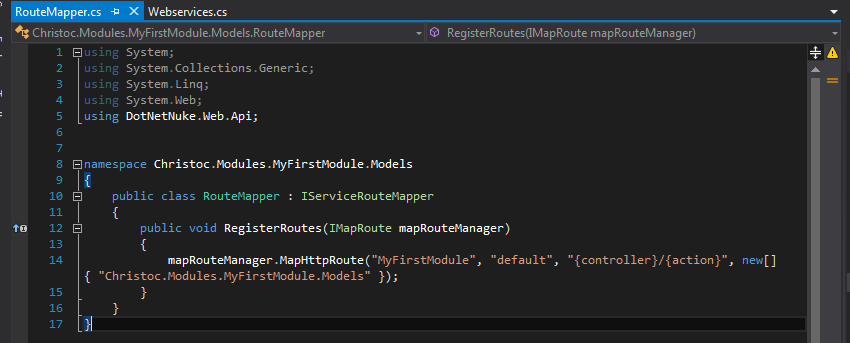
So let’s create a new class again by right-clicking on the “Models” folder and adding a new class. You can name this class whatever you’d like. I’m going to name mine “RouteMapper.cs”. Once you have this class created be sure to include the “using” statements “using System” and “using DotNetNuke.Web.Api” up at the top of the class file.
Next update the stubbed out class to look like the following and click save:
namespace Christoc.Modules.MyFirstModule.Models
{
public class RouteMapper : IServiceRouteMapper
{
public void RegisterRoutes(IMapRoute mapRouteManager)
{
mapRouteManager.MapHttpRoute("MyFirstModule", "default", "{controller}/{action}", new[] { “Christoc.Modules.MyFirstModule.Models" });
}
}
}
Notice that this class of “RouteMapper” inherits from the IServiceRouteMapper interface (the colon should have tipped you off to the inheritance :-) ) which is needed in order to register routes to various URLs. In order to explain the following parameters I’m going to reference some text from a blog entry “Getting Started With the Services Framework” below and I’ve already updated the 2 necessary parameters cited in this blog entry to make it work for our module.
- "MyFirstModule" - string moduleFolderName: Unique to DNN this parameter should be a name unique to your module/service, and will typically match the name of the DesktopModules folder in which your module is installed. It is important to use a name unique to your service to avoid routing conflicts with other services that may be installed.
- "default" - string routeName: A name for your route. This makes up part of the total route name when routes are registered in ASP.Net. The combination of moduleFolderName and routeName must always be unique. This name is important when trying to use the UrlHelper extensions. For most services that only use a single route, "default" is perfectly acceptable.
- "{controller}/{action}" - string url: Standard WebAPI parameter that defines the unique characteristics of your route.
- "new [] {"Christoc.Modules.MyFirstModule.Models"} = string[] namespaces: Unique to DNN, this is an array of namespaces to search for controllers for this route. The parameter helps prevent conflict between services built by different developers.
Now with everything saved we should be able to get the “Hello World” text returned to us from our route. In order to do this we must access the specific URL of this web service. Depending on what you named your site and your module your URL may differ from mine a little, but in order for me to access it I have to go to the following:
http://moddev2.loc/DesktopModules/MyFirstModule/API/ModuleTask/HelloWorld
When I access that URL I see this:
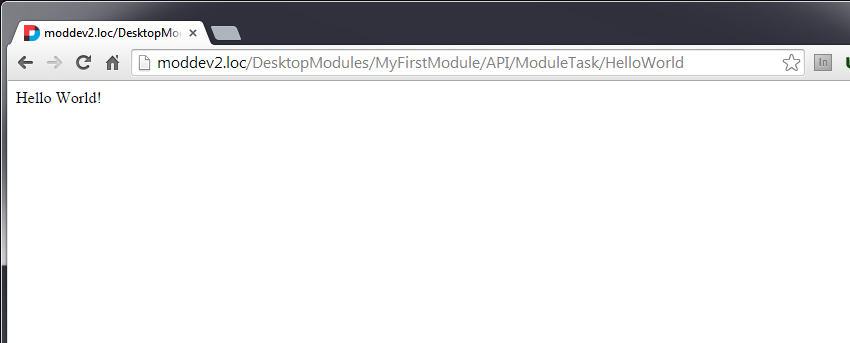
There she is in all her beauty staring right back at us saying “Hello World”. If you see the “Hello World” text then congratulations… you’ve just built your first web service!
Let’s talk about the path of that web service for a second though before we get too carried away. Notice that we first access the root URL of the site, then we go into the DesktopModules folder because this is where all modules reside. Next we go into our specific module’s folder… in this case it’s “MyFirstModule”. After that we look into API then we see “ModuleTask” and if you remember “ModuleTask” is the name of our controller minus the “Controller” ending. Then finally we see “HelloWorld” which is the name of our method. Hopefully that explanation provides you insight into how to arrive at various service routes.
Creating the GetTasks Method on our WebService
With our “Hello World” Service under our belt we have some confidence and are ready to move forward. Can you already guess how we will access our “dummy” data in the Tasks table? If you can then kudos to you and keep rocking out! There is one other thing that we must consider for our GetTasks web service though. In order to access our task table data we need to account for the ModuleID parameter. So let’s discuss how we can go about this.
Just below the HelloWorld() method copy and paste in this code:
[AllowAnonymous]
[HttpGet]
public HttpResponseMessage GetTasks(int moduleId)
{
try
{
var tasks = new TaskController().GetTasks(moduleId).ToJson();
return Request.CreateResponse(HttpStatusCode.OK, tasks);
}
catch (Exception exc)
{
return Request.CreateErrorResponse(HttpStatusCode.InternalServerError, exc);
}
}
Notice that we start off again with the [AllowAnonymous] and [HttpGet] attributes again. Again this means that anyone can access this data on this service route and also that it will respond to HttpGet requests. Then we created another public HttpResonseMessage called “GetTasks” which accepts a parameter of moduleId that is of type integer.
The “Try/Catch” Block
Inside the squigglies of this function you see something we haven’t seen yet… a “Try / Catch” block. Why is it there? Why are we using it? The Try/Catch block helps us to log exceptions in the scenario that our module throws an error. The code in the “Try” section is the code that will be executed when the method is called. The “Catch” section will log the error if in fact there is an exception thrown in our module. We pass in an Exception named “exc” and then in the ErrrorResponseMessage we add the exception as a parameter.
Let’s focus on the code inside of the “try” block now. Notice that we first create a variable called “tasks”. You can call the variable whatever you would like. We set the tasks variable equal to a new instance of the TaskController (remember we just created this controller class) that executes the GetTasks method which is scoped by the parameter of ModuleId. Once we get that information we convert it to JSON (JavaScript Object Notation) by adding .ToJson() to it. Now we have the information we need and we simply need to return it as a response. In the next line we do exactly that by returning the HttpStatusCode of “Ok” along with the variable “tasks” which, by this point in our method, is a JSON object holding our tasks from the tasks table!
With all of this information saved build your solution again and let’s see if we can get some data at our web service route URL! Though, you may be wondering… what will the URL for this web service since we are dealing with a parameter? Well we’ll access the URL that you’re probably thinking of already and add a parameter to it like this:
http://moddev2.loc/DesktopModules/MyFirstModule/API/ModuleTask/GetTasks?moduleId=416
Oops We Found an Error!
When I accessed that URL I saw a JSON object which is a good thing, but the object had “null” descriptions in it for the “Name” and “Description” fields. It looked like this:

The fact that we’re getting a JSON object back is really good news, but I have definitely done something wrong for the name and description to be null. So my apologies, but I have previously lead you astray. Though, it’s good because it helps us learn to troubleshoot a little bit. After looking into my code for the Task table and my Task class I realized that I made an error very early on. When we created the Task Table in SQL I named the name “TaskName” and the description as “TaskDescription”, but in my Task class I named the name “Name” and description as “Description”. Obviously these don’t match up! Yes, fail on my part. It’s an easy fix though. We just need to update the class names to reflect the proper names. Open up the Task.cs class and update the name to “TaskName” and description to “TaskDescription”.
Now the Task class should look like this:

After you have fixed our/my error and updated the class save the file and then rebuild the solution. After you have re-built then go back to your web service URL and refresh… voila, now we have all the correct data from SQL showing up here on our screen as a large JSON object! It looks like the below:

If you notice the parameter for our module is 416 and when viewing the tasks for that module we see data returned. Go and update that id of 416… change it to something else, any number, and click enter. Did you see any data returned? You shouldn’t have and that’s because there are no tasks for any other module ID’s in our database. If you want to test it out you can go back into the database and insert some more test data, but use a different ModuleID, and then try to hit the URL for that ID.
Did you just successfully get data returned via your web service? If so, tweet to the DNN Community and let us know!
The below video walks through the concepts covered in this blog entry
Pause for Celebration
Here we are, we’ve come from not much knowledge to already having returned SQL data to our module through DNN’s Web API Service framework! I remember when I first took minor steps and something would work I would get excited. I’d be sitting here at my desk clinching my fist as if I’d just thrown a touchdown pass or something. Hey, nothing wrong with celebrating and matter of fact we should take a moment to celebrate how far we’ve come. If you’ve made it this far then you’ve thrown several Td’s by now. And Td’s are good, but the game isn’t over just yet. We have made great progress, but we’ve still got more to go… so congrats for hanging in there, but we've got to finish the game. You’ll be writing these tutorials before you know it ;-)
Using Web Services Beyond DNN
Now that we’ve got a web service out there I want us to pause and take a step back to consider something. Our web service can be accessed by anyone (because remember we used the “[AllowAnonymous]” attribute) and this opens up possibilities. What possibilities you ask? Well the web service framework allows us to ultimately expose any data that you choose from your DNN instance on an end-point and that data can then be consumed by “Get” requests regardless of where they come from. Developers use DNN’s web service capabilities to integrate DNN site data with external applications such as CRM’s, mobile apps, and other custom solutions. So, just because we have a service created within and living in DNN don’t let it limit your imagination to only using this data in a DNN module. You can use web service data in DNN and beyond!
Helpful DNN Web Services links:
Next Steps
Now with a web service that has data just dangling out there waiting to be consumed we are finally ready to return back to our View control and throw some JQuery and AJAX on it to pull this JSON data into our view. Exciting times… see you in the next blog!
Go to the next Blog Entry: Using jQuery and AJAX