It’s important to note that there are several different ways to go about developing a DNN module. You can start inside of DNN, use some modules that help you build other modules, use DNN’s built-in “Module Creator” module, start from scratch in Visual Studio, or you can use module development templates. Module development templates speed up the ability to start developing a DNN module as they reduce some of the repetitive tasks and setup, include needed references, and provide the foundation for your module. Chris Hammond’s module development template is one of the most popular templates in the DNN Ecosystem and is the one we will use initially in this series. By starting out with a module development template we will be more efficient, at least here early on, in our module development quest.
There are a few different ways to install Chris’s template into Visual studio. Follow Chris’s instructions on how to install it here (see “Installing the Templates” section): http://www.chrishammond.com/blog/itemid/2616/using-the-new-module-development-templates-for-dot.aspx
After you get the module template installed you should be ready to go. Now just click File > New Project and then expand the Visual C# node and you should then be able to see the DNN module development templates as shown below:
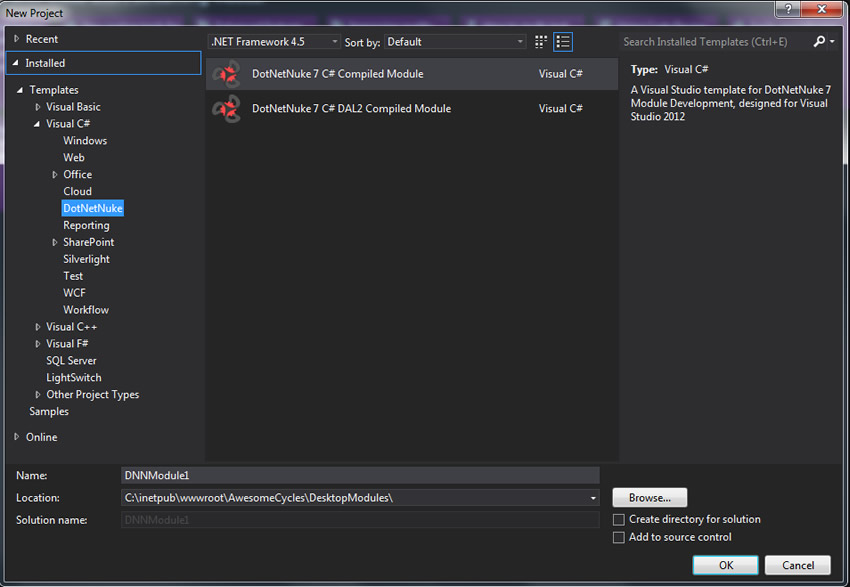
You’ll see there are 2 different templates the DotNetNuke 7 C# Compiled Module and a DotNetNuke 7 C# DAL2 Compiled Module. In case you’re wondering, the term “DAL” stands for “Data Access Layer” which refers to the layer of code where we exchange data with the database. The subject of data access layers brings up a different topic that we will further investigate later in this blog series.
In this tutorial we will not review the DAL2 Compiled Module Template so be sure to select the first option of DotNetNuke 7 C# Compiled Module template. Next you should give the module a name, maybe something like “MyFirstModule”, and then ensure that the location is sitting inside of your site’s “DesktopModules” folder. Why should ensure that your module’s code base lives in the “DesktopModules” folder? That is because the “Desktop Modules” folder is where DNN modules reside in the file structure. It is true that you can develop modules outside of this folder, but that requires a few extra steps and complexities that we’re not incorporating into this series. Remember, this series is just targeted at getting a modern, simple module created to get our feet wet with developing modules for DNN. Finally ensure that the “Create directory for solution” box is NOT checked then click “Create Solution”.
Visual Studio may take a few seconds/minutes to build your module’s solution. After Visual Studio creates your project you will have a few tabs open where Chris is giving you some helpful links and instructions. It is true that we can (and probably should) update some of the information in the module’s properties, but for now we’ll just leave everything the way it is and close all the open tabs. Before we get too technical and explanatory I want you to see what this template is going to do for us.
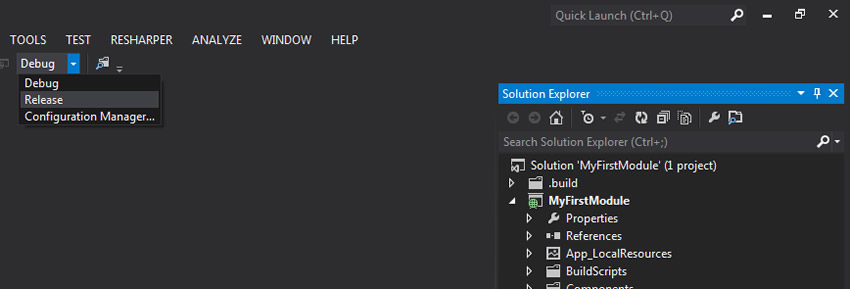
If you look in the far right pane you will see all the files and components that make up our DNN Module in the “Solution Explorer”. At the top you will see a “.build” folder. This folder is there because the module development template makes use of something called MSBuild which helps with the building and packaging of modules. When we select the solution name and right-click we have the option to “Build Solution”. This also works in combination with the build option we have selected which can be “Debug” or “Release” mode. You select this from the drop down at the top center of Visual Studio. Building in debug mode creates .pdb files that help you troubleshoot your module or to “step through the code” in your module should you have any issues with the module compiling - More on debugging in a future blog.
Building in “Release” mode uses MSBuild to create an install package. The install package, by DNN terms, is a zip file that gets placed in your module’s folder (the one inside of the “Desktop Modules” folder) in a new “install” folder. This package is what we will use to install the module and we will select this install package whenever we go to the HOST > EXTENSIONS page and click “Install Extension”.
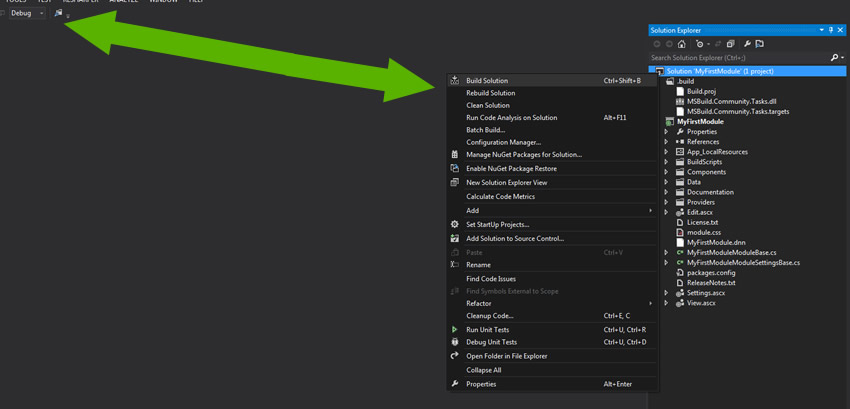
So go ahead and build in debug mode and you should get a successful message toward the bottom of your screen. After getting a success message toggle the build mode drop-down to “Release” mode and build the solution again. This will create the install folder and the install package inside of your module’s folder inside of the DesktopModules folder.
Now we still haven’t really discussed what all of the components in the Solution Explorer are and when I was first learning it drove me crazy not initially knowing what all those were. Don’t worry, we will discuss these components, but before we do I want us to install the module that we just built. Yes, this is currently a blank module, but this will help us connect the dots with the components that we have in the solution explorer and where they actually show up in our module once the module is installed into DNN. For visual learners like me this is helpful.
After building the module in release mode go to your site and login as the host user. Once logged in as the host user go to the HOST > EXTENSIONS page and click “Install Extension”. Now you are presented with a pop-up window and it’s asking you to upload the extension. So click “Choose File” and navigate to your site’s DesktopModules folder and find your “MyFirstModule” (or whatever you named your module) folder and once you get inside the module folder you should see an “install” folder. This install folder was created as part of the building in release mode process that we just completed. Click into that folder and select the install.zip file.
You will then be presented with a few screens where you must click Next, Next, Accept the license, and install. After clicking through the install wizard your module should install and you will see a success message. Once you see that success message then close the modal window and let your site refresh. Sometimes the refresh after installing an extension takes a little longer because the application recycles any time a new .DLL file is dropped into the site’s bin folder. If you’re not familiar with what a .DLL is don’t get hung up on it just yet. It stands for “dynamic link library” and, for our purposes at this point, think of it as the compiled code that Visual Studio creates that represents our module’s functionality.
Once the site reloads then simply navigate to any non-administrative page in the site and add the new module to the page. To do this hover over the “Modules” menu item in the control panel and click “Add New Module” as shown below.

If you scroll over to the right in the available module drop-down menu you should see your module listed as whatever you named the module (probably “MyFirstModule”). The icon file will probably be broken and that’s because we didn’t associate a module icon with the module yet. No worries though our module will still work even though we’ve yet to associate an icon with the module. Now drag your new module to the page.
The page refreshes and voila, your new module is on the page. Of course our module is still blank, doesn’t have any functionality yet, and isn’t too useful, but from a high level we’ve done all that we need to do and now it’s time to get into our custom business logic of the module. Before we do though hover over the module’s action menus and go into the module’s settings as shown below:
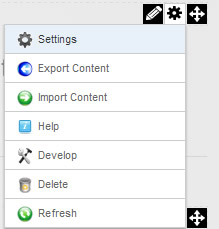
Once you get into the module settings notice those first 3 tabs (yes the tabs we previously discussed). Here again we didn’t have to do anything to get these to appear. That is one example of the power of using DNN. We don’t have to code permissions/security access… it’s already built in for us. There should now be a 4th tab, the “MyFirstModule” settings tab. This is a result of the settings user control that we just installed.
So now that we are slowly connecting the dots let’s go back into Visual Studio. Once you get there go into the Solution Explorer and double-click the very last file the “View.ascx” file and when it loads up in the editor window type some text in the view file. Let’s type “My first module” there and then click save. Because this is simple text and not really any code that needs to be compiled (server side code) we don’t need to build our solution again. Now toggle back to the website where your module is on the page and click refresh. You should see the “My first module” text on the page. Congratulations! You’ve just made your first view control in a DNN module.
Now it should be very clear that our view.ascx is the file that’s loaded on the page whenever our module is present. The data, content, and functionality we want to offer from the initial entry point of our module needs to be added here.
This is a good point to reiterate that we can have as many user controls (.ascx files) that we want within our module. How many user controls you add is totally up to you and we can easily navigate to other controls in our module via the NavigateURL method that DNN provides us. Again, there are typically 3 controls at minimum which are the view, the edit, and the settings.
Speaking of settings, let’s discuss the settings control. Like we discussed earlier modules often times have settings that are specific to their functionality. These settings are controlled by the 4th tab the module specific settings tab. Click on the “Settings.ascx” file in your solution inside of Visual Studio and open it just type in “My Module’s Settings” and click save. After saving, go back to your site and refresh the page then go into your module’s settings again. This time venture to the 4th or last tab and see if you see the “My Module’s Settings” text that we just added now showing up on the page. Settings are somewhat unique in that their values are stored in something called a hash table. We will review this more in depth later.
The Edit control is usually the control that’s loaded whenever data is either being added or updated within a module. Depending on how your module is structured there may not be a need for an Edit control, but that is obviously up to how you structure your module’s functionality. There are different ways that we can allow our users to access or arrive to the edit control. We can have buttons they click, text hyperlinks to get them there, or we can use the module action menu. By default Chris’s template uses the Module Action Menu as the way to access the edit control. We will investigate different ways to access the edit control in a future blog. Initially in our module will not even use the edit control, but we can easily extend it to do so.
Anyways, in Visual Studio find the “Edit” control and double click it to make it open inside of Visual Studio. Once you’ve got it open type in some text, something like “My Edit Control” into the Edit control and click save. Now go to your site and hover over the module action menu and you should see a small pencil icon as the left most icon. Click the edit icon and the pop-up window will open and you should see the “My Edit Control” text that we just entered into the edit control in Visual Studio.
By now you should be successfully wrapping your mind around what the View, Edit, & Settings controls are within a DNN module. Hopefully it makes sense to you where you can find these controls in Visual Studio as well as where they are surfaced within your module. With the basic understanding of user controls let’s now take a look some of the other items in our module.
MODULE COMPONENTS
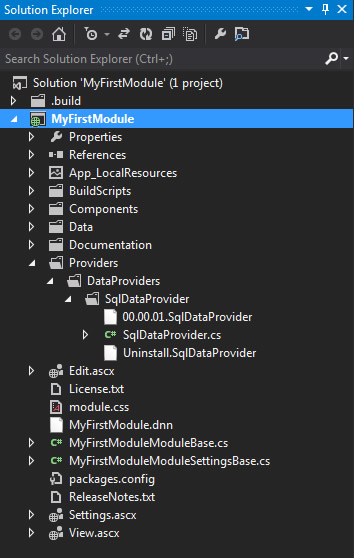
.build Folder
Starting at the top of the files and folders in the Solution Explorer section of our module the first item we see is a folder titled “.build”. The components in this folder have to do with the MSBuild functionality that builds and packages our module. You won’t have to change anything in this area unless you need something specific with your build process.
Properties Folder
Next we see the “MyFirstModule” Project that exists within our solution. Also, note that it is possible to have multiple projects within our one solution. Within our project the first folder we see is the “Properties” folder. The only file there is the “Assembly.cs” file which contains general information about the module assembly. We don’t need to update anything in this file so we can leave it as is.
References Folder
The next folder we see is the “References” folder which we don’t typically have to update often, but yet is very important to our module’s ability to function correctly. Expand the “References” folder node in the solution explorer and you’ll see several dll’s that are referenced with the “DotNetNuke” dll being the first in the list. These references represent dependencies that our module has in order to function. Our module is dependent on the DotNetNuke.dll reference in order to get the information needed about permissions, users, modules, etc. Without it our module won’t build correctly. Fortunately the references that we need are already built into the module template. When we update our module to use the Web API Services Framework we will add some new references, but for now we are good to go.
App_LocalResources
The App_LocalResources folder is one that we won’t be investigating much in this tutorial series as it has to deal with localization. Expand the App_LocalResources folder node and you’ll see 3 .resx files, one for each of our user controls in our module (View.ascx.resx, Edit.ascx.resx, Settings.ascx.resx). These .resx files are name/value pairs that allow for the interface of our module to be translated. If you double-click on one of those .resx files it will open and you’ll see a table like structure where these name/value pairs can be entered. Perhaps in the future we can come back and expand this series to include localization, but for now we’re leaving it out to help keep things as simple as possible.
BuildScripts
The “BuildScripts” folder is another folder that has to do with MSBuild and our module. We won’t have to modify anything here for our module. As we can have multiple projects in one solution each project has its own specific build scripts and that is what this folder represents.
Components
The next folder we see is the “Components” Folder. The components folder has one file in it, the FeatureController.cs file, which is a file that DNN references to see which interfaces the module implements. Interfaces define properties, methods, and events that classes can implement. DNN has several interfaces that modules can leverage such as IPortable, ISearchable, and IUpgradeable. These interfaces allow for module content to be exported (IPortable), indexed in DNN’s search (ISearchable), and custom code to be executed during an upgrade (IUpgradeable). Here again for simplicity’s sake we’ll not implement any interfaces.
Data
Following the Components folder we see a “Data” folder. While this might sounds like the specific folder where all interactions with data occur there is more to it than that. Expanding this data folder we see a “DataProvider.cs” file. This file has to do with data access, but it’s not a file that we will be updating or directly using as we will not access our data in this way. Over time you will come to learn that there are several different ways to access data in DNN. One of the older ways of accessing data is using this method of data access where there is something called an “abstract” data provider that works in conjunction with a “concrete” data provider. This DataProvicer.cs file is where the “abstract” methods can be defined. When I was first trying to learn all this and figure it out the abstract/concrete stuff really confused me. Luckily, we don’t have to go about accessing data in this way as there are options which I believe to be better and easier to understand.
Documentation
The next item in the list is the documentation folder. The Documentaiton.html file is simply documentation that we see when we first install this module template. It is used for instructional purposes and doesn’t have anything directly related to our module’s specific functionality. As noted in the last line of the file we can delete the documentation folder after we’ve read the file. So feel free to delete this folder if you want.
Providers
The next folder is the “Providers” folder and it has to do with data. As we’ve mentioned DNN is built on a Provider model and in this folder we see a sub folder of “DataProviders” that has a “SQL DataProvider” folder within it. This provider model offers the flexibility to use various data stores (other than SQL) within our module. Typically SQL is the primary database used with DNN sites, but there are sites out there that use other databases, such as Oracle, to house their data.
Continue to expand all the files and folders and you’ll see 3 files in the SQLDataProvider subfolder. Those are the 00.00.01 SQLDataProvider, Uninstall.SqlDataProvider, and the SQLDataProvider.cs. The 00.00.01 SQLDatProvider file will be executed when the module is installed and this file has all the SQL scripts for creating tables and stored procedures necessary for your module’s data. We will discuss the creation of these scripts more in depth in another blog entry here shortly. The Uninstall.SqlDataProvider file contains the SQL scripts that will be executed whenever your module is uninstalled from a DNN site. The script should delete the tables & stored procedures that are associated with your module. The SqlDataProvider.cs file is what’s known as the concrete data provider class and this helps configure the properties around the handshake between our module & the database. If you open the SqlDataProvider.cs file you will see a line where the connection string is set up. The connection string is what connects us to the database and it is stored in the web.config file of our site. This line tells our module to simply use the same connection string in our module that is listed in the web.config file. It is possible to use a totally different database, but generally speaking most modules will inherit from the web.config and in doing so ensure all data is stored in the site’s database. We won’t need to update or change anything in the SqlDataProvider.cs file.
Remaining Files
As we look at the remaining files present in the module there are a few more that we need to review. The “License.txt” is a plain text file that shows the text we saw during the install process of the module. DNN looks for this file during the install process and presents the contents of the file to the user during the install process.
- The “module.css” is a cascading style sheet file that helps us style the contents of our module. DNN looks for the module.css file for each module and if there is one present then it uses it to style the contents of our module if we do indeed apply styles. If you are coming from a front-end perspective this should make sense.
- The “MyFirstModule.dnn” file is the manifest file. The manifest file is just an XML file that lays out the location of the attributes of our module and the components that make up our module.
- The “packages.config” is another file associated with MSBuild. This file also indicates the targeted .NET framework version.
- The “ReleaseNotes.txt” file is another file that seen during the install process which simply lists the release notes for the specific version of your module. This becomes more important whenever you release a new version of your module (an upgrade) that addresses any issues or adds in new functionality.
The below video visually walks through what we've just discussed
Did using Chris’s module development template help you develop a module faster than you would on your own or did it help you learn something? If so, tweet to Chris and let him know. I just used @Christoc’s Module Dev Template in @CBPSC’s Module Dev Series
Hopefully this blog entry has given you more insight into how and why using a module development template is beneficial. You should now be more in tune with what the module development template will do for you as well as what the components that make up the template are.
Go to the Next Blog Entry "Designing & Styling the View Control"