DNN on Microsoft Azure Websites – you’ve got to try this out!
If you haven’t yet tried out Microsoft Azure Websites I think you’re missing out on a great product. Azure Websites is an Azure technology designed to make it simple and fast to deliver – well, websites. You aren’t restricted to building .NET based websites, but .NET websites and Azure Websites go together like fish and chips. And as we all know, the best .NET websites are built with DNN. So DNN on Windows Azure Websites is like fish and chips and some ketchup – it all works together perfectly. Less than three years ago I did a presentation on delivering DNN in the Cloud – I tried to show how you could deliver DNN in Azure – but at the time it was like chips and icecream – great individually, but no so good together. All that is in the past now and Microsoft Azure Websites is a great product that I find myself evangelizing about quite a bit. Sometimes I think it was designed with DNN in mind, but I don’t think that is the case.
Moving right along – let’s get into the step-by-step process of creating a DNN Install. If you’ve got your account all set up, it should take about 15 minutes to do.
How to create a new Azure Subscription and get Free stuff
The first step in creating a new Microsoft Azure Website is creating a new Microsoft Azure Subscription [if you don’t already have one, that is]. An Azure subscription is an account you create that acts as a container for all the various Azure resources you might use. Although the term ‘subscription’ denotes some type of ongoing fee – creating a subscription itself is free, you don’t pay for anything until you start using resources.
If you already have an Azure subscription you can skip to the next section straight away.
The good news is that Azure has special introductory offers, so you can get a free trial when you create your new subscription. This includes enough resources to run a DNN site for months – so you can really get to try the service before you pay a single cent. For the free trial you don’t even have to get out your credit card, which is a bonus.
The steps are simple
- Visit this link - http://www.windowsazure.com/en-us/pricing/free-trial/ and click on the ‘Try it now’ button
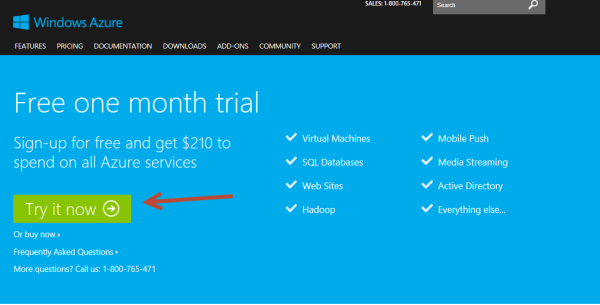
- Log on with a Microsoft account if you have one. You might have a hotmail, live or other account. If you don’t have one of those, you can create yourself an account (you don’t have to have a Microsoft based email to do so)
- Once you are signed in, go through the signup process.
- Choose your Country/Region carefully. This will set your billing currency and account location for the new subscription. This can’t be changed once it is created. So don’t be lazy and pick Afghanistan or Albania or whatever appears at the top of the list.
- You will have to verify either with a text message or telephone call – so have one of these communication devices at hand
- You can skip the payment information if this is a new trial – otherwise you need to enter in the payment information that you will be billed with.
- Tick the agreement boxes and click on ‘Sign up’
Once you have a new Azure Subscription created, then you’re ready to start creating fantastic new things in the cloud. And your first will be a new DNN installation – read on.
How to create a new DNN installation in your Azure Subscription
Note : I suggest keeping a ‘Notepad’ or similar text editor window open as you work through this process. You will be creating a few account names and passwords you will need further during the process. As you create these, copy/paste them into the text editor window as you go. Here’s the format I use (you can copy into your text editor)
Azure Website Name:
Azure SQL Server Name:
SQL Azure Database Name:
Login Username:
Login Password:
Azure Website URL:
DNN Host Username:
DNN Host Password:
Keeping this will make the process much easier (fill out each value as you create/find it) but you can also save the file in a secure location when you’re finished.
1. Log on to http://manage.windowsazure.com/ – when your account finishes loading, click on the + NEW button in the lower left-hand corner.

2. Choose Compute –> Web Site –> From Gallery to select an application from the existing gallery.

3. Scroll through the list until you find the DNN Platform entry, select it and click on the next button
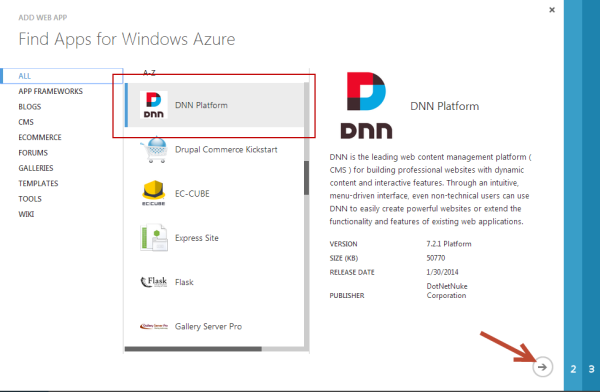
4. The next step involves setting the configuration of the installation. Choose carefully as these values are not easy to change or undo.
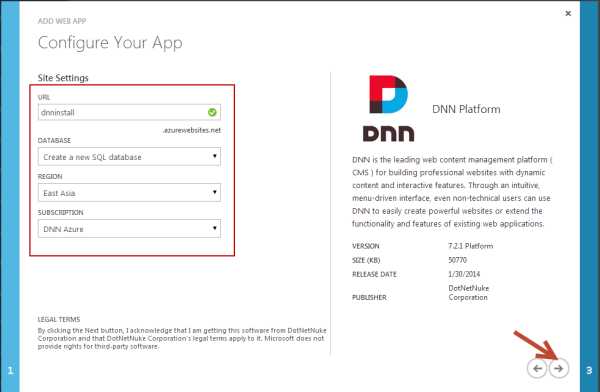
- Select the URL for your site. This will be pre-pended to .azurewebsites.net to form the URL for the installation [free sites cannot have a ‘proper’ domain, and will only be available on this domain]. Note down the URL you have used.
- Select ‘Create a new SQL Database’ (this will create a new Azure SQL Database for you).
- Choose the Azure location you wish your site and database to be created in
- Select which Azure Subscription you wish to use. Note this down.
5. The final step is to create your Azure SQL Database. Choose a name of your database, and either select an existing server if you have one, or create a new server.
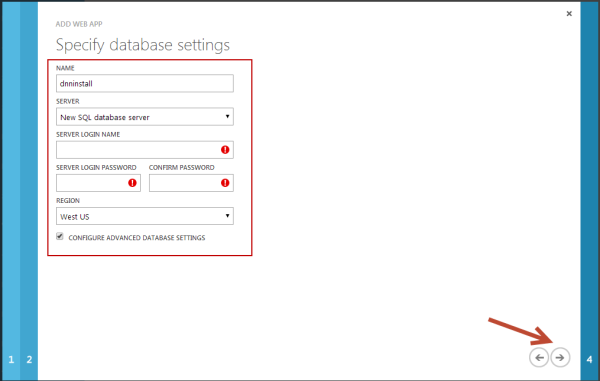
- You’re not really building a new SQL Server when you create a new Azure SQL Database server. Think of it more like a bucket for holding databases than a physical SQL Server. There’s no cost for a server, only for databases.
- Whether you create a new server or choose an existing one, note down the name of the server.
- You can either accept the default name of the database, or you can create your own. I always create the database name the same as the site name, so it’s easy to know which belongs to which. Note down the database name you choose (or copy/paste the default if you decide to use that)
- Don’t ever create a database in a different location to your site – it will not run properly as the database calls go over the public internet. Always choose the same location as your site.
- Create a sufficiently ‘hard’ login name and password. Please don’t use a simple, weak password. Generate a random string, copy it into a notepad window or similar and use that – and no, I don’t mean qwertyasdf! Make sure you note down the login name and the password!
- Check the box for ‘Advanced Database settings’
6. Set up the advanced database settings – here you want to choose the database size you need.
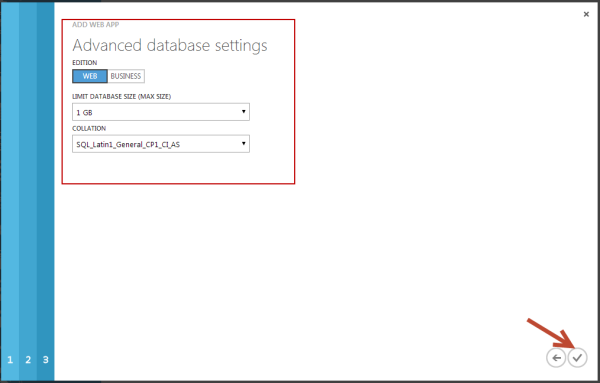
- You can always re-size the database later, so start with 1GB unless you know you’re about to load up a sufficiently sized database
- Web Edition is fine – again, you can change to Business edition later
- Stick to the standard Collation unless you have a specific reason to change
7. Click the final ‘Check’ button and your site and database will start to create
- You’ll see the new Azure Website being created in your list of Websites

- You’ll see the bottom ‘status’ bar showing a message as well – click on the messages icon to expand and view the current status

8. Start the DNN Install process
- You have now created your new Windows Azure Website. But this is just an empty site with a DNN Platform install sitting in it. Now it is time to run the DNN Installer.
- Click on the notifications icon and you should get a message showing the install succeeded. Click the ‘Setup’ to get started with the DNN Installer.

- If you don’t see this message, you can always click on the site listing showing the URL of the install (it will redirect to the installer).
9. When the DNN Install page loads, set the configuration values (it will take a short period of time as the site initializes for the first time)
- Choose a ‘host’ [SuperUser] account name and password. It’s good practice to choose a non-default name, and use a strong password that is different from the database password you created. Note the host username and password down in your open text editor.
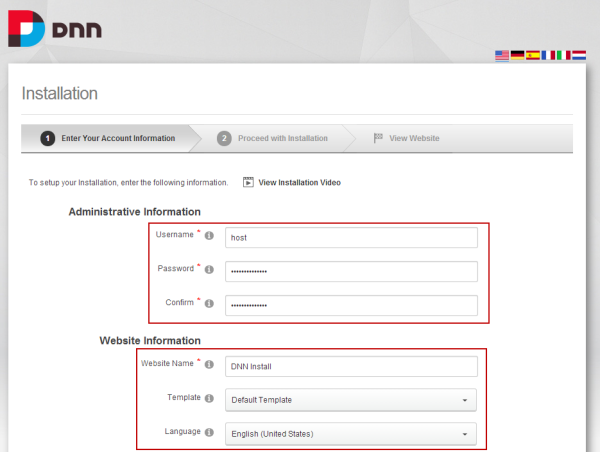
- Set the Website Name – this should be the name your install is going to be called. Usually people choose the name of the first site they’re going to build.
- Choose the template and installation language – in my case I’m using the default site template and English.
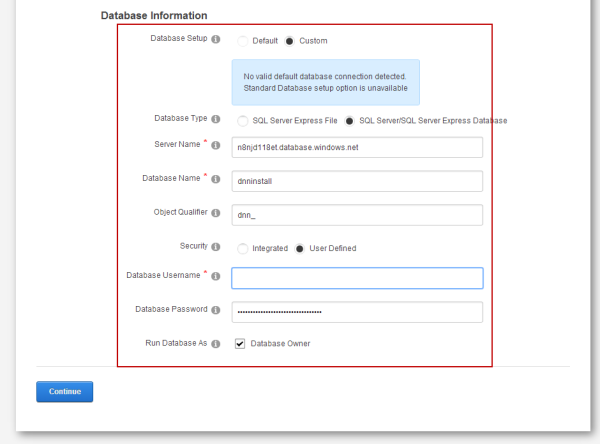
- Set the database configuration:
- Database Setup is ‘Custom’
- Database Type is ‘SQL Server/SQL Server Express Database’
- Server name is the name of the Server you created as part of creating your Windows Azure Website. You should have this noted down. If you can’t find it, go back to your Windows Azure Console and look under ‘SQL Databases’ – the Server name is listed for each database. The name of the server is .database.windows.net

- Database name is the name you gave when you created the Azure Website – enter it as normal
- Object Qualifier is optional. As some modules are sensitive to this being turned on, I recommend leaving it empty. For the purposes of the demonstration I have entered dnn_ in the screenshot - you probably shouldn't include this so leave it blank.
- Security is User Defined
- Database Username is the Server Login Name you created earlier when creating the Azure Website. Enter as
- Database Password is the Server Login Password you created earlier. Enter by copy/paste from your text editor.
- Run Database As should have Database Owner checked.
- Click ‘Continue’ when you are finished.
The install wizard will take a few seconds to validate the database connection, then will start running the installation process. You can sit back and watch it complete, then click on the ‘Visit Website’ when it is done.
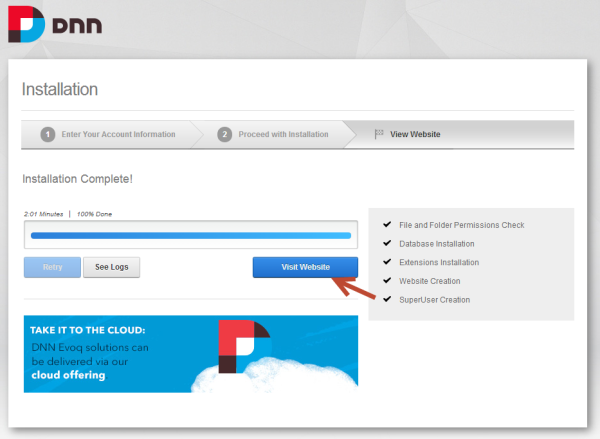
10. Take a look at your new site
- Take the time to look through the Welcome Popup if you’re new to DNN. The helpful videos will get you started on the basic tasks of setting up a site.
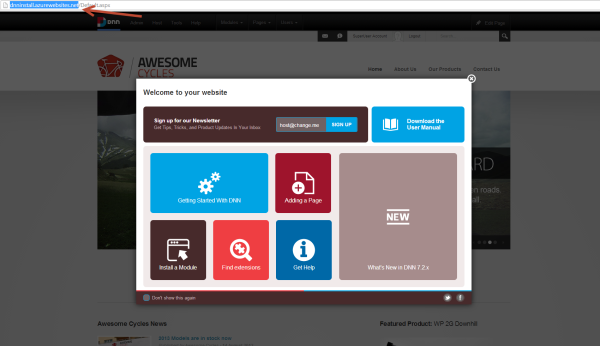
- Sign up for the DNN Newsletter
11. Time for some housekeeping!
- Set the Host Email value in Host->Host Settings->Basic Settings. This gets defaulted to a value derived from the domain name the site was created with. In this case, it will be from the *.azurewebsites.net domain, and you don’t have a valid email address there. Enter a valid email address. Note that depending on the SMTP server configuration, this is likely to be the email address that people receive email from the website. It’s good practice to have a ‘noreply@’ style email address for the purpose, rather than using your own personal email.

- Set the Host Title and Host URL here. Just choose something that makes sense to you. For the most part these don’t get used much, but you might as well update it to something meaningful.
- Set the SMTP server settings. These are in Host->Host Settings –> Advanced Settings –> SMTP Server Settings. Enter a valid SMTP Server and port, and login. If you don’t have an SMTP server, you can use options like using the Gmail SMTP Server if you have an account, or you can sign up with a cloud-based SMTP provider. It’s important to configure a valid SMTP server, though, because items like password notifications and new site confirmations are all sent via this section. Your Azure Website doesn’t have a built-in SMTP server and so the site really isn’t fully functional until you complete this step.

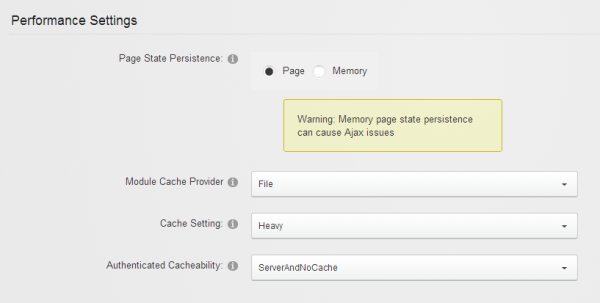
- Set the Caching Parameters in the Host->Host Settings->Advanced Settings->Performance Settings. Use the settings as shown below:
- Configure your site to use the Client Resource Management functionality in Host->Host Settings-> Advanced Settings-> Client Resource Management which will combine and minify your JS and CSS files
- Check the Composite, Minify CSS and Minify JS options
- Click Update
- Click ‘Increment Version’ when done

Wrapping Up
If you’ve reached this point – congratulations, you’ve got a new DNN install created in Windows Azure Websites. At this point you’ll need to start building out your site by changing the Skin, installing any Extensions you need and building out your content. I think this way of creating DNN Installs is very simple – and because of the flexibility of Windows Azure Websites you can start small with a free trial subscription and eventually build out your site to be a much, much larger entity. You can continue to scale up and out with Windows Azure and never have to migrate to a new server. The path from the free, simple, shared Azure Website to dedicated, auto-scaling website is a smooth and simple one. I like using Azure so much that I don’t have a single DNN site left on traditional hosting anymore.
So go on, create yourself a new site. I hope this blog post causes at least thousand DNN installs on Azure Websites to bloom!
If you did follow this and create a new site, feel free to link to your new creation in the comments. Also, let me know what other how-to articles on Azure Websites you’d like me to do, or any other questions you might have on Windows Azure Websites.
If you've enjoyed this article - move on to the next in the Azure Website series - Launching a DNN Microsoft Azure Website