Understanding Config.yaml File and Running Test Contexts
Introduction
This is the second article in a series of articles on how to
use the F# automation Framework to write UI tests and WEB API tests.
In the previous article I introduced the ATFS and how to use
for testing your own site. In this one, I’ll explain the various configurations
elements in the YAML configuration file that controls the written tests. Also,
I will walk you through running individual test contexts.
Prerequisites
You need to refer to the previous article of how to start
using ATFS framework here
https://www.dnnsoftware.com/community-blog/cid/155462/dnn-automation-ui-testing-with-f-atfs--part-1
ATFS Project Structure
The ATFS project consists of 3 major parts:
- Main entry point, general
libraries, helpers, and configuration located directly under the project folder,
- DNN specific libraries
located inside the DnnCore
folder, and
- DNN specific test cases
located in the TestCases folder
and sub folders.
Understanding ATFS Configuration File
ATFS configuration is coded in the “Config.yaml” a file to
specify the various aspects of the running site and tests to run. You can
search the web for more information about YAML syntax.
The following table explains the settings in this file:
|
Entry in YAML file
|
Description
|
|
# site
specific parameters
Site:
|
This is the main entry line for site
specific parameters.
|
|
SiteAlias: "dnnce.lvh.me"
|
The URL for the site to test. This can be a locally installed site or a site on
a remote machine.
|
|
WebsiteFolder: ""
|
IF you are testing a site on the same machine (or a shared UNC
drive) you can add this here; otherwise, leave it empty as “”.
This will help in analyzing the log files to see if they contain
any unexpected exceptions.
|
|
BackupLogFilesTo: ""
|
If you need to get a backup copy of the DNN generated site Log4Net log files, then add
some path to the location here. Note for this to work, the previous entry (WebsiteFolder)
must have a valid non-empty entry. Also, the site must be local or on a shared UNC
drive.
|
|
HostUserName: "host"
|
The “username” of the default super user of the site.
|
|
DefaultPassword: "dnnhost"
|
The “password” of the default super user of the site. Usually
this will be the password for all users created in the tests.
|
|
HostDisplayName: "SuperUser
Account"
|
The display name of the default super user of the site.
|
|
ChildSitePrefix: "childsite"
|
The name to use for the first child site to create. If a child
site with the same this exists, it will append a random 4 numeric digits to it - from 0000 to 9999.
|
|
IsRemoteSite: False
|
Specifies whether the targeted site is installed locally or on a
remote machine.
|
|
IsUpgrade: False
|
Whether this site it to be upgraded or a brand new site
installation.
|
|
DoInstallation: False
|
Whether to run the site installation test or not. Usually during
development, you will target an already installed site, but in automated CI
environments the site will be installed as one of the validation tests where this value is set to TRUE.
|
|
UseInstallWizard: True
|
Whether to use the Wizard for the site installation or the
Auto install mode.
|
|
InstallationLanguage: English
|
The language of the installed site. The following languages are
currently supported in by the framework (case insensitive):
-
ENGLISH
-
GERMAN
-
SPANISH
-
FRENCH
-
ITALIAN
-
DUTCH
|
|
EnableCDF: False
|
Whether to enable (Client Resource Management or Client Dependency
Framework) CDF for the site after installation and before running all other
tests or not.
|
| DevQualifier: "dnn_" |
This variable specifies the default database tables’ prefix in a DNN site. Currently, it is used during the setup/installation test only. |
|
# all
time-out values are in seconds
Settings:
|
This is the main entry point for tests
specific parameters
|
|
Browser: chrome
|
Specifies which browser to open and run tests under. Supported
values are: chrome, ff, firefox, ie, internetexplorer.
There are other values which can be used but they are not fully
tested and might not work.
|
|
ShowOnMonitor: 2
|
If you have multiple monitors, you can pin the browser to
second, third, etc. monitor so it is out of the way of the command window
|
|
TestsToRun:
|
Specifies which tests to run.
|
|
DevTestsOnly: False
|
For development mode, this is set to true. For automated
environments, this needs to be set to false.
|
|
CoverageTests: False
|
If set to true, it will run all the tests in the projects. Note
this will require a very long time to complete.
|
|
BvtTests: True
|
Whether to run the BVT (Basic Verification Test) tests only
|
|
P1ALL: False
P1_Set_01: False
P1_Set_02: False
P1_Set_03: False
P1_Set_04: False
P1_Set_05: False
P1_Set_06: False
P1_Set_07: False
P1_Set_08: False
P1_Set_09: False
P1_Set_10: False
P1_Set_11: False
P1_Set_12: False
P1_Set_13: False
P1_Set_14: False
P1_Set_15: False
P1_Set_16: False
|
To reduce the amount of time spent on running all the tests we
choose to split these into separate sets.
If you set “P1ALL” to “True” then all P1 tests will
be selected to run regardless of the individual P1 sets. If you set “P1ALL”
to “False”, then it will follow each individual set separately.
|
|
API_Set_1: False
API_Set_2: False
|
These two settings control API tests which can be run in two
different sets. There is no one set to group them all like in the previous
settings.
|
|
RegressionTests: False
|
Whether to run regression tests. This option was created for the
purpose of isolating tests under development so they don’t go into the main
automation tests. Usually QA developers use this area to write their tests
and once they are validated, they move them into other test sets as
necessary. This is just a logical separation and not necessarily physical.
|
|
RepeatTestsForChildSite: False
|
Whether to repeat all the tests that ran on a main site for a
child site. Note this option doubles the total time to run all the included
test sets as each test is repeated twice: once for the main site and another
for the child.
|
|
DiagMode: False
|
This setting is good for demo purposes to show which selectors are being operated on.
Keep this set to False when running your test sessions. If set to True, then each selected element will be highlighted to help with diagnosing any selector issue you might face.
|
|
HideSuggestedSelectors: False
|
This setting is relevant to Canopy and controls whether canopy
will show suggested selectors in case it doesn’t find the one in the test.
|
|
DontCaptureImages: False
|
Whether to stop capturing screen-shots for failed tests.
ATFS captures a screen shot after each failing test and saves in
a file which is helpful in UI tests. But, in WEB API tests, this becomes
meaningless. Therefore, this flag serves this case. Also, you can control
this from within the tests themselves.
|
|
ElementTimeout:
Remote: 20
Local: 10
CompareTimeout:
Remote: 20
Local: 10
PageTimeout:
Remote: 60
Local: 30
WaitForInstallProgressToAppear:
Remote: 120
Local: 60
WaitForInstallProgressToFinish:
Remote: 480
Local: 300
WaitForChildSiteCreation:
Remote: 480
Local: 360
WaitForPageCreation:
Remote: 60
Local: 30
|
All these settings specify different types of timeout periods
(in seconds) that are used by various areas in the framework when running
some tasks or looking for selectors. There are two variables for each setting
to control the local and remote targeted sites. Usually, if you target a
remote site to test, remote values will be used; otherwise, the local ones
will be used.
If you are running your tests on a slow machine, you can increase some of these values to run properly without timing out. But be careful that increasing these will take longer to run the tests when timeouts occur.
|
|
Reports:
|
|
|
Html: False
|
Whether to generate HTML report for the tests. Usually this
opens another browser window and shows a report of the passed/failed tests
progress.
|
|
TeamCity: False
|
Canopy supports reporting in TeamCity. Set this to true to allow
TeamCity to capture the tests you run and report them properly.
|
Running existing test contexts
In the previous article I showed you how to run the existing
tests by changing the configuration settings. In this one I will explain how to
run a very specific test or a set of tests in the project. Before proceeding, you
need to revert all changes that you had made in the source code or start with a
fresh copy of the repository.
ATFS separates tests into different categories: BVT (Build
Verification Test) and P1 (Priority 1). BVT tests for basic features to make
sure the site is running normally in general and can be installed and run for most without major problems. P1 tests are for more thorough and
inner features testing.
Canopy tests are different than NUnit and other similar framework
tests in its concept. All the tests must be registered in Canopy first then starting a browser and running these tests. Therefore, no reflection is used to discover the tests. The tests
are organized in test contexts. A test context consists of one or more related tests that
are executed one after another during runtime in the same order they appear in the source code file - top to bottom.
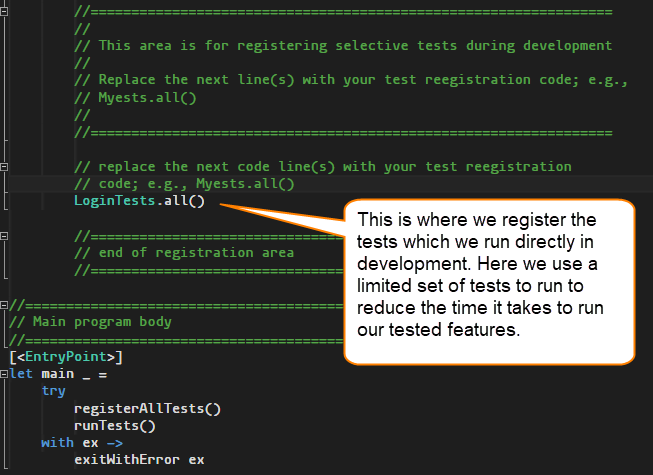
The “Program.fs” is where the tests are registered. As show
in the next image, we are registering all login tests in the development
section of the application.

Practice
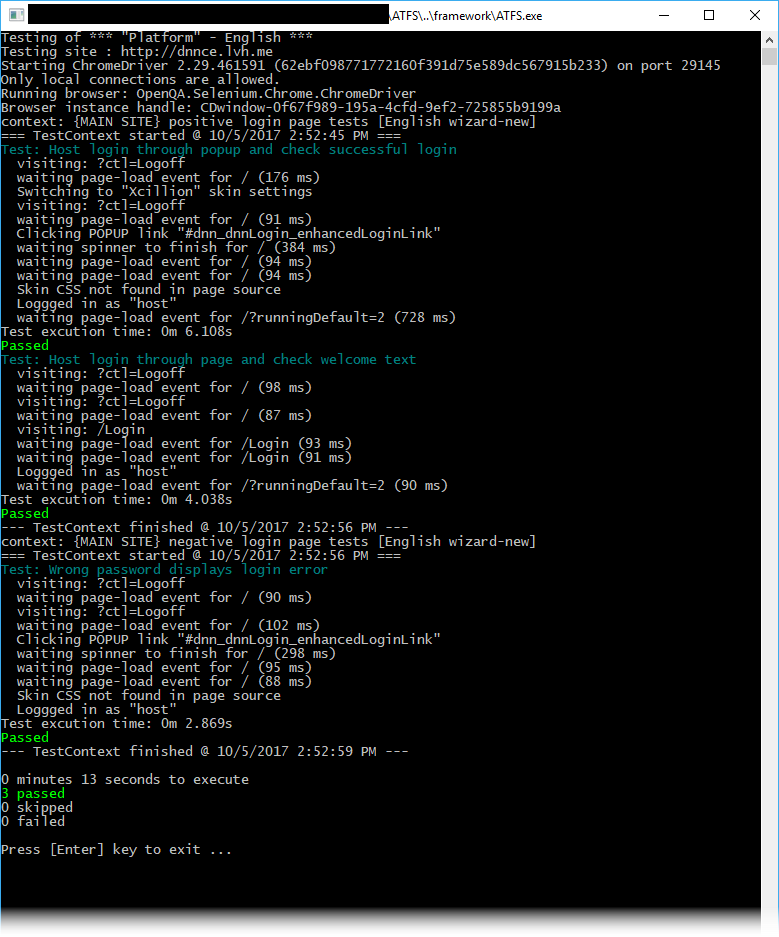
As a practice, go ahead and add this line to replace the
empty unit “()” at the location shown in the above image then run the
application. If everything works well, you will see a screen similar to this
one.

Afterwards, revert the code to the way it was before in prepl.
Summary
In this article, I explained how to tune the YAML
configuration file and how to run a specific existing test context. In the next
article, I will show you how you can start writing your own tests.