My last blog post was an introduction to developing simple Dnn modules using a Razor view mixed with WebAPI calls to the underlying code mixed in. Building single place applications (SPA) is possible with a simple mixture of using Razor views to provide the initial page structure, and then using WebAPI in Dnn to push/pull data from the server. The benefit of this entire design was that it doesn’t require any complex project structure or Visual Studio, and can be edit-and-run debugged in any environment, including cloud-based editors like Visual Studio online.
The example in the blog post was a very simple ‘Hello World’ which served to show just how you could connect a Razor view and then use WebAPI to update. It didn’t go further into common areas of Dnn applications such as having a data layer or using client-side binding to map between the UI and the results from those WebAPI calls.
This is the promised part 2 of the series, and in this example the basic concept is expanded to include these additional examples:
- Reading/Writing to the database for persistent storage of data
- More complicated WebAPI calls including updating the server and introducing parameters to WebAPI calls
- Adding security to functionality by integrating with the Dnn security groups
- Adding defensive coding such as the anti-forgery token to the WebAPI calls, and leveraging the Dnn WebAPI services framework in general
- Using a client-side binding library such as Knockout to easily bind data from the WebAPI with the UI
While doing all of that, it will remain a simple, edit-and-run application structure which can be edited with any text editor.
The objective of this blog post is to highlight how simple it is to build these types of applications – simple CRUD database modules – within Dnn, leveraging all of the power of the Dnn Platform (extensibility, security models, user, content and asset management). Importantly, leveraging all that power while keeping your application code conceptually simple, fast and using modern tools.
Building a SPA To-Do list
The module being built is a super-simple To-Do list. The imaginary requirements are:
- it’s a shared list, which more than one user can contribute to
- anyone can see the list, but only registered users can add items or mark them as completed
- each item on the ToDo list is a simple text task
- Adds/Deletes are permanent and automatically saved (no need to click ‘save’)
- Updates are not necessary – if a mistake is made, delete the old one and create a new one
When I built my first Dnn module of this type, it would have involved at least two UserControl files, lots of code-behind wackiness and a reload per new task (new URL to add, redirect back to list, etc). The viewstate being trucked back and forth would have filled a modest USB drive (of the day..we’re going a way back here!)
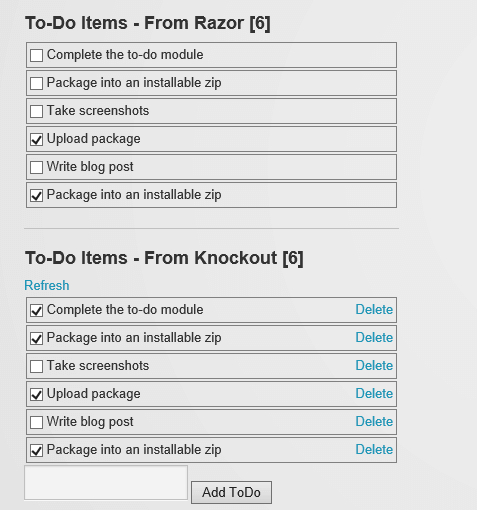
Above : the To-Do Module in action, showing the Razor and Knockout views.
This module is very contrived and actually displays the To-Do list twice – to demonstrate the differences between the server-side Razor View syntax and the client-side Knockout syntax. Conceptually both do the same job of binding UI elements together with a View Model – understanding how one works from the server and one works from the client enables the correct selection for your specific needs.
Download the Example To-Do Module Here
Remember, because this is compile and run - the install package is also the source code.
This blog post refers to multiple technologies and assumes at least an introductory understanding of them. You may want to follow these resources for background:
Services Framework / WebAPI Reference
Dnn Knockout Reference
Dnn Razor Reference
The further requirement for building this module was to do it in a way that didn’t require compilation or any type of Visual Studio project. As it turned out, Microsoft released Visual Studio Code while I was preparing this post, so I switched to using it for an editor. This allowed me to write this application natively on my Macbook.
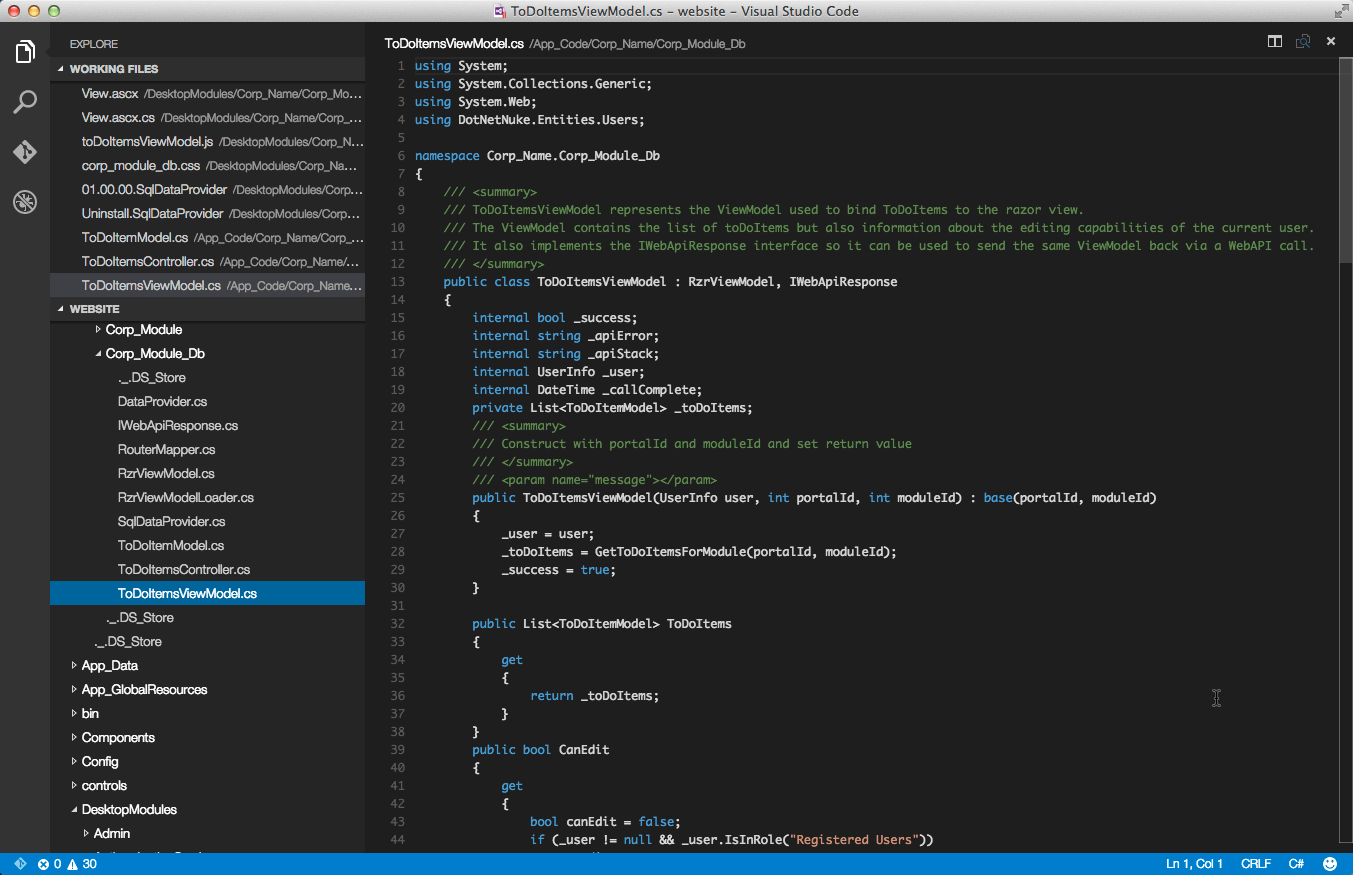
Above : This entire module can be edited using Visual Studio Code, a cross-platform, free code editor from Microsoft.
Backend – the Server Components
Most of the code for the ‘Server’ components are installed in the application App_Code folders. This is compiled automatically when any of these files are saved, providing the edit-and-run capability. In the same way that the ‘Hello World’ application was written, I have harmonized the ViewModel used for the Razor view and the WebAPI calls, so that it’s easy to use the same code for both purposes. This is done with a base RzrViewModel class and an IWebApiResponse interface. The RzrViewModel base class provides some simple plumbing for integrating with the Razor view, while the IWebApiResponse interface provides some standard properties a ViewModel being returned from a WebAPI call can use, making it simple to design the client-side code to call out to the API.
Adding to this is a SQL Data Provider, which is a Dnn standard for the data layer. This contains the simple CRUD methods for accessing the database.
Some might read this and say – no PetaPoco? No EntityFramework? No Linq to SQL? No. In the last while I have force-crushed a stress-ball while trying to determine poor performance on applications when the culprit turns out to be poorly optimized SQL generated by frameworks running on resource-thin environments like the cloud. SQL is a beautiful powerful language. I enjoyed Database 101, Database 201 and whatever other classes I took, and I distinctly remember not enjoying Computer Aided Software Engineering. I like writing SQL - nothing is more satisfying than an efficient, short, powerful database query. So I’ll continue to roll my SQL and database code by hand. It fits with what I’m trying to do here, which is develop close to the metal free of drag-n-drop and the like. Besides, you can’t use EntityFramework if you’re shunning full-fat Visual Studio for the purpose of the exercise.
The actual module Html is output from the Razor view (which is in the /DesktopModules/ module specific directory, as opposed to /App_Code/). The RzrViewModelLoader class joins the view with the ViewModel, completing the Razor specific part of the code. The remainder is the definition of the WebAPI aspect of the server-side code, which includes the URL Route definitions and the Controller methods which define the API.
Frontend – the Client Components
The Razor View is server side code in that it executes on the server and renders code for the client. The remainder of the contents of the /DesktopModules/ application folder is mainly client-side components, including separate js files for the client-side representation of the To-Do ViewModel, and the module-specific code which ties it together. Both the jQuery and Knockout libraries are referenced in the View.ascx file (which is a container for the Razor View).
How the SPA Razor, WebAPI and Knockout example module works
In place of giving a step-by-step instruction on how to build this type of module, I’ve decided to give a step-by-step description of how it actually works, based on the lifetime of the page (and events during that lifetime). You can download it, install it and step along if you want a line-by-line process.
On Page Request
When the Dnn page is first requested, Dnn itself will determine if the specific Module is to be loaded (technically : it finds a TabModule record and loads the View.ascx file in the specified Container). This is achieved because the View.ascx file is an instance of the RazorModuleBase, and the Razor view (_view.cshtml) is an instance of the Razor.DotNetNukeWebPage. The Razor View then gets the correct ViewModel by calling GetToDoItemsViewModel(), which dynamically loads the method in RzrViewModelLoader.cs. In the case of the To-Do list, it’s a SPA so there is no need to look at the querystring and load a specific record – we just want all To-Do items for the module instance (remember : the requirements were for a shared to-do list). The RzrViewModelLoader has the current request context so knows which Portal and Module the request is for.
Once the correct ViewModel is loaded from the database (by calling GetToDoItems), the Razor View code is then executed. The view uses some Razor and Javascript to store some module-specific context information on the client side, and execute an ‘onModuleLoad’ method using the jQuery document.ready call.
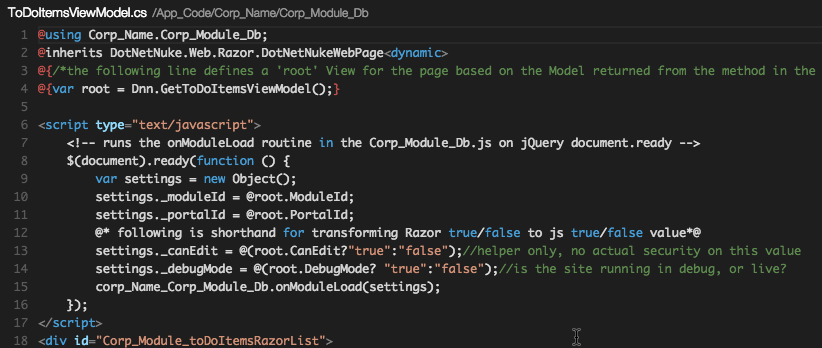
Above : In the Razor View (_view.cshtml), properties from the module are transferred to page-level Javascript variables using jQuery document.ready
For displaying the actual content, in the case of the Razor-specific code in the module, it uses the @ syntax to iterate the existing To-Do items. Each of the html elements has an attribute or value set by the @ razor syntax, and bound to the ToDoItemsViewModel retrieved from the RzrViewModelLoader. The result is that the web page, when requested, contains the data for the To-Do items in plain Html (and no ViewState or server-generated attributes in sight!).
The Knockout code, however, uses a limited amount of @ Razor script and instead shows the basic inputs and elements that make up the display, coupled with the Knockout data-bind syntax. Where the @ Razor syntax is used is in adding extra UI when the current visitor is a logged-in User. This is done by exposing this as a true/false value in the ViewModel, then driving appearance of Html elements based on @if statements. As this is evaluated server-side, it’s not the type of code that can be trivially modified as a similar client-side code would be.

Above : This Razor code checks the CanEdit property of the ViewModel and determines whether to show the Add button.
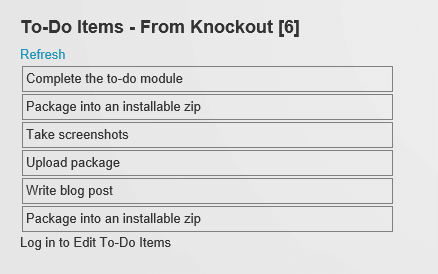
Above : Anonymous Browser View – no edit controls
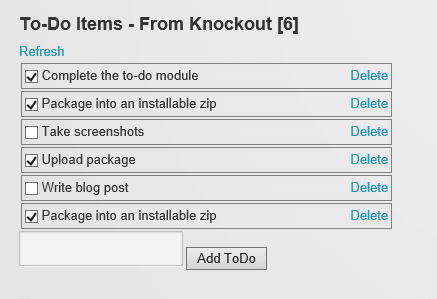
Above : Authenticated view – edit controls visible
If you’re not familiar with Knockout, it’s a client side library that implements the Model View ViewModel (MVVM) pattern to build applications where User Interface elements are bound to an object representation of the data via the data-bind declarative statements. Once bound, changes in the model are reflected in the UI elements, and vice versa.
The Knockout binding is against a client-side representation of the ToDoItemsViewModel – you can’t re-create a C# class in Javascript, but you can model the properties and add functions required for binding operations, such as the adding and removing of items. The data elements (Tasks for display, checkboxes for ‘Complete’) are bound to a koobservable collection of ToDoItem objects, while the add/remove methods of the ViewModel are bound to the actions of clicks and text input.
I have represented the Knockout-specific part of the Module in this jsFiddle demo : Knockout To-Do List Binding Example – it’s simplified down from the actual example (no API code, events, etc.) but you can play with it if you’re new to Knockout.
When the page loads, the jQuery.document.ready() declared in the Razor View (_view.cshtml) calls the onModuleLoad routine the module Javascript file. That, in turn, initializes the ViewModel and calls the WebAPI GetToDoItems method using jQuery to return the list of To-Do items in JSON format. The JSON objects returned from the API are then added to the koobservable array, and the Knockout binding automatically iterates across that array, showing the list of To-Do items on the page.

Above : for-each databinding in Knockout, to repeat a set of html elements on every To-Do item in the array
The output from the Knockout binding and the Razor script is virtually identical, with the difference being that the Knockout binding is performed by Javascript on the client, where the Razor binding is performed by server-side script on the server. In the example module, only the Knockout script has the functionality to add/remove items. That isn’t to say that the Razor code couldn’t be made to do the same functions by binding with jQuery to the UI elements – but I haven’t completed that in the example because using Knockout is easier.
Note: I have written in the past about the impact of client-side evaluation on SEO – and the desirability of having server-side code generate the content. That is becoming less of a case over time – there is convincing evidence that, at a minimum, Google can read and index content shown by client-side libraries. However, you should think carefully and choose when you should user server-side data binding over client side. If you’re showing largely static content then it makes sense to bind that at the server end. If you’re showing dynamic content or have a CRUD application that isn’t likely to be indexed by a search engine, ever, then it makes sense to leverage client-side binding. Mixing the two is always a possibility – you could show a blog post using server side binding and then dynamically load comments and tags, for example.
On Items Refresh
The Knockout code includes a ‘Refresh’ link. If you inspect the code you won’t see a click handler on the link, it’s just a link. This makes for clean, understandable Html. The link click is handled by jQuery, and the refresh binding is performed by Knockout. The Knockout update is caused by removing all the items in the array, and then refilling the array with fresh results from the GetToDoItems WebAPI call. No other changes are needed as the Knockout binding immediately updates the list when the array items are added.

Above : Link binding using jQuery to the refresh method. This clears/refills the Knockout array, which refreshes the screen
Note: In the Knockout code I have defined an ‘onArrayChange’ function which acts as an event handler on the koobservable array holding the To-Do items. When all the items are cleared prior to refilling from the API results, the onArrayChange event is fired for each removal. This event does nothing (except write to the console) – otherwise each refresh may have unexpected consequences. Being mindful of the knock-on effects of Knockout is paramount when developing a ViewModel design. Perhaps the name was coined for the bewildering side-effects that can knockout the unsuspecting developer.
On Item Add
Adding an item to the list is achieved by binding the ‘Add New Item’ to the AddToDoItem function of the ViewModel. The input textbox where a new task is entered is bound to a ViewModel property called ‘newTask’. This is a dummy holding area for changes to the input textbox – remembering that Knockout bindings always synchronize between a ViewModel and the UI elements. It’s easy for developers used to explicitly copying data between UI and Memory to forget this point when looking at peripheral controls like input text boxes that don’t truly belong to the ViewModel. It’s bound to a stub property of the ViewModel, so that when the click event binds to a function, the input values for the function are already in the ViewModel. So you just copy them from that stub property instead of grabbing it from the UI. It cleanly keeps the UI and ViewModel code separated.

Above : AddToDoItem function from the ViewModel

Above : Binding from the ‘Add ToDo’ button to the AddToDoItem in the ViewModel
The To-Do database design uses a Guid (Globally Unique ID, if you didn’t know) as the ToDoId – the primary key for the table. It would be nice to generate the id on the client end so that every newly created To-Do item was allocated a key before even being sent to the server for saving. But the kicker is that Javascript has no function for generating a Guid. I’m told that this is because generating a Guid requires hardware level randomization, and Javascript doesn’t have that. You will find reference online to Guid generators for Javascript – which use a series of number randomizers to create a random Guid. No Guid is *really* guaranteed globally unique, but at the same time using a Javascript randomizer is not really up to scratch.
To get around this problem the module has a a WebAPI call GetNewKeys which returns an array of Guids from the server. If the page is running in edit mode, then this API method is called when the page loads, and a couple of fresh Guids are placed into a stack. Whenever a new To-Do item is added, a Guid is popped from the stack, and used, and then another call is made to the API to push a new Guid back onto the stack to replace the one that was used. By keeping an inventory of new Guids for primary keys, the To-Do item has a unique Id from the point in time it is created. This pays benefits in the Knockout world because it is bound the moment a new item is added.
The To-Do module design doesn’t have a ‘save’ button – changes are reflected instantly in the database. This is achieved by subscribing to changes in to koobservable array which holds the To-Do items
Note: You can pass a new item to the server and let it generate and attach a key, and return the completed item (indeed, the SaveToDoItem API does return the saved object back). However, the API call is asynchronous, and without a key to ‘look back’ at the item in the array and identify it, any way of adding the new key to the original empty item is going to be subject to some other non-unique lookup. This defeats the purpose, hence pre-assigning a key before saving. You could also call the API to create a new Guid right before the save to allocate a key, but once again it is an asynchronous call, which makes it difficult to organize into a batch transaction. By keeping an inventory of unique values in the client, it’s possible to use those positively when creating new records and avoid issues related to lack of a unique key.
The subscribe to the changes in the koobservable array are done with a subscription. This particular design uses a Javascript object called callBacks. This object defines the methods for changes in the ViewModel which need to be handled by the API calls. It’s debatable whether you should embed the API calls within methods of the ViewModel, or use a late-bound quasi dependency injection pattern. Normally you might code this way to allow a unit testing framework to test the ViewModel. But that isn’t going to happen here. The reason for separating them out is because the API calls use some of the context at the page level – namely the service framework values of module Id and portal ID, which are used to determine the correct API URL. You can use whichever pattern suits. I chose this pattern to separate out different parts of the code.
When a new Item is added to the list, the koobservable Knockout array notifies the onArrayChange function of the callbacks object, which then calls the SaveToDoItem WebAPI call. The main thing to notice here is that the sf.SetModuleHeaders call has been performed, which initializes the call with the relevant PortalId and ModuleId, and also sets a anti forgery token to prevent cross-site scripting attacks. The sf.GetServiceRoot also provides the correct WebAPI URL, as distinct from the way the more simple HelloWorld module did it, which was to pass the value from the Razor view via the ViewModel. The final thing to note here is that the data property of the AJAX call is done with a JSON.stringify call to the toDoItem ViewModel. But before the toDoItem is passed into the saveToDoItem function, it passes through a Knockout function called ko.toJS(). This function converts observable objects into plain object properties and arrays. If this is not done, then the stringify function will return garbage as Knockout properties are usually complicated functions. This is done to ensure that the toDoItem model – passed in as a Knockout object full of observable properties – is transformed into a simple JSON representation of a model with simple properties. These map neatly to the C# declared ToDoItemModel, allowing the WebAPI content negotiation to convert the JSON call into a C# object automagically.
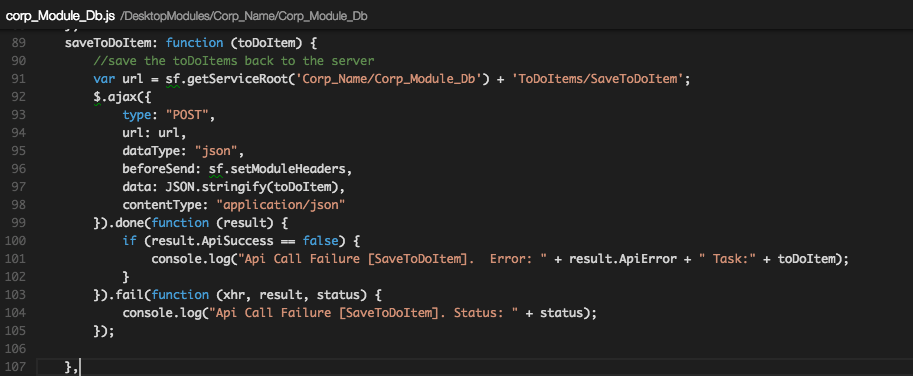
Above : The call to the SaveToDoItem WebAPI method using jQuery AJAX. Note the JSON.Stringify to convert the object to JSON.
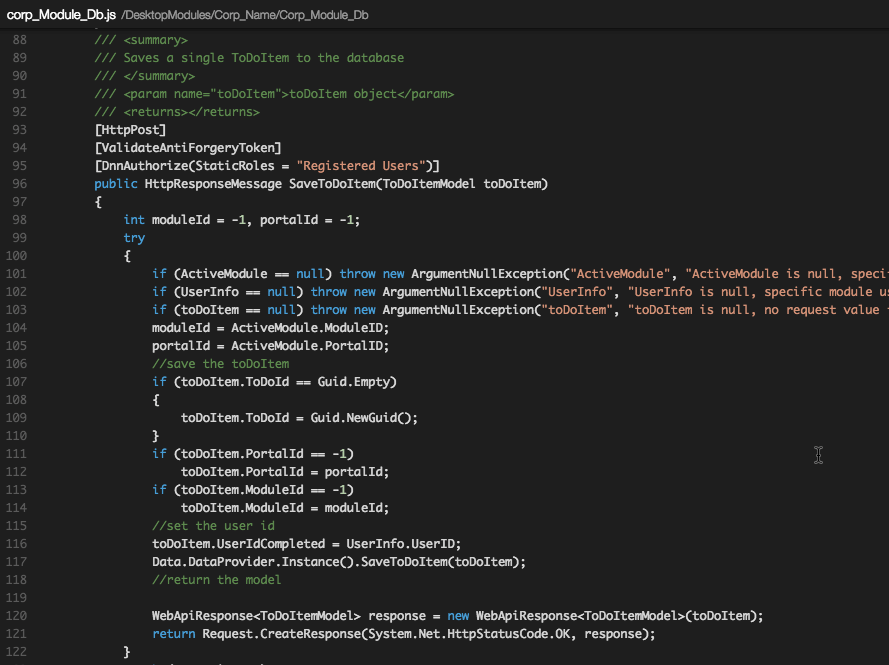
Above : WebAPI method for saving ToDoItemModel instances to the database.
This is a simple method which just calls through to the data provider to save the To-Do Item model. The argument of the WebAPI call is the ToDoItemModel – and this arrives correctly formatted from the JSON representation at the AJAX/browser caller. The method attributes include the [HttpPost] – which means it only accepts a POST call, [ValidateAntiForgeryToken] – which checks the anti-forgery token provided by the client-side services framework call is present and valid, and the [DnnAuthorize] attribute which restricts the call to callers with valid Dnn user credentials. The method itself has some defensive checks against null values, and adds defaults to the incoming object if any of the required values are missing. Once the object is ready it is saved to the database, and returned via the WebApiResponse object. The WebApiResponse object is an implementation of the simple IWebAPIResponse interface. All this does is codifies a set of common response codes, result values and error information. This allows somewhat boilerplate client-side code as the properties of the response are well known and the same in each instance.
All that code works together so that a new ToDoItem is saved to the database as soon as it is added to the list by the end user.
On Item Change
The To-Do items module is very simple – all you can do to an existing task is check the box to mark it complete. This is also achieved by using Knockout, this time by making the ‘Complete’ property of the toDoItem ViewModel as an observable.

Above : The toDoItemModel, which replicates the similar class design in the C# class ToDoItemModel

Above : Knockout checkbox databinding, which binds a true/false value to a checkbox.
This is bound to the Checkbox in the Razor View, which in turn uses Razor script to pull from the (Razor) View Model and determine whether the current visitor is authorized to check the boxes. For the module, that’s any registered user on the site. The Knockout binding creates a link between the checkbox state, the ‘Complete’ property, and fires the onCompleteChange function when it changes. The onCompleteChange function is again passed in as part of the callbacks object when the form is first loaded. Again, that is then bound to the WebAPI SaveToDoItem method. So each click on the checkbox directly fires the call to save the toDoItem back to the database. This does create a ‘chatty’ interface and you probably wouldn’t want a save happening on each change. It’s here to demonstrate how it can be done, and to eliminate a ‘save’ button which will bundle the state and do a single save.
On Item Delete
The final interaction on the page is the ability to delete a To-Do item. In the same way that the Complete checkbox triggers an instant event, which then calls the WebAPI method via AJAX, the deletion of a To-Do item works the same way. It’s also similar in the way that the addition of a new item occurs, in that the trigger is a specific event bound to the koobservable array. If you look at the code you can see that the onArrayChange will respond to an addition, or a deletion – but there is a separate method for the actual delete. This is because the array change event (onArrayUpdate) is bound to any change in the array – whether from the visitor deleting the item, or from the Refresh action clearing out the list and filling it again. So the Remove is bound by Knockout to the specific ‘Delete’ link click rather than just the removal of the array. Otherwise, whenever the effective array.clear() function is called, it would delete all the items from the database. Working around these types of interactions are one of the aspects of working with Knockout that are most likely to trap the unwary.

Above : Delete method for the onArrayRemove callback function, which responds to the removal of an item from the Knockout array

Above : Razor View showing the Knockout databinding to bind the delete link click with the method that removes the item from the array.
Again, the ability of Razor to perform server-side processing with a simple syntax provides an easy way of showing/hiding the delete links. Hiding the delete links isn’t a security measure – that is achieved by the [DnnAuthorize] attribute on the WebAPI – but there is no point sending the links to the client if they are not authorized to use them.
Keeping Scope under Control
When using WebForms, all of the control Ids on the page are generated to create a unique value. This means adding the same module to the page twice has no effect on the module functionality, because all of the code is correctly scoped to the TabModule instance (that is, the instance of a module on a specific page, with a unique TabModuleId).
When building with Razor views this functionality is no longer automatically taken care of. Adding the same module to the page twice can create ID collisions in the html, and it can also create scoping issues with Javascript variables and functions. If a module is to be used more than once on the same Dnn page, these issues will need to be addressed. In the example module, this takes the form of adding the moduleId to div Ids in the Razor View, so the created page has no duplicate Ids. Careful management of the Knockout binding scope is also required, so that where a binding occurs, it is scoped to a parent control – without this scope, Knockout is bound to the entire page and can cause problems.
Managing the Javascript scope is very important, and this is addressed in two ways – careful inclusion of instance specific information within the viewModel, and also namespacing of the main functions so that they are under a corp_Name_Corp_Module_Db variable. This allows use of common terms like ‘load’ and ‘save’ without the fear of a naming clash with another module (or even core Dnn function) on an implemented page. It is very common for a module to be pronounced working, only to have it fail utterly when another instance of the same module is added to the page. For some modules this is unlikely, but for content modules it remains a real possibility. Even for a narrow audience, good software has a habit of spreading and so care should always be taken around the scope.
Using this template for Production Applications
The attraction of modules like this are:
- Ease of coding to quickly build functionality
- Modern flexible tools which can be quickly learned, even if the developer is not a Dnn or even ASP.NET specialist.
- No special development environment required – using online editing tools like Visual Studio Online or offline, cross-platform tools like Visual Studio Code make it easy to perform the changes
This example module provides a good basis for exploring these concepts but it shouldn’t replace a carefully planned architecture. This is code developed to show concepts and is not production-ready code. Particular attention should be paid to making the application secure, which includes carefully considering what data is exposed to the client from the server, treating all incoming requests with suspicion and not trusting any unchecked input. This application also reveals console.log statements in the browser so an observer can track what is happening with the application, and shows stack traces if an exception occurs. All these should be removed from production code (I suggest using #if (DEBUG) statements).
The example also shows instant-save techniques, which work well for a low-impact, small data model like this. Careful thought needs to be applied to using techniques like this. While the ‘save’ button can be a usability anachronism, there are other ways to achieve the same thing without using Knockout triggers. These might include save on specific actions, or saving on the basis of a timer or a certain amount of data entry. All these topics should be carefully considered and planned before building any SPA.
Polishing Needed
It’s important not to think of this module as anything but an example of how to do things. There are a lot of things not present here. If I were to polish this module, I would be adding in ‘wait’ icons while the API calls were doing their work. I would likely add a ‘Settings’ control in the normal way and allow choice of which registered users had the permission to create a to-do list. Perhaps I would allow editing of the task once a to-do was created. I would tidy up the design. I would also complete all of the correct information in the manifest file, such as a change log, correct license and description.
These are all things that would be done with a proper production implementation. Finishing off a module for production properly is often the difference between success and failure of a piece of software to be updated. I once release a piece of desktop software with the tab order of fields in a non-sequential order. It drove the users crazy, and it was a simple mistake – one that I often think of. That’s the difference between proper production polish and a rough job. Take your time and get it correct.
How you can use this module to build your own
The module was built to be copied and forked to create applications by people wanting to build in this style. You can install the module as-is, but that means you are stuck with the ‘Corp_Name Corp_Module_Db’ naming. If you would like to use the module as a template, then I suggest first unzipping the package into a directory. There are also two more zip archives within the package zip – for resources and app_code. All of these must be expanded to change it to your own creation.
You can then run a find/replace both on the filenames (replacing Corp_Module_Db with the module name) and also in the files themselves. Most code editors have a find/replace all – you need to replace ‘Corp_Name’ with your organization name, and ‘Corp_Module_Db’ with the module name. Then re-zip the directory into a new package and install it – everything should still work OK if you have done the rename correctly. You will need to re-zip the resources and app_code packages first. A warning : Dnn install packages expect all of the files in the root of the application.
I recommend reading the Wiki on Manifests, which is the key to understanding Dnn packaging.
Wrapping Up
I’ll admit the project to write this blog post suffered from a bit of scope creep from the initial plans. I did this to create a useful resource for people to actually dive in and start building real-world applications in this style. There is nothing to stop your next project from being built in this way. The time and convenience savings can be significant. With the rider that the first time you try and write an application like this, there might be a learning curve over a ‘traditional’ Dnn module pattern. But the applications run faster, are easier to build in complicated functionality, and are simple to develop and deploy.
Please provide feedback in the comments and let me know if you’ve managed to build something in this way.