In the previous blog entries we’ve covered a lot of ground and are now at the point to where we actually need to return some data. When I first started trying to learn about DNN module development the handshake between the database and the site was a very foggy area for me. How does one go about getting data that exists in a SQL database to actually being presented to a user on the website? That very topic is what we’ll cover in this entry and the next few entries in this series.
We have a view control that is just waiting on some task data. Now we need to create the data that will be returned to the list of tasks in our View control. So we must first go into SQL Server and create a new table. As you may imagine we need to create a table that will house information about our tasks so we’ll call it the “Tasks” table.
Turn on SQL Server (or SQL Server Express) and connect to your local database engine. Once connected be sure to expand the correct database. Your database can be named anything, but if you’ve been following along in this tutorial your database will be named either “ModDev” or “ModDev2” so whichever one you have expand the database node and you should see the sub-items become visible… things like “database diagrams, tables, views”, etc. Expand the “tables” node and you will see a lot of tables that DNN installs as part of the install process. DNN depends on these tables to run and these tables hold data specific to your site. Whenever DNN modules are installed they can (and frequently do) create their own tables and stored procedures to hold the data for their modules. Next we will create a new table for our tasks module.

CREATING THE TASKS TABLE IN SQL
Here again seasoned developers usually create tables in SQL by writing out SQL statements and when done in this manner is referred to as creating tables via T-SQL (Transact SQL). So it is possible to script out this table and create it by using a script, but if you’re new to SQL it may be easier to create the table in design view first. On the Tables node right click and select the “New Table” option. When you do this a new tab will open up in the right hand pane of SQL. Your cursor defaults to a “Column Name” field and in this field we shall list the name of our data fields that we want to house in this table. The next column is “Data Type” which is where we indicate the type of data associated with each column. The last column is “Allow Nulls” which is a checkbox column. The “allow nulls” column represents whether or not we want to allow this column to be empty or to not have any data in it. Now that we are ready to create the table’s structure we need to think about what data we need to store.
Task Data Points
Some of the fields that we need to store make sense and are somewhat obvious, but there are 3 data points that may not be so evident. Let’s look at the view again with some additional comments added:
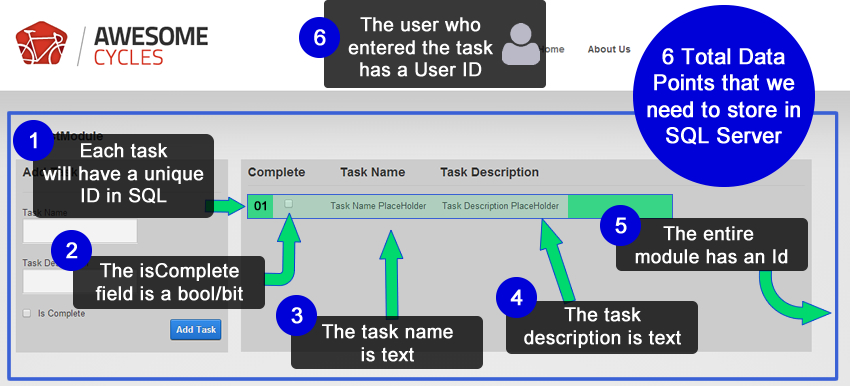
As you can see in the above image there are 6 data points that we need to have for each task. The Task Name, Task Description, and IsComplete fields are the obvious ones, but the UserID, TaskID, and ModuleID are the ones that may not initially be so evident. Each task will inevitably be entered by a user so we need to capture the user’s ID. This will help us in future scenarios where a user may want to go back and edit some of their task entries. Since each task will be unique we associate a unique ID with each entry and this task ID will also serve as the primary key for each record. (The term “Primary Key” is a term related to SQL Server and database tables. Primary keys help ensure that each record has a unique identifier). Back to the fields we are trying to capture… there is a possibility that a module could be added to more than one page or there could be multiple instances of this module on the same page. In this case we need to capture the module’s ID so we can separate or “scope” the module data by their unique ID’s so that each module doesn’t show the same information across all pages. You may wonder where we can get the user ID and module ID from… well that information is also provided to us by the DNN API. As a side note, most of the time there will be additional fields included in database tables such as “Date created on”, “Date modified on”, “Created by User ID”, “Modified by User ID”, etc. These fields provide more thorough logging information, but for brevity’s sake we’ll be leaving them out in this tutorial.
Go ahead and create the table structure setting it up to accept each of these data points as shown in the below image:

If you want to know more about the SQL Server data types then reference the following page. It provides in-depth information on SQL Server data types http://msdn.microsoft.com/en-us/library/ms187752.aspx
Setting the Primary Key
Now that we’ve got the proper table structure configured we need to do one more thing. We need to create the aforementioned primary key so that each record in the table can be uniquely identified. So select the TaskID column and right click on it choose “Set Primary Key”. Then look down below at the “Column Properties” section and expand the “Identity Specification” and change the (Is Identity) field to Yes and ensure that the “Identity Increment” is set to 1. This means that as each record is entered the TaskID will increase by 1 automatically. So we won’t have to create the TaskID for each task… SQL Server will handle that for us.
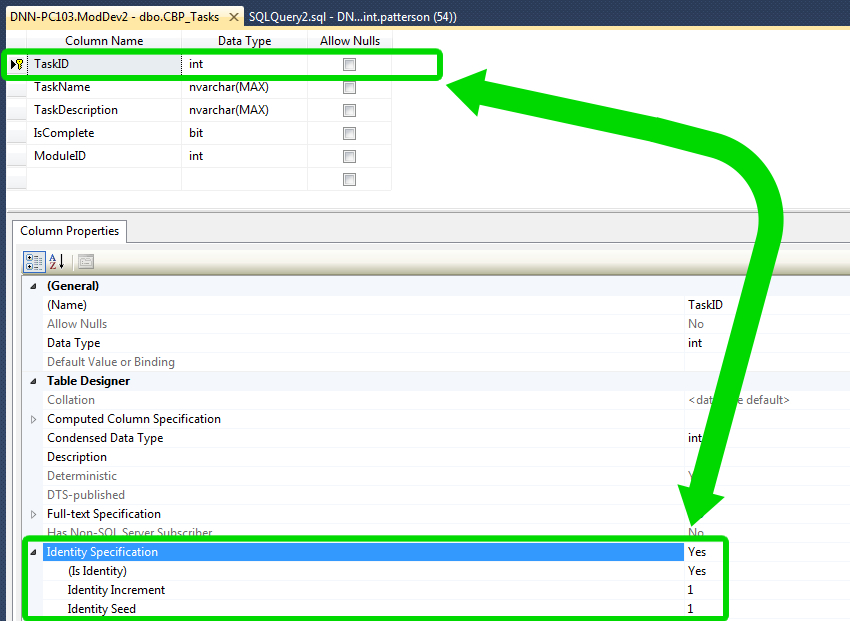
Table Naming – Best Practices
After you get that set then we need to talk about naming conventions.How you name your table(s) and stored procedures is important. We want to create a table named “Tasks”, but that is pretty generic. It is possible that another module vendor may have also have a table named “Tasks”. In this case there could be a clash or an error if we left the name being really generic. For this reason it’s best to preface your module namespaces, SQL tables & stored procedures with a prefix that is something specific to you or your organization. When I clicked “Save” I used my initials as my prefix. My table name was then “CBP_Tasks”. Feel free to name yours whatever you would like just be sure that it’s something unique. Click the save button and save your table with your unique name.
Manually Adding in Sample Data
Now that we have our table structure created we should add some sample data because, keep in mind, our first goal is just to get some data returned from the database to our view control. In order to create some sample data right click on your table name and select “Edit Top 200 Rows” and then click in the TaskName column and start typing in your sample data. After your done with a column just tab through the next fields. Now at this point we don’t know what the moduleID is so we can just substitute a number for the time being and we’ll come back to edit this field when we get to that point shortly. Add 2 or 3 rows of information so that we’ll have a few sample rows of data that can be returned for our testing purposes.

Updating the SQL Data Provider File
Another thing that we need to keep in mind when creating tables (and later on stored procedures) is the 00.00.01 SqlDataProvider file that resides in our modules Providers > Data Providers > SqlDataProvider folder. This is the file that will execute whenever our module is installed in a different DNN site. Sure we already have the table created here in our development environment, but potentially in the future you will want the table to be created during the install process so that the module is easily installable into other DNN sites. So what script goes in the file and how do we get that script?
We can easily get SQL Server to create a script for us that will create this table, but the script that SQL will generate won’t factor in everything we need for DNN so we need to modify the script some. Let’s take it one step at a time though. First find the table that we just created (in my case “CBP_Tasks”) and right click and select “Script Table as” then “CREATE To” then click “New Query Editor Window”

After you click that you should see some code that looks like the below:
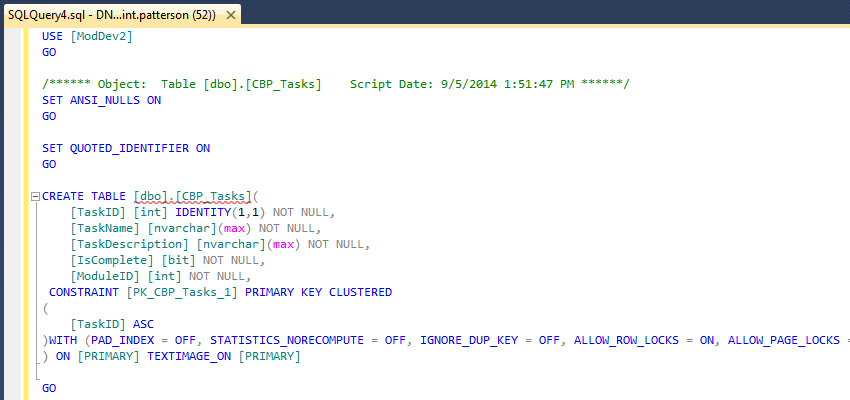
It would be nice if we could just copy and paste this into the 00.00.01 SqlDataProvider file, but as I mentioned we need to modify this script. So what is it that we need to do and why? We need to insert a snippet of code before the table creation script and we need to update anywhere we see the term “.dbo”. When we install this module into a DNN site we need to first check and see if the table already exists in the database. If the table already exists then we shouldn’t re-create it and likewise if the table is not there then we should create it. The first snippet of code checks to see if the table exists. Also, we need to account for DNN’s databaseOwner and objectQualifier values. Anywere you see the text “.dbo” we will replace it with the “{databaseOwner}{objectQualifier}”. DNN will replace these fields during the install process with the appropriate information. We also need to update the way the Primary Key is created. So if we take the script that was just generated for us and update it to look like the below we should be good to go:
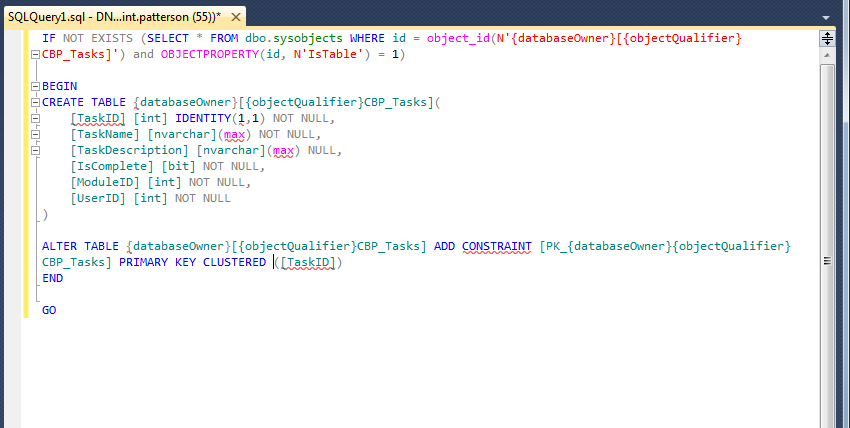
And here is the code in case you want to copy/paste it:
IF NOT EXISTS (SELECT * FROM dbo.sysobjects WHERE id = object_id(N'{databaseOwner}[{objectQualifier}CBP_Tasks]') and OBJECTPROPERTY(id, N'IsTable') = 1)
BEGINCREATE TABLE {databaseOwner}[{objectQualifier}CBP_Tasks](
[TaskID] [int] IDENTITY(1,1) NOT NULL,
[TaskName] [nvarchar](max) NOT NULL,
[TaskDescription] [nvarchar](max) NULL,
[IsComplete] [bit] NOT NULL,
[ModuleID] [int] NOT NULL,
[UserID] [int] NOT NULL
)
ALTER TABLE {databaseOwner}[{objectQualifier}CBP_Tasks] ADD CONSTRAINT [PK_{databaseOwner}{objectQualifier}CBP_Tasks] PRIMARY KEY CLUSTERED ([TaskID])
END
GO
One other thing that is notable is the the way the primary key is created had to be updated from the way SQL Server initially auto-scripted for us. The constraint code was auto-generated as so:
CONSTRAINT [PK_CBP_Tasks] PRIMARY KEY CLUSTERED
(
[TaskID] ASC
)WITH (PAD_INDEX = OFF, STATISTICS_NORECOMPUTE = OFF, IGNORE_DUP_KEY = OFF, ALLOW_ROW_LOCKS = ON, ALLOW_PAGE_LOCKS = ON) ON [PRIMARY]
)
And I updated it to be:
ALTER TABLE {databaseOwner}[{objectQualifier}CBP_Tasks] ADD CONSTRAINT [PK_{databaseOwner}{objectQualifier}CBP_Tasks] PRIMARY KEY CLUSTERED ([TaskID])
Notice that here again we substitute the {databaseOwner}[{objectQualifier} for the .dbo syntax and instead of just saying “CONSTRAINT” we update the script to “ALTER TABLE… ADD CONTSRAINT”. We do this so that whenever our module is installed in another DNN instance (which we’ll do at the end of this series) the table will be properly created.
Note that, if you update these statements in SQL Server, SQL Server indicates that we have some incorrect syntax and that is because it does not understand the {databaseOwner} and {objectQualifier} syntax. Don’t worry though because this won’t be an issue because DNN is going to insert the appropriate syntax in that location when needed so we not need worry about it here. Now that we’ve got this script we need to copy and paste it into our 00.00.01 SqlDataProvider file back in Visual Studio. Once you’ve got it pasted in it should look something like the below:
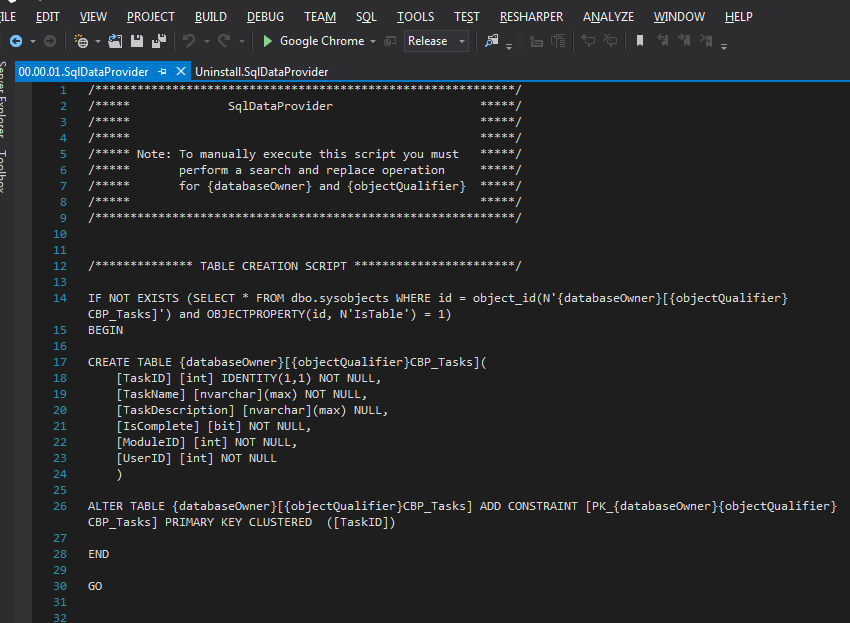
So we’ve just created the file that will be executed during the install process and created the table needed in SQL for our module. We then pasted it into the SQLDataProvider file in Visual Studio. Now we need to also create the script that will uninstall all of the tables and stored procedures associated with our module should our module be uninstalled from a DNN site. Luckily the uninstall script is a little simpler.
Again we should right-click on the table and “Script Table as” then “Drop to” then “New Query Editor Window”. In SQL terms “dropping” a table is the same as deleting a table. After you do that you should see a script similar to this

Here again this script will need to be updated in order to function properly with DNN. So we need to update this script to look like the below:

In this scenario (the uninstall scenario) we first check to see if the table exists and if it does exist then we drop the table. And here is the code in case you want to copy/paste it:
IF EXISTS (SELECT * FROM dbo.sysobjects WHERE id = object_id(N'{databaseOwner}[{objectQualifier}CBP_Tasks]') and OBJECTPROPERTY(id, N'IsTable') = 1)
DROP TABLE {databaseOwner}[{objectQualifier}CBP_Tasks]
GO
Once you’ve got your code updated then copy and paste it into the Uninstall.SQLDataProvider file and save it.
The Web.Config File
I remember when I was learning I often wondered how DNN knew which SQL Server and/or database to connect to and send data. I mean we’re copying and pasting files from SQL Server into Visual Studio and at some point in the future all this stuff is going to be installed and work in our DNN site, but what is the link between the site & SQL Server? If you happen to be wondering something like that then we’ve really already answered that question and we just need to connect the dots again.
If you remember during the installation process we had to specify the SQL Server name as well as the database name. DNN Stored those values in a file that resides at the root of our site’s folder structure. The web.config file is a file that holds a lot of information about our application and one of those items is the connection string information. This is one reason why we are entering the token {databaseOwner} because DNN already knows the site database and references it any time it connects to the database. If you would like to see this information just open the web.config file located at the site’s root folder and look somewhere around line 33 or so and you should be able to see it.
The below video walks through the concepts covered in this blog
Want to know more about SQL Server? Here are some helpful tutorial links for SQL Server:
Blog Summary
At this point we’ve created the table and scripts needed to get started. We’ve also inserted some “dummy” data so that we can hopefully pull into our view shortly. Our time and fun in SQL is not over because we have to create some stored procedures in the near future. Now that we have our table created we need to create the Task Class in Visual Studio to represent this table in code. More fun times and geekery ahead!
Go to the Next Blog Entry: "Creating the Task Class"