This article is cross-posted from my personal blog.
In previous blog posts in this series on creating testable modules I have shown how the various layers of a DotNetNuke module can be built and tested independently. In this blog I will create the LinksView UserControl and demonstrate in the browser that everything does indeed work as expected.
The LinksView UserControl
Lets first take a look at the code file for the UserControl. As we would expect the UserControl has to implement the ILinksView interface. As we are writing a DotNetNuke Module it must also implement the IModuleControl interface. In DotNetNuke 5.0 the IModuleControl interface replaces the PortalModuleBase class as the contract which all module controls must implement.
Listing 1 – The LinskView UserControl’s Code File
|
1: public partial class LinksView : ModuleUserControlBase, ILinksView
2: {
3: LinksViewPresenter presenter;
4:
5: public LinksView()
6: {
7: //Instantiate associated Presenter
8: presenter = new LinksViewPresenter(this,
9: new LinksRepository(new DataService()));
10: }
11:
12: public int ModuleId
13: {
14: get { return this.ModuleContext.ModuleId; }
15: }
16:
17: public List Links
18: {
19: set
20: {
21: grdLinks.DataSource = value;
22: grdLinks.DataBind();
23: }
24: }
25:
26: protected override void OnLoad(EventArgs e)
27: {
28: base.OnLoad(e);
29: presenter.OnViewLoaded();
30: }
31: }
|
In this case as we are creating a UserControl we can inherit from the new ModuleUserControlBase. The View has to create an instance of the LinksViewPresenter, which in turn requires an instance of LinksRepository and an instance of DataService, and this is all wired up in the Constructor.
The ModuleId property, which the presenter uses, wraps the ModuleId property of the IModuleControl’s ModuleContext property, while the Links property wraps the DataSource property of a DataGrid control on the ascx page. Finally, the view’s OnLoad method calls the presenter’s OnViewLoaded method to make everything work. This is similar to how we wired up the concrete View control in our HelloWorldMVP application.
Listing 2 - The LinskView UserControl’s ASCX File
|
1: <asp:DataGrid ID="grdLinks" runat="server" AutoGenerateColumns="false"
2: GridLines="None" ShowHeader="false">
3: <Columns>
4: <asp:TemplateColumn>
5: <ItemTemplate>
6: <asp:HyperLink
7: ID="lnkLink" runat="server" CssClass="CommandButton"
8: NavigateUrl='<%# DataBinder.Eval(Container.DataItem,"LinkUrl") %>'
9: Text='<%# DataBinder.Eval(Container.DataItem,"LinkText") %>'
10: ToolTip='<%# DataBinder.Eval(Container.DataItem,"Title")%>' />
11: ItemTemplate>
12: asp:TemplateColumn>
13: Columns>
14: asp:DataGrid>
|
Listing 2 shows the ascx file for the UserControl. Here we just set up the binding to the various properties of our Link objects.
Registering the LinksMVP Module
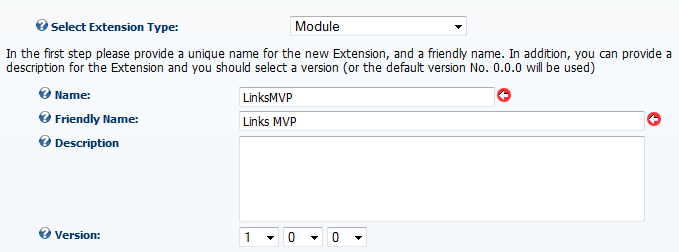
We are now ready to Register the Links MVP module. The process has changed a little in DotNetNuke 5.0. In Host/Module Definitions (or Host/Extensions) select the Create New action. On the first page of the Create new Extension Wizard fill out the Package level properties (Figure 1) – Note: if you launched the Wizard from the Module Definitions page (Rather than Extensions) you will not see the Select Extension Type drop-down.
Figure 1 – Creating the New Module Definition – Page 1
|
 |
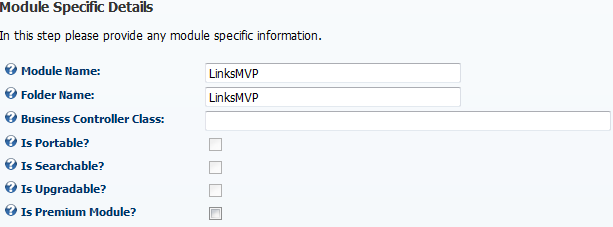
The next Wizard page will allow you to set the Module properties. (Figure 2).
Figure 2 – Creating the New Module Definition – Page 2
|
 |
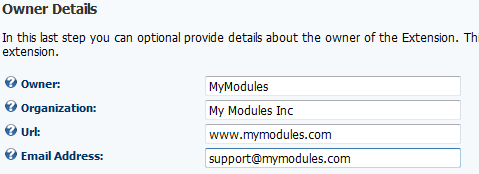
Finally, on the last Wizard page, if you intend this module for distribution, you can add some information about you or your company (Figure 3).
Figure 3 – Creating the New Module Definition – Page 3
|
 |
After selecting Next the Module will be registered. You will need to add the Module Definition and the Module Control reference. This is done in much the same way as it was prior to 5.0.
Setting up the Database
The last step is to create the database objects we will need. We will do this by executing the same SQL we used in our DataService tests.
Listing 3 – The TSQL required to create the Links Table and GetLinks Procedure
|
1: CREATE TABLE {databaseOwner}[{objectQualifier}LinksMVP_Links](
2: [LinkId] [int] IDENTITY(1,1) NOT NULL,
3: [ModuleId] [int] NULL,
4: [LinkText] [nvarchar](250) NULL,
5: [LinkURL] [nvarchar](1000) NULL,
6: [Title] [nvarchar](250) NULL
7: CONSTRAINT [PK_{objectQualifier}LinksMVP_Links] PRIMARY KEY CLUSTERED ([LinkId] ASC)
8: )
9:
10: CREATE PROCEDURE {databaseOwner}[{objectQualifier}LinksMVP_GetLinks]
11: @ModuleId int
12: AS
13: SELECT *
14: FROM {databaseOwner}{objectQualifier}LinksMVP_Links
15: WHERE ModuleID = @ModuleID
16: GO
|
Add the Module to a Page
Once the Module is registered and the Database obejcts have been created we can add an instance of our new module to a test page. As there is no data we will not see anything, but we can use SQL Server Management Studio to add some links to the database.
Figure 4 – Adding Data to the Links Table
|
 |
After adding links to the table, we can refresh the page and we should see a list of the links (Figure 5)
Figure 5 – The LinksMVP Module with two Links
|
 |