 Occam’s Razor is an often referenced heuristic that basically states that the simplest explanation is more likely to be the correct one. This principle has many corollaries in computer science as we often strive to find the simplest solution to a problem in order to keep the complexity of our applications under control. The new ASP.Net Razor view engine embraces this philosophy and certainly shows that even simple solutions can be very powerful. Charles Nurse has a recent series of blog posts which discuss how you can even use Razor within DotNetNuke, with the focus being on lowering the barrier for creating DotNetNuke modules.
In keeping with this focus on simplicity, On December 6th, the Seattle DotNetNuke User Group (SEADUG) will be hosting the DotNetNuke Razor Hackathon. Like previous Hackathons, we’ll be live streaming the kick-off event on DotNetNuke.com.
Participation
You can participate in the Hackathon in two ways:
If you are in the Seattle area:
The best way for you to participate is to attend the Seattle DotNetNuke User Group. People in attendance will have the opportunity to win some great door prizes including an XBox Slim!
If you are anywhere else:
The Hackathon is a week long event that takes place mostly online, so it doesn’t matter where you are in the world, you can still participate. To help participants get up to speed on Razor, we’ll be live streaming the kick-off event. We’ll also make this video available online if you are unable to attend during the actual user group meeting time (apparently people in Europe will be asleep at that time of night). For those that can’t attend the kickoff, you can still submit a Hackathon entry and be eligible for the grand prizes.
Unleash Your Inner Hackmaster
After the completion of the kickoff event, you’ll have until December 13th at 6PM PST to create the ultimate hack for DotNetNuke using Razor. Whether it is a new Razor Helper, a simple Razor script, a new DotNetNuke Module using the Razor engine or even an enhanced version of the DotNetNuke Razor Host module, the choice is yours. The one hard and fast requirement is that your entry must use the Razor view engine and must be installable in DotNetNuke. The complete details for participating in the hackathon are available online.
So breakout your copy of WebMatrix Beta 3 or Visual Studio and start boning up on your Razor skills. I highly recommend that you download the Razor samples and pdf for AspNet Web Pages Beta 3 to help get up to speed on the Razor syntax. With the basics out of the way, you are now ready to download the DotNetNuke Razor Host module, which is currently in beta. We expect this module to be included as an optional component in upcoming DotNetNuke releases. We are still working on some additional capabilities which will enhance the ability to automatically package Razor modules.
Building Razor Scripts for DotNetNuke
To highlight some of the capabilities of the Razor Host module, I decided to create a quick script to display user profiles. This is something that many organizations need, so I thought it would be a great way to show off the power of Razor and show some integration with DotNetNuke. I built a similar display using the Reports module in DotNetNuke Tips & Tricks #10. Looking at the two solutions, it is easy to see the huge differences between the two approaches.
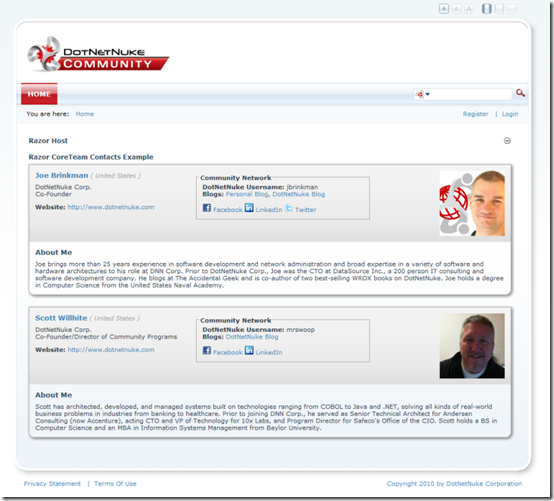
My original version of the contact listing, relied on a heavy dose of SQL and XSLT to create the listing. It worked well, but if you look at the SQL and XSLT involved, you realize it is not for the feint of heart. I think that the Razor version is much more approachable for the average power user with a little bit of scripting and HTML experience. To begin with, lets look at what I am trying to build:

To get started, I add the Razor Host module to the page. The Razor Host is a module that will help us create our script, and render it to the page. When we first add the module to the page, it will look pretty plain because we haven’t told it what module we want displayed.

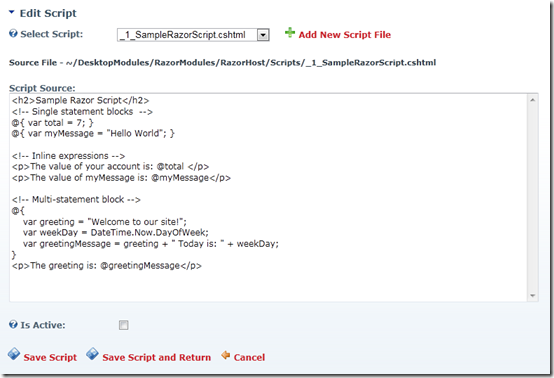
Clicking the “Edit Script” link will open the script editor and allow us to choose and activate one of the pre-installed scripts, edit a script or even create a new script.

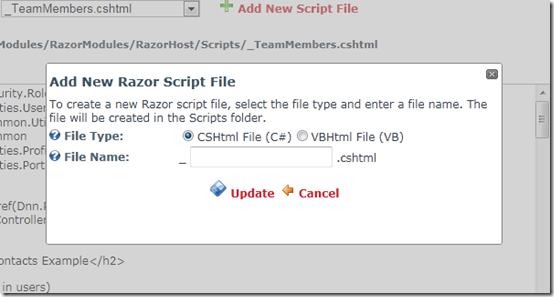
In my case, I want to create a new script, so I click the “Add New Script File” link and enter TeamMembers as the name of my script. I also choose to use C# for my script.

This will create a simple script for me and place it in the RazorModule/RazorHost/Scripts directory. The script filename is automatically prepended with an underscore and the appropriate extension for the type of script I am creating. The underscore ensures that site visitors cannot craft a URL directly to the script file and is an important security consideration since the developer may not want just any user executing the script.
At this point you are ready to begin editing the script. You have a wide choice of editors to choose from. If you only need to make a simple tweak to an existing script, you can use the existing text box in DotNetNuke. Alternatively, if you open the script in WebMatrix, you will have access to a more user friendly editing experience. Unfortunately, I found the WebMatrix experience to be a little frustrating since it does not have built in Intellisense to tell you when your code won’t compile or to help you determine the available properties or methods on an object. Microsoft invested a lot of man-years in creating the Intellisense experience in Visual Studio and it is a little bit of a let-down that they weren’t able to leverage that capability in WebMatrix. Using WebMatrix, I often found that I would end up with mismatched braces or parenthesis, or that my VB background would takeover and I would use parenthesis when accessing an array element when I should have used square-brackets. It is little things like this that make Visual Studio such a powerful editor.
Like most applications there are 3 main components that we must be concerned with when creating our Razor scripts: data, presentation and behavior. Razor provides the ability to directly query the database using some straight forward syntax. Of course, that is not recommended for most DotNetNuke applications, since the database is not guaranteed to be backwards compatible. Also, if you looked at my earlier report module example, you will see that the SQL for working with user profile data is not exactly simple. Because Razor has full code support, we can and should take advantage of the existing business layer in DotNetNuke.
Using the business layer I can get all of my user data with just a few lines of code:
@using DotNetNuke.Security.Roles

@{
  var users = (new RoleController()).GetUsersByRoleName(Dnn.Portal.PortalId, "Coreteam");
}
Compared to the 100+ lines of SQL I had in my previous example, this is much easier. In this example, I am just retrieving a list of users who are in a specific role. This is perfect for my script. The real benefit is that DotNetNuke has a very rich API already for accessing all of the data for your website, so there is probably some way to get the data you need for your script without resorting to SQL.
With my user data in hand, I just use a simple foreach loop to output the same block of HTML over and over again for each user in my data set. When developing my script, I found that the same script pattern was repeated over and over again. I often wanted to output a chunk of HTML to display some profile property, but if the user had not filled out that profile element, I wanted to hide the element on the page. Notice that in the picture above, that my listing shows a Twitter link, but the listing for Scott Willhite doesn’t have that link. With Razor I can define methods inside a “function” block which are then available to the other script on my page.
@functions {
  public static string GetProfileProperty(UserProfile profile, string propertyName)
  {
    ProfilePropertyDefinition objProperty = profile.GetProperty(propertyName);
    if (objProperty == null || string.IsNullOrEmpty(objProperty.PropertyValue)) return string.Empty;

    return objProperty.PropertyValue;
  }

  public static string GetFormattedProfileProperty(UserProfile profile, string propertyName, string tagformat)
  {
    string propertyval = GetProfileProperty(profile, propertyName);
    if (propertyval != string.Empty)
    {
      return string.Format(tagformat, @propertyval);
    }
    return string.Empty;
  }
}
Using these functions I can now display profile properties with a simple call:
@GetFormattedProfileProperty(user.Profile, "CompanyName", "<div class=\"company\">{0}</div>")
Putting it all together with some additional HTML we end up with the following script.
@using DotNetNuke.Security.Roles
@using DotNetNuke.Entities.Users
@using DotNetNuke.Common.Utilities
@using DotNetNuke.Common
@using DotNetNuke.Entities.Profile
@using DotNetNuke.Entities.Portals

@{
  var teamImageDir = Href(Dnn.Portal.HomeDirectory) + "teamImages";
  var users = (new RoleController()).GetUsersByRoleName(Dnn.Portal.PortalId, "Coreteam");
}

<h2>Razor CoreTeam Contacts Example</h2>

@foreach (UserInfo user in users)
{
  <div class="teammember">
    <div class="teamheader clearfix">
      <img class="profilephoto" style="width:120px;height:120px" src="@GetProfileUrl(user.Profile)" alt="Profile Photo for @user.DisplayName" />
      <div class="organization">
        <h2>
          <a href="@Globals.UserProfileURL(user.UserID)" >@user.DisplayName</a>
          @GetFormattedProfileProperty(user.Profile, "Country", "<span class=\"country\">( {0} )</span>")
        </h2>
        @GetFormattedProfileProperty(user.Profile, "CompanyName", "<div class=\"company\">{0}</div>")
        @GetFormattedProfileProperty(user.Profile, "JobTitle", "<div class=\"title\">{0}</div>")
        @GetFormattedProfileProperty(user.Profile, "Website", "<div class=\"website\"><span class=\"NormalBold\">Website: </span><a href=\"{0}\">{0}</a></div>")
      </div>
      <div class="social">
        <div class="legend">Community Network</div>
        <div class="community">
          <div><span class="NormalBold">DotNetNuke Username: </span>@user.Username</div>
          @{
          var personalblog = GetProfileProperty(user.Profile, "PersonalBlog");
          var dotnetnukeblog = GetProfileProperty(user.Profile, "DotNetNukeBlog");
          }
          @if (personalblog != string.Empty || dotnetnukeblog != string.Empty)
          {
          <div><span class="NormalBold">Blogs: </span>
            @GetFormattedProfileProperty(user.Profile, "PersonalBlog", "<a href=\"{0}\" >Personal Blog</a>")@((personalblog != string.Empty && dotnetnukeblog != string.Empty) ? ", " : string.Empty )
            @GetFormattedProfileProperty(user.Profile, "DotNetNukeBlog", "<a href=\"{0}\" >DotNetNuke Blog</a>")
          </div>
          }
        </div>
        <div class="socialmedia">
          @GetFormattedProfileProperty(user.Profile, "FacebookUrl", "<a href=\"{0}\" ><img src=\"" + teamImageDir + "/fb.png\" /> Facebook</a>")
          @GetFormattedProfileProperty(user.Profile, "LinkedInUrl", "<a href=\"{0}\" ><img src=\"" + teamImageDir + "/li.png\" /> LinkedIn</a>")
          @GetFormattedProfileProperty(user.Profile, "TwitterUrl", "<a href=\"{0}\" ><img src=\"" + teamImageDir + "/tw.png\" /> Twitter</a>")
        </div>
      </div>

    </div>
    @GetFormattedProfileProperty(user.Profile, "Biography", "<div class=\"bio\"><h2>About Me</h2>{0}</div>")

  </div>
}
@functions {
  public static string GetProfileUrl(UserProfile profile)
  {
    string strPhotoURL = Globals.ApplicationPath + "/images/no_avatar.gif";
    ProfilePropertyDefinition objProperty = profile.GetProperty("Photo");
    if (objProperty != null &&
        string.IsNullOrEmpty(objProperty.PropertyValue) == false &&
        objProperty.Visibility == UserVisibilityMode.AllUsers)
    {
      DotNetNuke.Services.FileSystem.FileController objFiles = new DotNetNuke.Services.FileSystem.FileController();
      DotNetNuke.Services.FileSystem.FileInfo objFile = objFiles.GetFileById(int.Parse(objProperty.PropertyValue), objProperty.PortalId);

      // There is a bug in the Photo profile property that stores the host photo
      // in the Current Portal and not in the host portal (-1). To overcome this
      // bug we just look in the current Portal if we can't find a photo in the Profile Portal
      if (objFile == null)
      {
        objFile = objFiles.GetFileById(int.Parse(objProperty.PropertyValue), objProperty.PortalId);
      }

      if (objFile != null)
      {
        PortalInfo objPortal = (new PortalController()).GetPortal(objFile.PortalId);
        if (objPortal != null)
        {
          strPhotoURL = string.Format("{0}/{1}/{2}", Globals.ApplicationPath, objPortal.HomeDirectory, objFile.RelativePath);
        }
      }
    }
    return strPhotoURL;
  }

  public static string GetProfileProperty(UserProfile profile, string propertyName)
  {
    ProfilePropertyDefinition objProperty = profile.GetProperty(propertyName);
    if (objProperty == null || string.IsNullOrEmpty(objProperty.PropertyValue)) return string.Empty;

    return objProperty.PropertyValue;
  }

  public static string GetFormattedProfileProperty(UserProfile profile, string propertyName, string tagformat)
  {
    string propertyval = GetProfileProperty(profile, propertyName);
    if (propertyval != string.Empty)
    {
      return string.Format(tagformat, @propertyval);
    }

    return string.Empty;
  }

}
Once you break the script down, you will see that there is not a lot of code here. Most of it is needed to get around a bug in DotNetNuke 5.6.0 for the PhotoURL profile property which does not seem to work correctly with virtual directories. Below are the links for the full script, css and images for the contact list, and a link to the Razor Host Module beta.
DotNetNuke Razor Contact List
Razor Host Module 1.0 Beta
In my next razor post, I’ll show how I take this script, associated CSS and images and turn it into a full blown DotNetNuke module.
This article is cross-posted from my personal blog.