This blog post is cross-posted from my personal blog.
In previous blogs in this series I have introduced some of the concepts I will use for creating Testable Modules, including the use of the Module View Presenter design pattern and I have created a simple standard ASP.NET application, with some sample tests.
We are now ready to start to build a DotNetNuke Module. Our DotNetNuke module will be a Links module. It will behave like the core DotNetNuke module, although it will not necessarily have all the features of the core module.
In this blog post I will lay out the specifications for this Links module and show the project set up.
Specifications
As we did with our Hello World sample application, we will start with the basic specifications of the Module.
- The links module should display a list of hyperlinks – these hyperlinks can be any type of valid URL – a page hyperlink, a file hyperlink or an external url.
- An administrative user should be able to Add new hyperlinks.
- An administrative user should be able to Edit existing hyperlinks.
- An administrative user should be able to Delete existing hyperlinks.
- An administrative user should be able to manage the order of the hyperlinks.
- Each link should have a Tooltip which provides more information about the hyperlinks.
This is pretty much the same specifications that the core Links module has, without the url tracking feature, and without the optional Settings that control the layout.
We may add that in later, but for now we will stick with these simple specifications.
Views
As with the core Links module we can envisage two “views” – a List View that displays all the hyperlinks and an Edit View that we can use to edit an individual Link. So in our Model View Presenter design pattern we will have two Views ListView and EditView (and associated interfaces IListView and IEditView, and two Presenters – ListPresenter and EditPresenter. We will however only have one Model – Link and its associated interface ILink, as both Views are displaying the same “Model”, in different ways.
LinksMVP Project
Before doing any coding we will set up our Visual Studio projects.
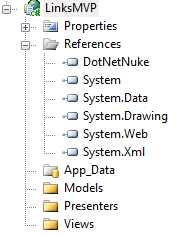
Figure 1 shows the Links MVP project. It is an ASP.NET Web Application project. After creating the project I removed the Default.aspx web page and the web.config file, which are added by the Project Template and added three folders for the Models, Views and Presenters. Again, as with our Hello World application this folder layout is just a convention.
Figure 1 – The LinksMVP Web Application Project

Finally I added an Assembly reference to the DotNetNuke assembly, and removed some unneccessary assemblies added by the Project template, that we will probably not use.
LinksMVPTests Project
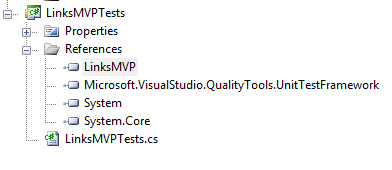
Next we need to add a Tests project. In this case I created a C# Test project (see Figure 2), removed the text file and manual test file that are automatically added by the Project template and renamed the UnitTest1.cs class to LinksMVPTests.cs. I then added a project reference to LinksMVP project. We will probably need a reference to the DotNetNuke assembly but we don’t know that yet for sure.
Figure 2 – The LinksMVPTests Test Project

That’s the basic project layout.
Physical Folder Layout
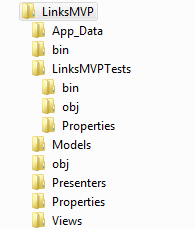
Finally, I should discuss the physical location of the project files (Figure 3). In this case, I have elected to not place the solution file in the “DesktopModules\LinksMVP” folder. Later, when we are ready to actually register (and use) the module in the DotNetNuke application, I will need to add an MSBuild task to the project file to copy the files to the correct DotNetNuke application folders. But as I will begin by building tests against Mock Views I don’t actually need a physical View Module Control yet.
Figure 3 – The Physical Layout of the LinksMVP projects
