 I don’t know if any else is like me, but occasionally I will run across something on a website and think that if only I could make some little tweaks to the site, that I might be able to make it more suited to how I think. Maybe it is just a bit of CSS that might clean things up a bit, or maybe if I could just re-arrange things on the page I would have an easier time finding that awesome feature that always seems to get tucked away in a hidden corner of the page, never to be seen again.
I was on the DotNetNuke forums this morning and noticed that Chris Paterra had added a new “Quick Reply” feature. This is a simple textarea and submit button that was added to the bottom of the forums page. The nice thing about the quick reply is that I don’t always need fancy html or the ability to pin the post or any of the other features that are on the regular reply page. Using the new Quick Reply, I can easily post a response without any visible postbacks. This is a much nicer Web 2.0 experience and something that I am sure many users will love.
I don’t know if you caught it or not, but the Quick Reply is posted at the bottom of the page. It is not too bad if you sort your forum posts with the oldest on top and the newest on the bottom. However, I have long favored having the most recent posts appear at the top of the page. This really saves a lot of time in long forum threads where I may only be interested in the last 3 or 4 posts. However, because the Quick Reply is displayed at the bottom of the page, I am forced to scroll down to post my message, and then scroll all the way back up to the top to read it in context or to see any new posts. Very annoying. This makes the new feature too painful to use for me and would probably result in me skipping it’s use altogether.
Recently, I have been doing a bit of reading on GreaseMonkey and thought that this would be the perfect opportunity to have a go at writing my own script. GreaseMonkey is a great FireFox add-on that basically allows you to run custom scripts on any website. These scripts have full access to the DOM and with a bit of JavaScript knowledge you can do quite a bit to enhance any page. Recently, Google announced that GreaseMonkey is also built into Chrome 4.0 and doesn’t even require an add-on. This makes it even more interesting since I now have the choice of browsers I can use and still run my favorite scripts.
One of my first tasks was to decide how I would like the page to work. Since this is my script, loaded in my browser, I could make the page behave in a manner that more suited my way of thinking. By loading my script onto UserScripts.org, I could share my script with the DotNetNuke community and if enough people liked the enhancement, maybe we could get it incorporated into the core forums so that everyone would be able to enjoy the feature. This was really intriguing to me. Essentially, using these scripts we could try out new layouts or features on DotNetNuke.com without affecting the website. We could give the the script to some of our users and get their feedback before we rolled something out for everyone.
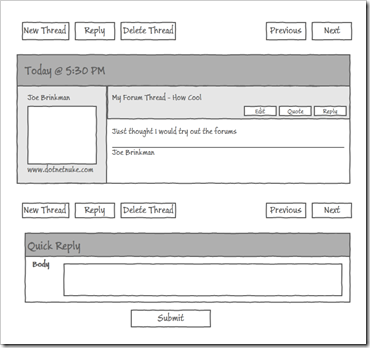
So, with the background out of the way, lets begin working on the script. For my layout I wanted to get rid of the form at the bottom of the page. I much prefer simple Web 2.0 style AJAX popups. They don’t take up any screen real-estate when not in use, but are still highly responsive to the user since no server round trip is involved. The first screen shows what the layout looked before I started.

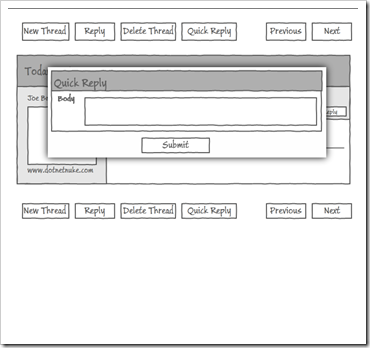
This second image shows what I wanted the new screen to look like. I would add a button in the button bars and change the form to a modal popup.

With my new sketches in hand (thanks to Expressions Blend 3.0 with Sketchflow), it was time to open up FireFox and get started. As a bit of housekeeping, if you want to follow along, you will need to be running the 0.8.0 version of GreaseMonkey. This version added a critical metadata element that allows us to load the appropriate javascript libraries inside the GreaseMonkey sandbox.
GreaseMonkey scripts are really nothing more than a bunch of JavaScript with a particular file naming convention, and a few metadata tags which provides a bit of information to the GreaseMonkey plugin on how to load the script. At the top of our file goes the metadata for the script. It could go anywhere in the file, but the convention is to put it all at the top.
// ==UserScript==
// @name           DNN Forum Quick Reply
// @namespace      http://www.dotnetnuke.com/greasemonkey/
// @description    Adds a quick reply button to the DotNetNuke Forums
// @include        http://*.dotnetnuke.com/*
// @exclude        http://support.dotnetnuke.com/*
// @exclude        http://customers.dotnetnuke.com/*
// @require        https://ajax.googleapis.com/ajax/libs/jquery/1.3.2/jquery.min.js
// @require           http://cdn.jquerytools.org/1.1.2/tiny/jquery.tools.min.js
// @require        http://ajax.microsoft.com/ajax/3.5/MicrosoftAjax.js
// ==/UserScript==
The important parts of this script are the include, exclude and require tags. These tags tell GreaseMonkey which URLs should load the scripts, which ones should not, and any external JavaScript resources should be loaded before executing the script. The name, namespace, and description tags are included to help distinguish this script from any others I may have loaded.
With the preliminaries out of the way, it was time to get down to some serious jQuery-fu. I had recently seen a great post from Dave Ward on how he used FireBug to learn jQuery. Firebug provides a great console that allows you to experiment and rapidly prototype key jQuery script elements. For this script I basically broke it down into 3 sections. First I needed to add the new Quick Reply buttons.
jQuery('td.Forum_NavBarButton>.Forum_Link:contains("Reply")')
    .closest('tr')
    .append(' ')
    .append('' +
        'Quick Reply')
    .find('.Forum_Link:contains("Quick Reply")')
    .click(function(event) {
        event.preventDefault();
        // add code to show our popup dialog
    });
First I look for the reply buttons in the navbar, find the parent table row, and then add my new Quick Reply button into the table row. Finally, with the new buttons in place, I can hook up a click event handler. For now this handler doesn’t do anything since we don’t have our popup dialog ready yet. Notice that I use event.preventDefault() so that the hyperlink doesn’t actually try to navigate to another page.
With the buttons in place I now turn my attention to the second step which was to create a “dialog” box placeholder. This actually consists of several separate pieces including, creating the new DOM element, moving the form from the existing forum screen into the new dialog box and adding the appropriate CSS to the page so the dialog will display correctly when it is shown.
// Create the dialog box placeholder
jQuery('#tblMain').parent().append('');
// Move the last 3 rows of the forum container into our new dialog
// These 3 rows contain the Quick Reply form
jQuery('#tblForumContainer>tbody>tr')
.slice(9)
.remove()
.appendTo('#qr_inserthere');
// We add some styles into the page for our dialog box
jQuery('#StylePlaceholder')
.append('#qr_dialog {display:none;z-index:10000;background-color:#fff;' +
'padding: 20px 5px 10px 5px;width:675px;min-height:200px;border:1px solid #666;'+
'-moz-box-shadow:0 0 90px 5px #000;-webkit-box-shadow: 0 0 90px #000;}');
Now I’m ready for the third step where I’ll display the popup dialog box. I decided to use jQueryTools to provide the popup behavior that I desired. jQueryTools is a set of jQuery plugins that work together to provide commonly used UI behaviors. For my purposes, I chose to use the overlay plugin which provides the popup behavior and the expose plugin which provides the opaque layer over the rest of the page to provide the overall modal appearance I was looking for. Using these plugins is pretty straightforward. First we create a reference to the overlay function, with the Expose options selected.
var overlay = jQuery('#qr_dialog').overlay({
                expose: {
                    color: '#999',
                    loadSpeed: 200,
                    opacity: 0.8
                },
                api: true
            });
Now we can show and hide our popup just by calling overlay.load() and overlay.close(). We’ll place the overlay.load() method call in the click event handler we setup earlier for displaying the dialog box. We’ll also add a new event handler to the submit button on the Quick Reply entry form so that it closes our dialog box when we are done.
jQuery('#qr_dialog').find('a').click(function() { overlay.close() });
This is all that it takes to handle the behavior in jQuery, and all of this code works great inside of the Firebug console. Unfortunately there are a few quirks to deal with when working with GreaseMonkey. The first issue we run into is that the forums Quick Reply feature relies on the ASP.Net AJAX UpdatePanel. When the reply is posted the entire forums table is automagically reloaded. I needed to capture the endRequest event and re-execute our jQuery to hide the form, inject the dialog box and add our buttons back to the page. Normally, you would use code like Sys.WebForms.PageRequestManager.getInstance().add_endRequest(EndRequestHandler); to add a handler to the event. Unfortunately, GreaseMonkey does not always play nice with scripts which are loaded with the Require tag. In this case, the ASPNET AJAX objects are getting created in the sandbox created by GreaseMonkey. Fortunately for us, we can use the unsafeWindow object to get access to the AJAX objects so we are able to use:
unsafeWindow.Sys.WebForms.PageRequestManager.getInstance().add_endRequest(EndRequestHandler);
Now it is just a matter of tying all of the pieces together into one script. If you have GreaseMonkey installed, then you can download and install the completed script from UserScripts.org. In the future I hope to use GreaseMonkey to do more prototyping of features for DotNetNuke.com.
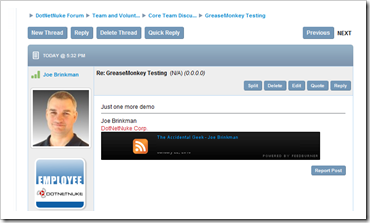
If you have installed everything correctly, you should see the the Quick Reply button shown below whenever you are viewing a forum thread on DotNetNuke.com

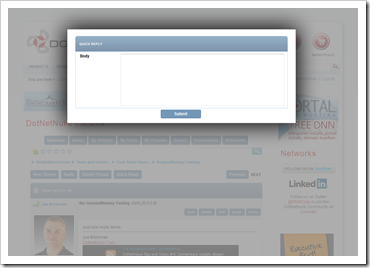
When you click on the “Quick Reply” button, you will get a nice Web 2.0 popup dialog as shown below.

I am really liking the new functionality and my newfound GreaseMonkey skills.