This blog has been cross-posted from my personal blog.
In the first post in this series I pointed out that DotNetNuke places few requirements on module developers, and this is often daunting to new developers – “where do I start?” being a common refrain.
So where do you start?
Before we actually start to build our first module lets look at what constitutes a module. In the default DotNetNuke skin/template that is used when installing DotNetNuke there are a number of examples of Text/HTML modules.
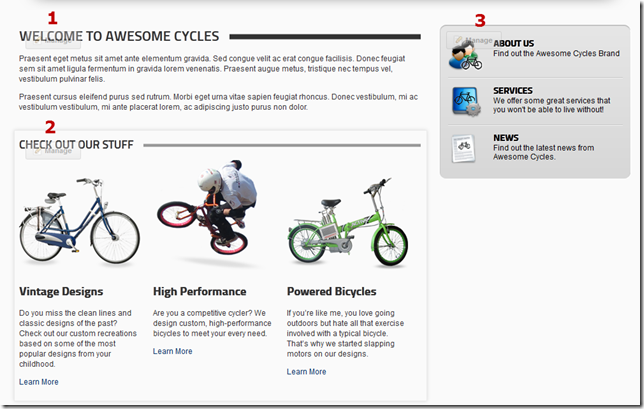
As an example Figure 1 shows 3 such modules on the Home Page.
Figure 1: Examples of HTML modules on the Home Page of the Default Template
|
 |
Some of the content on the page is provided by the module and some of the content is provided by the framework. In figure 1, while all three modules are HTML modules they all have slightly different “headers”.
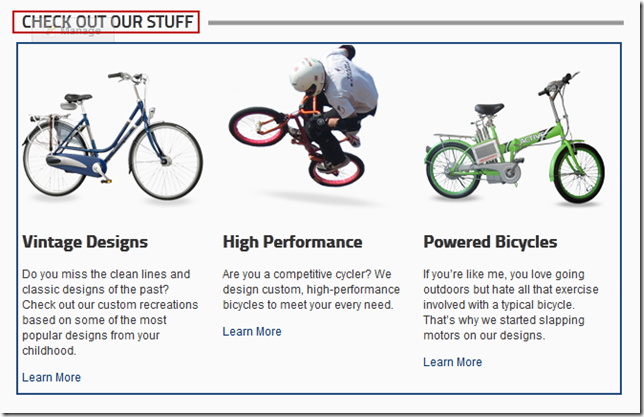
Module 1’s heading is in a larger font than Module 2 and Module 3 doesn’t have a heading at all. This module “chrome” is provided by the container which has been applied to the module. The module header text is provided by the framework (Figure 2 – red box), the styling of the chrome is provided by the container, and the text/images in the “body” of the module are provided by the module itself (Figure 2 – blue box).
Figure 2: The components of a Module
|
 |
This means that as a module developer, I don’t need to worry about the external chrome – or the module header – this is done for me, I can focus on the content inside the blue box.
IModuleControl
DotNetNuke is built on top of Microsoft’s ASP.NET Web Framework, using the Web Forms model. This model is based on Web Forms (.aspx files) and Web User Controls (.ascx files), as well as Web Controls (which are compiled as part of a class library).
Every page in DotNetNuke is a Web Form – in fact every page is the same Web Form – Default.aspx.
Sections of the page are made up of dynamically injected Controls – most of which are Web User Controls, and in most cases a module is implemented as a Web User Control (.ascx). So in order to create a module we need to first create a User Control.
But not just any User Control.
DotNetNuke needs to know certain things about a module – and conversely the module might need certain things from the DotNetNuke core, so there is an additional requirement that the User Control needs to implement a DotNetNuke interface – IModuleControl
Figure 3: The IModuleControl interface which defines a Module Control
|
    public interface IModuleControl
    {
        Control Control { get; }
        string ControlPath { get; }
        string ControlName { get; }
        string LocalResourceFile { get; set; }
        ModuleInstanceContext ModuleContext { get; }
    }
|
To make life easier for module developers, the core provides a few base classes which already implement this interface and which can be used as a base by module developers.
- PortalModuleBase – this was the original base class for all modules – In DotNetNuke 5.0 the requirement was modified to implement IModuleControl, and this class was refactored to accomplish this. It exposes a lot of extra properties and methods (in addition to the 5 properties that constitute IModuleControl) – most of which can also be accessed through the ModuleContext property.
- ModuleUserControlBase – this new (in DotNetNuke 5.0) base class is a simple implementation of IModuleControl, based on the UserControl base class. In addition to the 5 members of IModuleControl it adds a simple method LocalizeString which is a helper method for localization.
- ModuleControlBase – this base class (introduced in DotNetNuke 5.0) is based on the WebControl base class (rather than UserControl). To use this base class the module control would be compiled as part of a class library.
Basically all we have to do then is to create a “control” which inherits from any of these 3 base classes. This is the only requirement for building a DotNetNuke Module. There is much more that DotNetNuke offers to module developers, but the minimum requirement is to create a “control” which implements the IModuleControl interface.
For most of the rest of this series we will be using the ModuleUserControlBase class as our starting point, and in part 3 of this series we will actually create our first DotNetNuke module.