Overview
I recently had a customer who wanted to display the search results using a custom format. At first glance, I thought I might need to use a custom Search Input module along with a customized Search Results module. With a little slight of hand, and some quick thinking, I was able to perform the task by copying two ascx files, creating a new .dnn file and uploading the new "module" to the website.
Because the format required used the standard "fields" already available on the core Search Results module, I figured I could just create a new "skin" page for the Search Results module and everything should just work. Now you might be asking yourself how do you "skin" a module. The answer is the same as how you "skin" a DotNetNuke site. You create an ascx page that inherits from the common base class and then "register" that new ascx page as a module/module control. You will now have a new module with the same behavior as the original, but with a different appearance.
Create the "Skin"
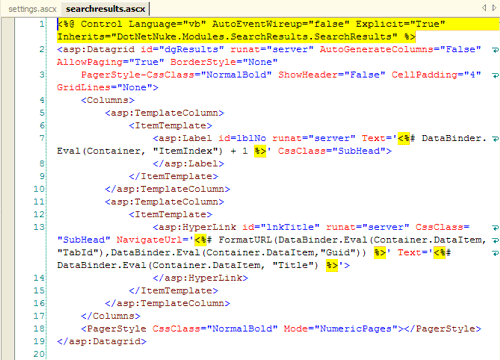
To create my skin, I just copied the standard Search Results module ascx and gave it a new name. Since it is just a skin, I removed the codebehind attribute from the Control directive at the top of the file (see figure 1).

Figure 1: SearchResults.ascx
Notice that I have also removed several tags from the second TemplateColumn/ItemTemplate. This is the new layout that the client requested. Because I am not adding any additional fields and I verified in the original codebehind that DotNetNuke does not directly reference any of the server controls in that template, then I should be done with editing this file.
Now that we have the search page complete, we can move on to the settings page. This is a simple copy operation. I chose not to change this screen because every control is referenced from the codebehind. Since I do not want to rewrite the codebehind, I just left things as they were. Again, I removed the CodeBehind attribute, but left the Inherits attribute (see Figure 2).

Figure 2: Settings.ascx
Package the Module
Now that we have our two user control "skins" complete, we are ready to package up our new module. To do this we create a simple DNN module manifest file.
<dotnetnuke version="3.0" type="Module">
<folders>
<folder>
<name>IP SearchResults</name>
<friendlyname>IP Search Results</friendlyname>
<foldername>IP SearchResults</foldername>
<modulename>IP SearchResults</modulename>
<description>This is a custom skin for the search results.
</description>
<version>01.00.00</version>
<businesscontrollerclass>
</businesscontrollerclass>
<modules>
<module>
<friendlyname>IP Search Results</friendlyname>
<cachetime>0</cachetime>
<controls>
<control>
<src>searchresults.ascx</src>
<type>Anonymous</type>
</control>
<control>
<key>Settings</key>
<title>Search Results Settings</title>
<src>settings.ascx</src>
<type>Edit</type>
</control>
</controls>
</module>
</modules>
<files>
<file>
<name>searchresults.ascx</name>
</file>
<file>
<name>settings.ascx</name>
</file>
</files>
</folder>
</folders>
</dotnetnuke>
One item to note in the manifest: I have set the Key for the settings.ascx to the value "Settings". The "Settings" value has magical qualities and as a result our settings screen will appear on the standard module settings screen as another settings block. Without this value we would have no way to access our settings screen because the original code did not support a custom edit screen beyond this "special" version.
Now that our module manifest is complete, just add the three files to a zip file and you are done creating your custom SearchResults skin. Upload it to your site and you are ready to go.
To keep my work to a minimum, I decided to hijack the existing search results page. It was already created and would be a great place for my new search module. I fired up the website and entered a search term in my SearchInput text box, then hit return. This took me to the hidden search results page. I figure that this is much faster than going to the Admin/Pages screen and then finding the search results page and then selecting the view button. This shortcut takes one step and can be done from any page on the site where the search box is located. Being logged on as Admin, I was then able to delete the old search results module and add in my new module.
Houston we have a problem
It seems that the original Search Input skin-object for DotNetNuke uses a little trick to find out where to redirect the user to view the search results. The skinobject gets the tabid of the tab on which the first "Search Results" module is located using the following code snippet:
Dim objModules As New Entities.Modules.ModuleController
Dim searchTabId As Integer = objModules.GetModuleByDefinition(PortalSettings.PortalId, "Search Results").TabID
This means that my custom search results module, whose module definition name is "IP SearchResults" will not be found and will result in an "Object reference not found" error on the page where we enter the search terms. I figured that my clients web visitors would not find these "results" to be of much use so I needed to find a way to make things work.
Well, if the code is just looking for the tabid of the "Search Results" module, then why couldn't we just move the original search results module back to the Search Results page. I went to the recycle bin and restored the module back to its rightful place. But now I had two modules on this page which would display the results. Clearly this is not what the customer wanted. By making the original search results module viewable only by administrators, adding a header to the module from the module settings screen which explained the purpose of the extra module, and limiting the result set to 1 entry, I was able to minimize the performance impact and hide the "hack" from general site visitors.
All-in-all, not a bad hack for 30 minutes of work. I now had a custom search results "module" for my customer, and I didn't have to write one single line of code to make it work.
You can download the code from my website: TAG Software.