WebMatrix is Microsoft’s new suite of technologies designed to make creating websites easier. There are four major components to the new WebMatrix “Web Stack”
- IIS Developer Express – a new free lightweight web-server, based on IIS 7, that runs on all versions of Windows and does not require Administrator level permissions
- SQL Server Compact Edition – a lightweight file based database that is simple to set up and free to download.
- ASP.NET “Razor” – a new view-engine option for ASP.NET that can be used to easily embed C# or VB code within an HTML page. This is “bin” deployable and free.
- WebMatrix Tool – a free lightweight developer IDE that integrates all the components.
In previous articles in this series I described how the WebMatrix IDE can be used to Setup, Publish and Update your DotNetNuke website.
In this article I turn to another component of the WebMatrix suite – the Razor scripting engine and ASP.NET WebPages, and how we can use these components in DotNetNuke.
ASP.NET WebPages and Razor
First lets take a quick look at WebPages and Razor. In ASP.NET WebForms – the technology used for DotNetNuke, most of the time we keep our HTML and our code separate – the HTML in “MyControl.ascx” and the code in “MyControl.ascx.vb”, but sometimes we find ourselves writing snippets of code directly in the HTML – because it is so much quicker (and easier).
Figure 1 – Inline Code in FileManager.ascx
|
 |
The <% … %> delimiters – nicknamed “bumble-bees”, because of their default syntax highlighting - are used to switch from HTML to code and vice-versa. The parser is not smart – and requires the delimiters to switch back and forth.
Razor simplifies this HTML <—> code switching. It uses a single character to switch from HTML to code the “@” symbol, and by being much smarter a delimiter to return to HTML is often not necessary.
Figure 2 – Example Razor Code
|
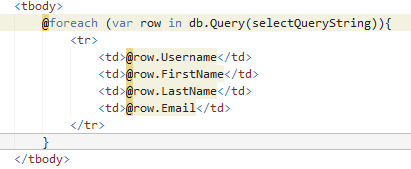 |
Note that we only have 5 “@” signs in this block of Razor code - this is because Razor is smart enough that once a statement is complete e.g.. after @row.Username – if the next character is not valid C# it assumes that it must be HTML, and switches context. Likewise the parser is smart enough to know that if we start a C# block with “{“ then at some later stage we will want to close it with “}” so the closing “}” does not need delimiting.
So that’s Razor – in future blogs I will dive deeper into Razor syntax. But how can we use Razor scripts in DotNetNuke.
Well the answer lies in the second piece of the puzzle – ASP.NET WebPages. This is a new lightweight WebPage Framework that uses the Razor syntax. An ASP.NET WebPage is a “cshtml” – C# or vbhtml – VB.NET file that uses Razor syntax.
We can use the WebPage Framework to load a Razor script file, parse it and return the resulting HTML.
The Razor Host Module
In addition to the new bits that are available as part of the WebMatrix suite, the Razor parser and the new WebPages Framework requires ASP.NET 4.0. As we still wish to retain compatibility with ASP.NET 3.5 we cannot directly integrate support for Razor scripts into DotNetNuke.
Therefore, our approach to providing support for Razor scripts is to provide a “Razor Host” module. If DotNetNuke users wish to use Razor scripts as part of their sites, they will need to install this module.
A Beta of this module will be available this month, based on the current WebMatrix Beta.
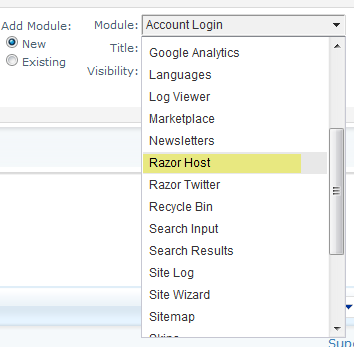
An instance of this module can be added to a page in the usual way by selecting it from the Ribbon Bar (see Figure 3)
Figure 3 – Adding a Razor Host Module to a Page
|
 |
The resulting Module will look like this (Figure 4)
Figure 4 – Razor Host Module on a Page
|
 |
The Razor Host Module is capable of displaying any Razor script that is provided to it. The script can be selected in the Module Settings (Figure 5).
Figure 5 – Selecting the Script to Display
|
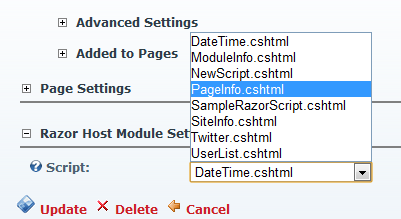 |
Here you can select one of the Scripts available. In this case, I have selected the “PageInfo.cshtml” script, which displays information about the current Page. Once you have selected a script, and clicked Update the “Host” Module will process the script and render its results.
Figure 6 – The Rendered Razor Script
|
 |
So that’s how we can select a previously created script, but how can we edit or create scripts. You will notice that when a user with Edit rights is logged in that there is an “Edit Script” Action Button (which is also available on the Action menu). Selecting this Action will bring up the “Edit Script” control (Figure 7).
Figure 7 – The Edit Script Control
|
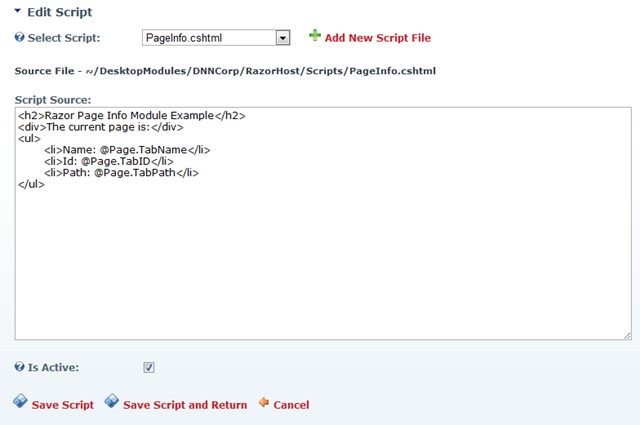 |
This control allows you to:
- Add a new Script File
- Choose a Script file to Edit.
- Modify the Script source in the Text Area.
- Set the current Script to be the Active Script (Is Active) – as an alternative to choosing the “Active” script in the Module Settings.
- Save the Modified Script.
The script files are all stored in the “Scripts” sub-folder.
The Text Area does not provide any Syntax Highlighting (or Syntax checking). But if you want some “Syntax Highlighting” you can use the WebMatrix IDE to modify the script files (Figure 8).
Figure 8 – Editing a Razor Script in WebMatrix
|
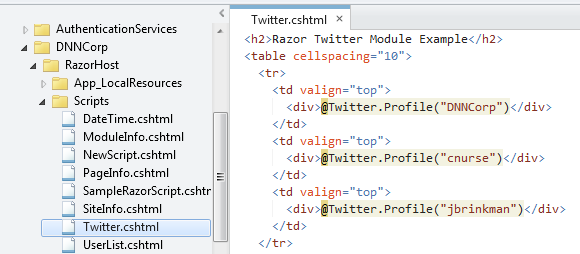 |
Note that the C# code has a different highlighting than the HTML.
What’s Next?
As mentioned earlier in this blog, this prototype module will be made available for separate download soon, so you will be able to start writing your own Razor scripts (or using scripts provided by others).
Microsoft will be providing a number of Helper methods to simplify common Web tasks, such as using a Gravatar, displaying a Twitter Feed, or sending an email, and we will do the same to provide Razor script writers access to the DotNetNuke API.
Over the next few weeks (and months) we will be enhancing this module so that when the final RTW version of WebMatrix ships we will be able to provide an “out-of-the-box” solution to allow users to take advantage of this new technology.
This article is cross-posted from my personal blog.