The Gooddogs DotNetNuke Technology Template includes the Blueprint CSS Framework, and this blog post/video will show you how to use the framework to control the formatting of your module’s output.
NOTICE: This is a work in progress. The template is not complete, during the course of this series we will be enhancing and tweaking the template as we build a new DotNetNuke module using these advanced technologies. The template is being released as-is so that you can download it and follow along, or participate by helping with the development. You can certainly use the template in it’s current state to build a DotNetNuke module, however, you will have to do some things manually for now until the template is complete. If you have any question at all, do not hesitate to contact me directly
The “Let’s Build a Module” series
1. Project Introduction
2. Downloading, Installing and Using the Template
3. Output Formatting
The Blueprint CSS Framework is a ‘grid-based’ css stylesheet that you can apply to your module, or any html based web page to provide a relatively easy way to control output formatting.
The basic concept is that you create ‘divs’ for the ‘sections’ of your output, then apply classes to them which provide positioning and some visual UI elements like colors, borders, images, etc. The resuls of using a framework like Blueprint, is very clean markup in your view, with all of the positioning and visual attributes provided by the included blueprint stylesheet.
Getting Started:
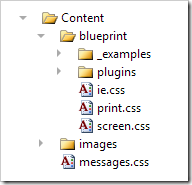
The project template comes pre-configured with Blueprint installed. You can find the Blueprint resources under the “Content” folder of your solution

figure 1. Blueprint CSS Framework resources
The Gooddogs DotNetNuke Technology Template will load the necessary stylesheets via the “module.css” file, which is automatically included in your module controls by the DotNetNuke frameowkr, so you do not have to remember to add the “link” statements to your views. The Blueprint classes will automatically be available for you to use in any of your module controls.
I won’t go into a lot of detail about using Blueprint, you can read the Wiki and Tutorials on their web site for more information.
However, just understand that the basics are as follows:
1. add a “div” around your entire module’s output and give it a class named “container”
2. decide on the width of your overall container and add a “span-n” class to the div.
(NOTE: A future blog / video will show you how to use the Blueprint framework to create a ‘responsive’ design that will re-format the output depending upon the width of the pane in which it’s being displayed, but for now we’ll start simple and work with a fixed-width module design)
3. for each row of output, decide on the column layout for your content
4. for each column, add a “column” class to the div, and a “span-n” class to set it’s width.
5. on the last column of a row, add a “last” class. This tells Blueprint the row is done and to start the next column on the next row.
There are many other classes you can add to your divs to control formatting and visual attributes, see the Blueprint Wiki for more information.
Example:
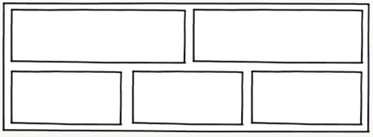
So a module with 2 rows of output, 24 columns wide, with 2 columns equally divided on the first row, and 3 columns equally divided on the second would look like this

The Blueprint markup to achieve that layout would look like this…
<!-- overall module container -->
<div class="container span-24">
   <!-- row 1 -->
   <div class="column span-12" />
   <div class="column span-12 last" />
   <!-- row 2 -->
   <div class="column span-8" />
   <div class="column span-8" />
   <div class="column span-8 last" />
</div>
Really clean markup, isn’t it? And easy to adjust complex layouts by changing the
span-n values to adjust column widths.
Specially formatted Message Boxes
The Gooddogs DotNetNuke Technology Template also includes a special stylesheet named “messages.css” which is located in the “Content” folder. It provides some specialized classes for user messages such as "info”, “error”, “warning”, etc.
You can see the different classes on the “Demonstration: page of a newly created module project using the template.
Demonstration Video
The following video demonstrates the Blueprint concepts and how to format the output of your module using the Blueprint classes.
Coming up next…
The next entry in this series will look at the Entity Framework and WCF Data Service components of the template, and how they are used to provide the data access layer for your module.
Thanks for reading …