 DotNetNuke has a lot of great features that come built-in, but there are often situations where the default implementation is not what the customer wants for their website. This was a big limitation of early versions of DotNetNuke – changing basic functionality often required the user to customize the core DotNetNuke code.
In DotNetNuke 2.0 all of that began to change with the introduction of Providers in the framework. This is also where we began focusing on a rich extensibility model that would allow users to install skins, skin objects, and modules as separate packaged extensions. Over time, the framework has evolved to include different extension types, and in DotNetNuke 5.0 we moved to a unified extension model that treats all extension types in a similar manner during the install and uninstall process.
One of the extension types that was added in the last couple of years was the Authentication Provider. Unlike most other providers, an authentication provider is not configured in the web.config and actually looks and behaves more like a module than an actual provider.
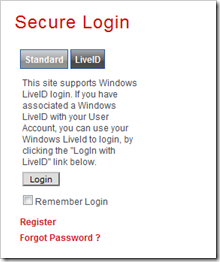 An authentication provider installs up to 3 UI elements that the framework cares about – a login control, a settings control and optionally a logout control. It is certainly possible to use more controls if needed, but these are the only three the core framework interacts with directly. Once installed the authentication provider can appear as one option in the standard DNN login. In the image to the left you can see the standard login on DotNetNuke.com with the LiveID tab selected. This clearly shows a different UI than the standard username and password.
Recently there has been a lot of discussion around a change made to recent versions of DotNetNuke. In the past, it was possible to define a custom login page and put the Account Login module on the page. This allowed you to create an SSL enabled login page or to put a login control directly on the home page. Unfortunately, users would sometimes change the custom login page setting without putting a login module on the page. In other cases, the login module would be added to the page, but the user wouldn’t have permission to see the page or the control. Recent versions of DotNetNuke try to detect this situation and prevent you from setting the custom login page to a location without a login control that is visible to unauthenticated users.
Unfortunately, there are a number of third party login modules currently on the market which are not implemented as Authentication Providers and this new behavior makes it impossible to use them with the latest DNN release. We’ll work on the behavior change to make it possible to use these modules but I thought that this highlights one of the issues with DNN. When we introduce an official extensibility point, we then start coding the core to use and rely on extensions which conform to the extensibility model. If you are coding a skin object that doesn’t conform to the official model then we may well break your skin object in future DNN releases. The same is true with Authentication Providers. Had these modules been code as Authentication Providers instead of Modules then they would have continued to function.
The real failure in this case rests with the core team and not the module vendors. When we introduce new features we often haven’t had the resources to fully document how to take advantage of the new feature. This is especially true for core API changes. The end result is that the core team ends up coding to the new APIs long before 3rd party vendors start upgrading their extensions. The biggest reason for this is because we haven’t done a good enough job in documenting how to use the new feature.
With all of this as background, I thought it would be good to run through exactly how to create your own custom Authentication Provider. In this example, I am going to start from the standard DotNetNuke Authentication Provider. For the sake of simplicity, I am going to code this as a WSP project, although the techniques apply just the same to a WAP project (LiveID, OpenID and AD providers are all WAP based implementations).
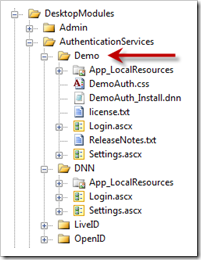 The first thing I do is make a copy of the DNN Authentication provider which is located in the DesktopModules/AuthenticationServices/DNN folder. I have renamed my copy to Demo so that we can distinguish it from the original. I have gone into the Login and Settings controls and changed the namespaces to avoid collision and changed them from DotNetNuke.Modules.Admin.Authentication to DotNetNuke.Modules.Admin.Demo.Authentication.
At this point I have a useable Auth Provider, but I don’t have a method to install it. I could use the Host/Extensions page to create a new package but since this is my first time I decided to build my manifest file using the manifest from the LiveID Authentication Provider as a template. After making a few modifications to the manifest to add a CSS file (more on that in a minute) and to fix some file names, I am almost ready to zip everything up.
<dotnetnuke type="Package" version="5.0">
    <packages>
        <package name="DNN_DemoAuthentication" type="Auth_System" version="01.00.00">
            <friendlyname>DotNetNuke Demo Authentication Project</friendlyname>
            <description>The DotNetNuke Demo Authentication Project is an Authentication provider for DotNetNuke that shows how easy it is to create your own custom auth provider.</description>
            <owner>
                <name>DotNetNuke Corporation</name>
                <organization>DotNetNuke Corporation</organization>
                <url>www.dotnetnuke.com</url>
                <email>support@dotnetnuke.com</email>
            </owner>
            <license src="license.txt" />
            <releaseNotes src="ReleaseNotes.txt" />
            <dependencies>
                <dependency type="CoreVersion">05.00.00</dependency>
            </dependencies>
            <components>
                <component type="AuthenticationSystem">
                    <authenticationService>
                        <type>Demo</type>
                        <settingsControlSrc>DesktopModules/AuthenticationServices/Demo/Settings.ascx</settingsControlSrc>
                        <loginControlSrc>DesktopModules/AuthenticationServices/Demo/Login.ascx</loginControlSrc>
                        <logoffControlSrc/>
                    </authenticationService>
                </component>
                <component type="File">
                    <files>
                        <basePath>DesktopModules/AuthenticationServices/Demo</basePath>
                        <file>
                            <path>App_LocalResources</path>
                            <name>Login.ascx.resx</name>
                        </file>
                        <file>
                            <path>App_LocalResources</path>
                            <name>Settings.ascx.resx</name>
                        </file>
                        <file>
                            <name>Login.ascx</name>
                        </file>
                        <file>
                            <name>Settings.ascx</name>
                        </file>
                        <file>
                            <name>Login.ascx.vb</name>
                        </file>
                        <file>
                            <name>Settings.ascx.vb</name>
                        </file>
                        <file>
                            <name>license.txt</name>
                        </file>
                        <file>
                            <name>ReleaseNotes.txt</name>
                        </file>
                        <file>
                            <name>DemoAuth.css</name>
                        </file>
                    </files>
                </component>
            </components>
        </package>
    </packages>
</dotnetnuke>
Before packaging the system however, I want to make some changes to the login controls just to make it a little clearer when I am using my new control versus the standard DNN version. The DNN login uses tables for handling the form layout, and I am going to use a definition list. I also want to get rid of the help icons next to the form labels and use some different styling on the actual textboxes. Finally, I want to get rid of the Captcha control.
The first step is to clean up the login HTML
<%@ Control language="vb" Inherits="DotNetNuke.Modules.Admin.Demo.Authentication.Login" CodeFile="Login.ascx.vb" AutoEventWireup="false" Explicit="True" %>

<dl id="DemoLogin">
    <dt><asp:label id="plUsername" controlname="txtUsername" runat="server" resourcekey="Username" /></dt>
    <dd><asp:textbox id="txtUsername" columns="9" width="150" cssclass="NormalTextBox" runat="server" /></dd>
    <dt><asp:label id="plPassword" controlname="txtPassword" runat="server" resourcekey="Password" /></dt>
    <dd><asp:textbox id="txtPassword" columns="9" width="150" textmode="Password" cssclass="NormalTextBox" runat="server" /></dd>
    <dt id="verifyLabel" runat=server visible="false" ><dnn:label id="plVerification" controlname="txtVerification" runat="server"/></dt>
    <dd id="verifyControl" runat=server  visible="false"><asp:textbox id="txtVerification" columns="9" width="150" cssclass="NormalTextBox" runat="server" /></dd>
</dl>
<asp:button id="cmdLogin" resourcekey="cmdLogin" cssclass="StandardButton" text="Login" runat="server" />
After making these changes I make the corresponding changes in my code-behind to remove references to the captcha control and to update the visibility code for the verification control/label. This is pretty much all that is needed for the Login control.
The next set of changes are made to the settings control. We need to make sure that we are saving our control settings using unique settings keys (although you are free to store your settings using whatever method you are comfortable with). In this case I create a new DemoAuthConfig class to replace the core AuthenticationConfig class. I then go back and update the settings and login pages to reference my new config class rather than the old class. I also remove all references to the captcha setting since I am not using it here.
Finally, I want my login control to have it’s own look which I may choose to surface on the settings page at some point. To handle this I include a CSS file in my project since I don’t want end users to have to muck around trying to edit core CSS files. My CSS file changes the way the definition list is displayed to show up as two columns.
One last bit that I need to update is to edit the login.ascx.resx resource file. This resource file contains the Title.Text resource which controls the tabname that is used when displaying the various login controls. In my case I used “Demo Auth” for my Title.Text.
At this point I am ready to package everything up in a zip file so that it is ready for installation. Installing an authentication provider in DotNetNuke 5.0 is exactly the same as installing a module. Navigate to the Host/Extensions page and select the “Install Extension Wizard” option from the module action menu. This will walk you through the installation process.
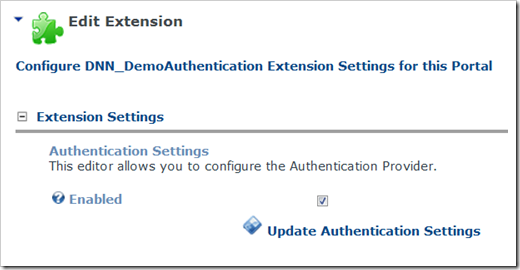
Once the provider is complete, you will need to go to the Host/Extensions page and edit the new Authentication Provider settings to make sure it is enabled (it should be enabled by default). To edit the settings, click the edit (pencil) icon next the the DNN_DemoAuthentication extension listing.

You should see the following settings which allow you to enable or disable this authentication provider for all portals.
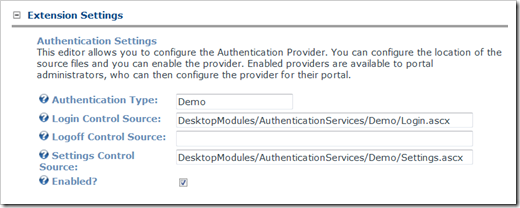
Once the provider is enabled at the Host level, you are now free to go to each portal and enable the provider for each portal where you wish to use it. Just go to the Admin/Extensions page and click on the edit (pencil) icon for the demo auth provider to bring up our custom settings page. Now we can enable our new AuthenticationProvider.
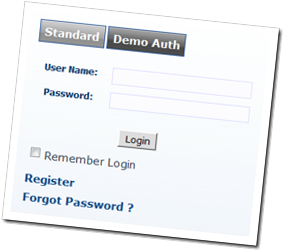
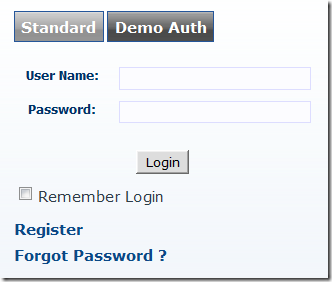
If you have followed along to this point, when you go to the login page, you should see two authentication types – Standard and Demo Auth. If you look at the Demo Auth page, you will notice that the “help” icons are removed and the text boxes are displayed using a custom style.
At this point you should be ready to create your own custom Authentication provider which plugs into the standard login system. This is the recommended method for providing custom layouts and authentication types for DotNetNuke and I highly recommend you check it out.
Download the demo code DemoAuth.zip