 The past couple of months I have spent a decent amount of time working on DotNetNuke 6.0. To be a little more specific, I (and several others) have been focusing on updating the user interface. If you have seen CTP 3, or read Joe’s blog post, you have already been introduced to some of the user interface changes we have going on. Although it may not seem like it, there was a lot of work and planning that went into overhauling the user interface in 6.0.
A few of the changes:
- jQuery UI inclusion w/ 6.0 core framework
- DotNetNuke client-side plugins that utilize jQuery UI
- Partial rendering support enabled for all module controls (where it made sense)
- A Module Actions update
- A common form pattern used across all core admin & host modules
- A control panel update
- New Icons & API
- Additional Telerik Control Wrappers (Should be all as of latest release)
Because I recently finished up converting some admin and host modules, I thought now would be a good time to look at implementing the form pattern in a custom module I wrote. The remainder of this post is my account of that process along w/ downloadable examples. You can also find some good examples in the core admin modules in 6.0 (like site settings) which take advantage of the new client-side plugins. Please note, this is meant to serve as a quick example.
jQuery & jQuery UI (ViewEntries.ascx)
To get started, I simply installed the source view of my Contest module into a DotNetNuke 6.0 I already had locally (you could use CTP 3 or wait for the upcoming Beta – the beta date is still TBD but should be within the next week).
After installing and placing the module on a new page, I realized I already had a problem. My module actions menu (which is now a DDR menu) and the control panel’s mega menu (also DDR) were no longer functioning. This was because I was loading a specific version of jQuery UI (which resulted in 2 versions of jQuery UI being loaded on the same page). To correct this, I utilized the new core method: jQuery.RequestUIRegistration in my module’s OnInit method. This also allowed me to remove jQuery.RequestRegistration (which registers jQuery itself) because this new method will handle that for me. I removed my previous way of registering jQuery UI and after a recompile my module was working as expected and the initial view loaded fine.
Before moving on… what you register in your module, if anything, depends solely on what controls/javascript/plugins you are using in your module. If you need only jQuery, call the jQuery.RequestRegistration (server side) method. If you need jQuery UI, call the jQuery.RequestUIRegistration method. If you want to utilize any of the jQuery UI controls used in the admin & host interfaces like module settings (client-side dnn plugins), use jQuery.RequestDnnPluginsRegistration. Each method will register jQuery, and then jQuery UI if applicable. In the next screenshot (which was taken from Host Settings), you can see the jQuery and jQuery UI integration options that are part of DotNetNuke 6.0.

Now, with my module working as it was before and an explanation of the jQuery updates out of the way, it is time to move on. (If you are curious, this control is used to display a list of the contest entries, and a user can vote from this screen.)
Basic Form Pattern (Settings.ascx)
To view the Settings.ascx control in the Contest module, you simply need to select the ‘Settings’ module action. As with previous versions of DotNetNuke, module developers can have a control of their own loaded into the module settings. Below is a screenshot of the module settings control w/ the Contest module’s Settings.ascx shown as-is in 6.0.
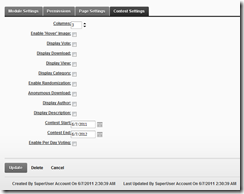
If you haven’t already noticed, the module settings area is now divided into tabs. The custom module control loaded here (in this case, Contest Settings) will always be the last tab on the right. If you can’t tell from the screenshot, this is a simple form with some checkboxes, a few Telerik controls and some dnn labels.
Previously, the module was basically using a div for each item, and I used Css to create ‘two columns’ (one left, one right). Now, by applying some of the new classes that are used in 6’s default.css (dnnForm, dnnFormItem) I was able to consolidate it down into a div for every row (instead of 2), removed NormalTextBox and SubHead classes on all form input areas and labels (textboxes, drop downs, labels, etc.). I was also able to remove 2 classes from my module.css (for left/right placement). I removed any hard coded width assignment, if possible, and the end result of this can be seen below.
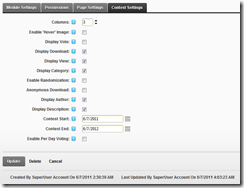
If you are not familiar with 6.0 yet, the module settings screen (shown above) looks very much like any other ‘form pattern’ based control in 6. In general, forms that follow this pattern (like the Contest module’s Settings.ascx now does) are going to output pretty clean HTML. Below is the source view of HTML from the control.

If you wish to compare or view the changes discussed so far, you can use this link to see the changes them at CodePlex.
Telerik Controls & User Actions (ManageEntries.asx)
This control in the Contest module is used to manage a collection of contest entries (associated by ModuleID). It contains some Telerik controls and it already had partial rendering enabled, therefore the changes required were minimal. To access this control, simply select the “Manage Entries” module action of the module. Here is a look at the control in 6 before any changes were done.

To get started on this control, I removed the extra Ajax panels and converted the Telerik controls to their properly wrapped DotNetNuke counterparts. I also made sure I wrapped the entire ‘form’ in a single div w/ a class set that is custom to my module.css. Next, I changed my cancel button to a hyperlink (instead of a link button) and set it’s URL to my module’s home page (ie. NavigateURL()). I then removed the module action I was rendering (which was to add an entry) and made it a new hyperlink (and placed it by the cancel hyperlink).
Then, I updated the css class assigned to the buttons (made the ‘add’ link use dnnPrimaryAction, because it is the primary action the user will take on this page, and made the cancel link use dnnSecondaryAction). I also created an unordered list, assigned the “dnnActions” css class to the ul and then put my links inside of it as list items. Please note, the primary action should always be the one on the left.
Finally, I added a ‘No Records’ template to the DnnGrid and styled and localized it’s value. The end result of which can be seen in the next screenshot. If you would like to view the code/HTML changes for this section, you can do so here.

More Form Pattern & Plugins (EditEntry.ascx)
This control is used to edit existing contest entries as well as create new ones. You can get to this view by clicking the “Add Entry” button shown in the last section. Once there, you should see something that looks similar to the screenshot below.
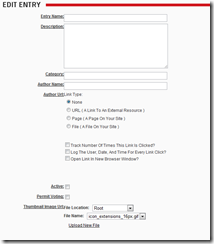
Although not absolutely necessary, I decided (for the sake of an example) to divide this page into smaller sections that should be easier to work with for end users of the module (In general, I prefer to limit the amount of ‘stuff’ in front of the user at any given time). Based on what is available in 6.0, I had a couple of options for doing this. I could use either tabs or panels (both of which utilize jQuery and our plugins).
To get started with this control, I applied the normal form pattern updates (discussed in the previous 3 sections) and left the rest of the module unchanged. I compiled it and this is what I ended up with (You can view the changes discussed in this section so far here).
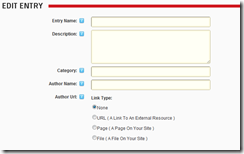
Now, to utilize the panels I am going to need to break the fields up into logical groups. For this module, it seemed like a good fit to have 3 sections. Because I have 3 sections, it was a perfect fit for the panels (In general, 3 or more logical groupings are recommended). Luckily, the dnn client-side plugins make integration into my module easy. I don’t want to get too far into the details in this blog, you can view the examples to see more. Also worth noting, if you review the example, is that I used the dnnConfirm client-side plugin for delete confirmation in the module. This utilizes jQuery UI.
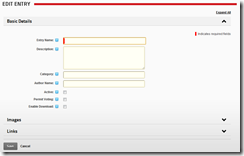
After I finished rearranging the control, I also added some validation and made the Entry Name field required (if viewing source, notice the updated fields and Css class addition). A sample of the module in it’s current (and for now, final) state can be seen below.
There are a few more things I could do with the module at this point, but for now I think it looks consistent with the 6.0 administrator and host modules (which is what I set out to do). When a beta of 6.0 comes out, I will compile a Beta release version of the contest module and post it for download.