 I have been using Windows Live Writer (WLW) for a few years now. I really love WLW for writing my blog. In fact I loved it so much that it was one of the reasons I had shifted my personal blog to BlogEngine.net. At the time, the DotNetNuke Blog module did not support a posting API which could be used with WLW. You don’t know real pain until you have tried to write a blog post with nothing but a web based rich text editor. Once you lose one or two posts because of a session timeout or your post gets mangled because of the way the editor handles script blocks or xml blocks, you will quickly swear off all blogging with an RTE.
Once I started using BlogEngine, I came to really appreciate some of its features. It really tries to leverage the capabilities of WLW to make the blogging experience as pain free as possible. One feature that I use quite a bit is the ability to split my blog into a summary along with the full post just by including the “[more]” tag in my post. Everything before the tag will be used when displaying the blog summaries. The entire content will be displayed when viewing a specific blog post. This is great, although it does limit your ability to craft a great summary that differs from the opening of your blog post.
Unfortunately, the DotNetNuke Blog module does not support the “[more]” tag. If you don’t provide a summary when creating a post for the Blog module, then it will try to create a summary using the first 1000 or so characters. This rarely works with my blog posts and even when it works it is generally not optimal. Because I usually include an image at the top of my posts, the auto-summary feature usually just chokes and I am forced to hand enter a summary for my blog on DotNetNuke.com. This is definitely a problem. My blog posts often include coding examples. When I edit a blog post just so I can hand craft the summary, it also has the side effect of opening the main blog content in the RTE which then reformats my code blocks when I go to save the summary. Hello mangled code samples.
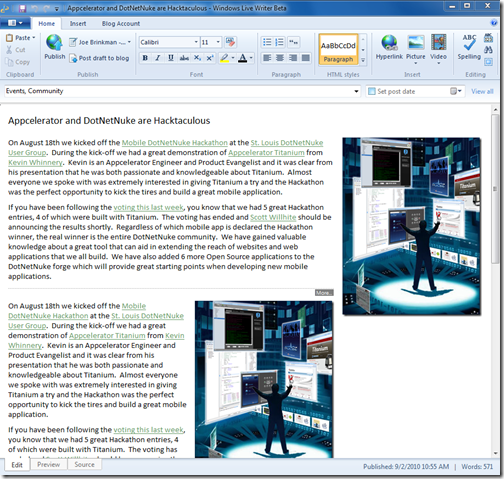
Recently, while reviewing my Hacktaculous post, I re-opened it using the new WLW Beta. Imagine my surprise when I was greeted with this image

Notice that this post includes both my summary as well as the full post and is separated by a dotted line with the word “More…”. In looking at the source tab I see in the HTML that I have both a summary section and the full content section separated by <!—more—>. This is awesome!
After playing around with this for a bit, I found that the DotNetNuke Blog fully supports this feature. I can create my summary along with my full blog post all within WLW. When posted to a DotNetNuke Blog, the summary and blog content are both posted correctly and I no longer have to hand edit my entry after posting to my company blog on DotNetNuke.com. Now I can have real summaries which are not just the first couple of paragraphs of my blog post and I don’t have to worry about mangling my code examples. After a little further research I found that there is a “split post” button on the insert tab on the new ribbon bar. This button inserts the magical <!—more—> comment tag into my post.

I don’t know how long this feature has existed in WLW or how long it has been supported by DotNetNuke Blog. For me it is brand new. As a fairly prolific DotNetNuke blogger, I am betting that it is probably new for many others in the DotNetNuke community as well.