
I have often heard it said that people have difficulty creating skins for DotNetNuke. I am always baffled when I hear these comments especially in light of what I see in the competing skinning engines on other platforms. In this series of posts I’ll be looking at the basics of DotNetNuke Skinning, creating a complete DotNetNuke skin and associated containers, dispelling a few Myths and Misconceptions about DotNetNuke Skinning and finally we’ll wrap up the series by comparing the DotNetNuke skinning engine with those of some other web platforms.
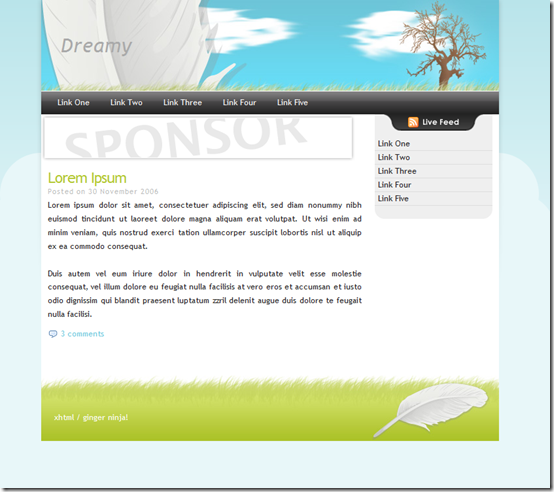
During the course of this series, we’ll be working towards building and packaging a skin that is based off of the Dreamy design template from the Open Source Web Design site. This template uses a very simple design layout which should work well for explaining the basic concepts of DotNetNuke skinning.
Packaging
History
One of the great strengths of the DotNetNuke platform over the past 6 years has been the rapid growth of the ecosystem for modules and skins. Very early in the project’s history we realized that in order to promote redistribution of extensions, we needed a standard method to package modules. At the time, one of the community members contributed their code for reading a standard xml file located inside a zip file containing all of the module files. Using this contribution as the foundation, I created the core module installation feature for DotNetNuke. The xml file that controlled the installation process came to be known as the module manifest.
The purpose of the manifest file was to identify key files within the package and designate where they should be installed. This manifest also contained some additional metadata that was necessary for creating the needed entries in the different module tables within DotNetNuke.
Over time, Charles and myself continued to extend the module manifest and the packaging standard so that we could handle more and more installation scenarios. Even with these additions, the manifest and packaging standard was still basically the same as what I had originally built in 2004.
When Skinning was introduced with DotNetNuke 2.0 it used a different packaging standard. Instead of relying on a manifest, it used a convention based approach and depended on having files follow a specific naming standard. This worked well, but it had a number of limitations. Like the module packaging standard, this remained largely unchanged until fairly recently.
A Leap Forward
DotNetNuke 5.0 introduced a new packaging standard that dramatically changed the format of the manifest file and extended it’s use to all DotNetNuke extension packages including modules, skins, libraries, providers and several others. Charles had started working on some of these features in DotNetNuke 4.6, but it was not until the release of 5.0 that the implementation was fully complete.
The DotNetNuke 5 manifest and updated installation system provides greater control and flexibility to extension developers. Now all extensions are first class citizens and share a common packaging standard which greatly simplifies the learning process. Beyond the common format, the new installation system provides a number of additional benefits.
From an architectural perspective, the new installation system is much more modular and extensible. Not only can you install many different types of components, you can even define your own installation component type with its own definition of how the component is specified in the manifest. Each extension can include one or more package, with each package containing one or more components. All of this is extensible so that as we create new types of DotNetNuke extensions, we can continue to use the existing installation system.
From a third party developer perspective, the new system provides greater control and freedom. New metadata types allow you to provide licensing, release notes and developer information that gets displayed during the installation wizard. Developers can create packages which mix and match component types that make the most sense for their extension. Under the original skin packaging system, there was no way to bundle required skin objects with the skin. With the new packaging format you can bundle a skin, container, widget and skin object in a single package. Module developers can package their module with a custom page template that includes an HTML module with instructions to help the user get started with the module. The bottom line is that the new installation system opens up a lot of possibilities for developers and designers.
The new installation system also incorporates several features that simplify common installation problems. Up until DotNetNuke 4.6, changes to web.config required manual edits by the end user. DotNetNuke 4.6 introduced XMLMerge which allows the core framework to update any xml file using XML Merge scripts. The updated installation system incorporates this functionality and makes it available to developers. For example, if your extension requires an HttpModule to be registered in web.config, then the new XMLMerge feature in the manifest allows you to specify how to merge this entry into a customers website, as well as unregistering this entry if the extension is uninstalled.
Packaging In Action
Now that you have a high-level understanding of the new packaging system, I’ll show you see how this translates into actual “code” by packaging up the skin and container that I created in Part 2 and 3. DotNetNuke 5 defines all extensions as a package. When packaging skins and containers, I’ll need to define the various “packages” that are included in the zip file that is used for distributing the skins and containers. The listing below shows the basic structure for the manifest file:
<dotnetnuke
	type="Package"
	version="5.0">
	<packages>
		<package
			name="MySkin"
			type="Skin"
			version="1.0.0">
			...
		</package>
	</packages>
</dotnetnuke>
Each manifest contains a <packages> node with one or more packages defined. Using this structure it is possible for us to define a skin, a set of containers and a skin object all inside a single manifest. This greatly simplifies installation for the end user and ensures that all of the pieces needed for the skin design are installed as a single unit. The root <dotnetnuke> node is boilerplate and will be the same for every manifest. The <packages> node will contain one or more package definitions and this is where the real strength and flexibility of the manifest begin to become apparent.
Each package in the manifest will identify the package type, the version and the name of the package. The package type is used by the system to determine the editor to use when editing the extension on the DotNetNuke Extensions page. There is a set of eleven package types which are defined by the default installation. You are free to create your own custom package types if you desire. For packaging my skin however, I will stick with the standard “skin” and “container” package types. The package version is an important part of the manifest since it is used to determine if the system should install the package. If the package is already installed then the version number listed in the package manifest must be greater than the version of the already installed package. The name attribute is used for determining if the package is already installed. In some installation scenarios the user will be given the option to “re-install” the package if the version number is the same as the installed package of the same name. In no case will a smaller version overwrite an installed package with a larger version number.
Each package has a number of meta-data elements which are used strictly for informational purposes. These elements will be displayed when I install the skin, but otherwise have no impact on system behavior. I’ll want to make sure to enter meaningful values for these elements so that anyone using my skin will have a little bit of information about this skin and the organization or individual that created the skin. The <license> and <releaseNotes> nodes can use the src attribute to designate a file with the text or html for the license and release notes. Alternatively, I could include the release notes and license text within the <license> and <releaseNotes> elements.
<friendlyName>Dreamy</friendlyName>
<description>A DotNetNuke Skin based on the
Dreamy design from www.OSWD.org.</description>
<owner>
	<name>DotNetNuke</name>
	<organization>DotNetNuke Corporation</organization>
	<url>www.dotnetnuke.com</url>
	<email>support@dotnetnuke.com</email>
</owner>
<license src="skinlicense.txt"></license>
<releaseNotes src="skinreleasenotes.txt"></releaseNotes>
DotNetNuke extensions often have dependencies on other packages or system attributes. I might want to use some skinning feature that is only available in a specific version of DotNetNuke, or I might want to use a specific navigation provider and need to make sure it is installed before installing my skin. Using a dependencies element along with one or more dependency nodes allows us to ensure that the DotNetNuke installation meets our specifications thereby avoiding users who get frustrated when the skin does not work properly. DotNetNuke includes the following dependency types: coreversion, package, permission and type. You can also create your own dependency by adding your dependency to a system list called Dependency (I’ll cover this in a separate blog post). For the Dreamy skin, if I want to make sure that DDRMenu is already installed and that the user is running DotNetNuke 5.2.0 or above before installing the skin, then I would add the following dependencies element in the manifest.
<dependencies>
	<dependency type="CoreVersion">05.02.00</dependency>
	<dependency type="Package">DDRMenu</dependency>
</dependencies>
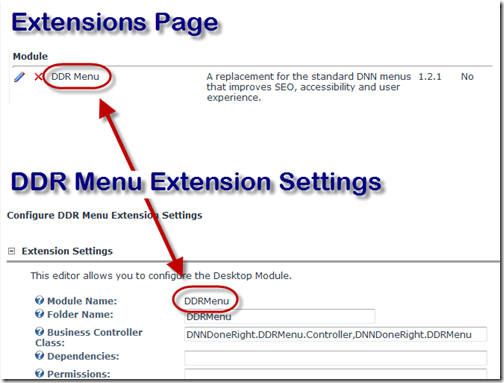
One item to keep in mind is that the name displayed on the Extensions page is the friendly name and not the real name of the installed package. To find the real name that I’ll need in the package dependency, I’ll need to look at the Extension Settings. Notice that on the Extensions page the DDR Menu has an extra space in the name whereas on the Extensions Settings page there is no space in the actual module name.
Now that I have defined the basic properties for my package and configured any dependencies, I need to start breaking my skin into components. Components define how individual files are installed and what elements are registered with DotNetNuke. For example, when installing a skin, I’ll want to make sure to use a skin component so that DotNetNuke knows to parse my html skin files and so that the skin layouts are properly registered. When I create my container package, I’ll replace the skin component with a container component.
<components>
	<component type="Skin">
		<skinFiles>
			<skinName>Dreamy</skinName>
			<basePath />
			...
		</skinFiles>
	</component>
</components>
In total, DotNetNuke includes 16 different component types which provide a lot of flexibility and control:
- File
- Assembly
- ResourceFile
- AuthenticationSystem
- DashboardControl
- Script
- Config
- Cleanup
- Skin
- Container
- Module
- CoreLanguage
- ExtensionLanguage
- Provider
- SkinObject
- Widget
Like many other portions of the installation system, you are also free to create your own component types.
The skin component, which inherits from the file component, allows me to identify files to use with that specific component. These files will be stored in the system relative to the webroot. Inside of the skinFiles node, I will specify the skinName and a basepath. The skinName will be used to create the folder in the portals/_default/skins directory. The basepath is used to further modify the path that is used as the root location for all files in the collection. Generally, the basepath is not needed when creating skin and container components.
The final step in creating a skin manifest is to identify the individual files in the package. Each file element must include the filename as specified in the zip package. Additionally, if I wish the file to be installed in a subfolder of the skin directory, then I will add a path element that specifies the additional path information. This file must also be in the same subfolder within the zip package. Occasionally I will use one structure in the zip package, but want to use a separate structure in the website. In this case, I can use the <sourceFileName> element to specify the path and name of the file in the zip package and then use the <name> and <path> elements to designate the location where the file will be installed. I will create a <skinFile> element for every file that I want to have installed
...
<skinFile>
  <path>images</path>
  <name>submenu_hover.png</name>
</skinFile>
<skinFile>
  <name>Index.ascx</name>
</skinFile>
<skinFile>
  <name>index.doctype.xml</name>
</skinFile>
<skinFile>
  <name>Index.html</name>
</skinFile>
<skinFile>
  <name>Index.jpg</name>
</skinFile>
...
Charles Nurse created a great series of posts on the manifest file format including one on the File component.
At this point I have a complete package defined for my skin and will basically duplicate these steps for the containers. Instead of using a skin package, I will use the container package type, and instead of using a skin component type I will use the container component type.
One goal that I laid out in Part 2 of this series was to package up the DDRMenu with the skin to simplify installation. After thinking this through I decided against that approach. The DDRMenu is not distributed under a license that would allow me to incorporate it into my package. To still show the flexibility of the manifest file, I instead chose to just create a dependency to ensure that the DDRMenu was already installed prior to installing the skin.
While creating the manifest may seem like a lot of work, it is actually quite simple and straightforward. In my case, I will take advantage of the DotNetNuke framework to create much of the boilerplate for me. I start by creating a new extension from the Module Action Menu on the Host/Extensions page.
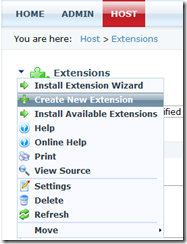
This will open the New Extension Wizard where I will enter some of the basic Skin information.
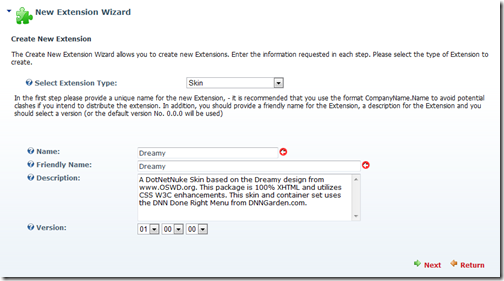
Clicking next allows me to enter information about myself and my organization.

Click next and I am finished defining the basics of my skin. This leaves me on the extensions page where I can use this information to automatically generate an installable package including the manifest file.
Since I have been building my skin directly inside my local DotNetNuke installation, I already have the files located at /portals/_default/skins/dreamy. By clicking on the edit icon next to my new skin on the extensions page, I can see all of the information I have just entered (I’ll ignore the empty License and Release Notes entries for now). On this Package Settings page, if I used the same name for my skin folder as the name entered in the New Extension Wizard, then I will have the option to “Create Package” from the Module Action Menu.
Now I will step through a wizard for packaging my new skin. On the first page I generally choose not to use an existing manifest because I want to use DotNetNuke to build the file list for me. I also like to review any manifest that will be generated.
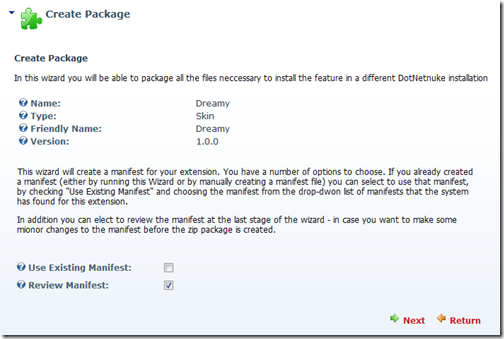
After clicking next, I have the option to define the list of files to include in the package. Since I am building my skin as an HTML based skin, I will exclude any ascx files which may have been generated during my testing.
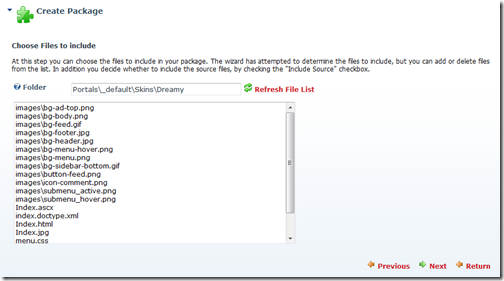
After making sure that all of the files are correct, I click next to see the generated manifest file.
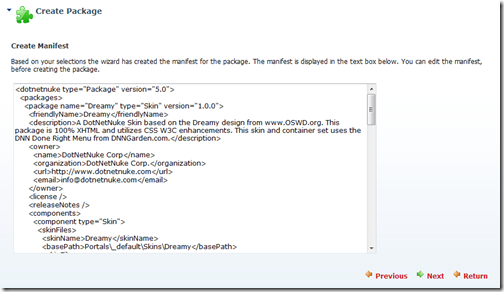
At this point I generally stop since I really just wanted to use the wizard to give me the basic structure and ensure that I captured all of the needed files. I will repeat this same process to get the file list and package definition for my containers as well.
I now have all of the pieces I need for my skin manifest. Combining all of the pieces together and editing the package names to ensure that my skin and container packages have unique names results in the final manifest.
<dotnetnuke type="Package" version="5.0">
	<packages>
		<package name="DotNetNuke.Dreamy.Skin" type="Skin" version="1.0.0">
			<friendlyName>Dreamy</friendlyName>
			<description>A DotNetNuke Skin based on the Dreamy design from www.OSWD.org. This package is 100% XHTML and utilizes CSS W3C enhancements. This skin and container set uses the DNN Done Right Menu from DNNGarden.com.</description>
			<owner>
				<name>DotNetNuke</name>
				<organization>DotNetNuke Corporation</organization>
				<url>www.dotnetnuke.com</url>
				<email>support@dotnetnuke.com</email>
			</owner>
			<license src="skinlicense.txt"></license>
			<releaseNotes src="skinreleasenotes.txt"></releaseNotes>
			<dependencies>
				<dependency type="CoreVersion">05.02.00</dependency>
				<dependency type="Package">DDRMenu</dependency>
			</dependencies>
			<components>
				<component type="Skin">
					<skinFiles>
						<skinName>Dreamy</skinName>
						<basePath />
						<skinFile>
						  <path>images</path>
						  <name>bg-ad-top.png</name>
						</skinFile>
						<skinFile>
						  <path>images</path>
						  <name>bg-body.png</name>
						</skinFile>
						<skinFile>
						  <path>images</path>
						  <name>bg-feed.gif</name>
						</skinFile>
						<skinFile>
						  <path>images</path>
						  <name>bg-footer.jpg</name>
						</skinFile>
						<skinFile>
						  <path>images</path>
						  <name>bg-header.jpg</name>
						</skinFile>
						<skinFile>
						  <path>images</path>
						  <name>bg-menu-hover.png</name>
						</skinFile>
						<skinFile>
						  <path>images</path>
						  <name>bg-menu.png</name>
						</skinFile>
						<skinFile>
						  <path>images</path>
						  <name>bg-sidebar-bottom.gif</name>
						</skinFile>
						<skinFile>
						  <path>images</path>
						  <name>button-feed.png</name>
						</skinFile>
						<skinFile>
						  <path>images</path>
						  <name>icon-comment.png</name>
						</skinFile>
						<skinFile>
						  <path>images</path>
						  <name>submenu_active.png</name>
						</skinFile>
						<skinFile>
						  <path>images</path>
						  <name>submenu_hover.png</name>
						</skinFile>
						<skinFile>
						  <name>index.doctype.xml</name>
						</skinFile>
						<skinFile>
						  <name>Index.html</name>
						</skinFile>
						<skinFile>
						  <name>Index.jpg</name>
						</skinFile>
						<skinFile>
						  <name>menu.css</name>
						</skinFile>
						<skinFile>
						  <name>skin.css</name>
						</skinFile>
						<skinFile>
						  <name>thumbnail_index.jpg</name>
						</skinFile>
					  </skinFiles>
				</component>
			</components>
		</package>
		<package name="DotNetNuke.Dreamy.Container" type="Container" version="1.0.0">
			<friendlyName>Dreamy</friendlyName>
			<description>A DotNetNuke Container set based on the Dreamy design from www.OSWD.org. This package is 100% XHTML and utilizes CSS W3C enhancements.</description>
			<owner>
				<name>DotNetNuke</name>
				<organization>DotNetNuke Corporation</organization>
				<url>www.dotnetnuke.com</url>
				<email>support@dotnetnuke.com</email>
			</owner>
			<license src="containerlicense.txt"></license>
			<releaseNotes src="containerreleasenotes.txt"></releaseNotes>
			<dependencies>
				<dependency type="CoreVersion">05.02.00</dependency>
				<dependency type="Package">DDRMenu</dependency>
			</dependencies>
			<components>
				<component type="Container">
				  <containerFiles>
					<containerName>Dreamy</containerName>
					<basePath />
					<containerFile>
					  <name>container.css</name>
					</containerFile>
					<containerFile>
					  <name>Sidebar.css</name>
					</containerFile>
					<containerFile>
					  <name>Sidebar.html</name>
					</containerFile>
					<containerFile>
					  <name>Sidebar.jpg</name>
					</containerFile>
					<containerFile>
					  <name>thumbnail_sidebar.jpg</name>
					</containerFile>
					<containerFile>
					  <name>thumbnail_title_green.jpg</name>
					</containerFile>
					<containerFile>
					  <name>Title_Green.css</name>
					</containerFile>
					<containerFile>
					  <name>Title_Green.html</name>
					</containerFile>
					<containerFile>
					  <name>Title_Green.jpg</name>
					</containerFile>
				  </containerFiles>
				</component>
			</components>
		</package>
	</packages>
</dotnetnuke>
The last step is to add all of the skin and container files into a single zip file. I need to make sure to keep my image folders intact, but that is relatively straight forward. You can download the complete packaged skin on the Dreamy Skin page on CodePlex.
In Part 5 of the series, I’ll discuss some of the common myths and misconceptions about DotNetNuke skinning.