DNN has a built-in User Registration page. This provides the familiar 'Register new user' popup that is seen when the Register link is clicked.
In some cases, administrators may wish to replace their registration page with a customized registration page, either to provide more content, or to provide a level of protection against bots which attempt to automate user registrations at the known address.
The steps in this article show how to create a customised registration page and block access to the default registration page. Note that the steps should be followed in order, and followed exactly except where noted. Deviating from this path may result in your DNN site becoming inoperable to you or new users. Always take a backup before starting changes like this.
Step 1 : Create new Custom Registration page
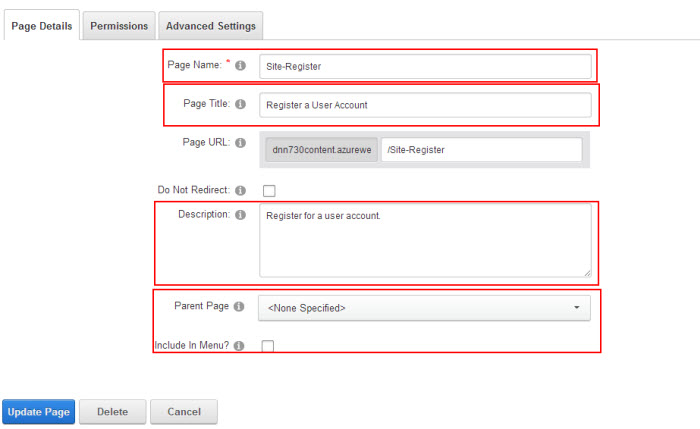
To do this, Add a new page to your DNN site. Give the page a meaningful name, but do NOT call it 'Register'. Something like 'Site Register' or 'XYZ Registration' is a good idea.

Set the page options as follows:
Name : as chosen
Title : as chosen - something along the lines of 'Register for XYZ Access'
Description : as chosen - 'Register today for access to XYZ and get benefit ABC'
Parent Page :
Include in Menu? : Unchecked
Page Permissions : All Users - View
Save the new page. This will be your new registration page.
Step 2 : Add the registration module to the new registration page.
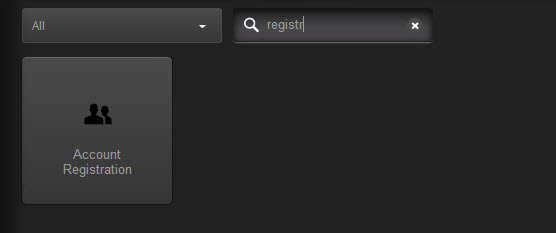
At this point you should be looking at an empty DNN page. Using the 'Add Module' functionality, find the 'Account Registration' module. Add this to the page by dragging/dropping it into a container

At this point, your new site registration page should be showing the Register functionality. The Url for the page should be something like example.com/site-registration or example.com/xyz-registration
For older versions of Dnn the module you should use is "Users and Roles". By default this module is not available from the module list.
To enable this module for your site go to:
Host > Extensions then click the edit button next to the module "Users and roles", scroll down to "Assign Premium modules" and add it to the "assigned" list box, save the module.
Now, from the module list you will see the module.
Add it to you new custom registration page and delete "Security Roles" and "User accounts" so that the only module from "Users and roles" is "Add new account.
Step 3 : Switch your site to use the custom registration page
In this step, you'll change the default registration links to point at the new custom registration page.
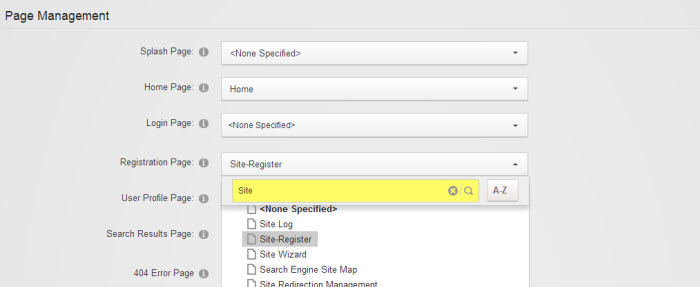
Go into the Admin->Site Settings page, and switch to the 'Advanced Settings' tab. Find the page selection list for 'Registration Page'. Use the drop-down to find the custom registration page you just created, and select it in the list. Click 'Update' to update the site settings.

Step 4 : Repeat for *all* Sites in your DNN installation.
You must repeat this action (create new custom registration page, add registration module, check) for every single site (portal) in your DNN install. If you don't repeat this for every install, you're going to break registration for those sites that you omit. Double check that every site has had a new registration page created. Check the 'Tools->Switch Sites' list in case there are some sites you didn't realise were in this Install.
Step 5 : Check that you have the new registration page set up.
In this step, you're going to verify that steps 2 and 3 were done properly.
Log out (or open a different browser) and browse to your site. If you have public registration, click on the 'Register' link. This should open up your new, custom registration page.
Repeat this for every site in the DNN install
Do not proceed further until you see your new registration page (carefully check the URL to make sure it isn't /register or /register.aspx).
Step 6 : Add a request filter to reject the default register URLs
In this step you are going to block the default registration URLs so that they can't be used to circumvent your custom registration page.
Go to your Host->Host Settings->Other Settings. Find the 'Enable Request Filters' checkbox and check it. You should see the 'Add New Rule' button appear.
Click the 'Add New Rule', and create a rule with these settings:

Server Variable : HTTP_URL
Operation : Regex
Match Value : (?<=\?)ctl=register|(?<!\?)/register
Action : NotFound
Location : (empty)
You must first click the 'Save' button to save the new rule, then you must click the 'Update' button for the Host Settings. If you only click the 'Save' for the rule, it will update the rule, but not activate the Request Filtering.
Step 7 : Check your work
At this point you're finished. What you need to check is :
- You can register by clicking the 'Register' link on your site
- If you request example.com/register, example.com/default.aspx?ctl=register or any other combination for the default registration page, you receive a 404 (note: you will not receive the site 404 page, but a simple 404 rejection)
- Repeat this for every site in your install