 DNN (DotNetNuke) is a great platform. Over the years we have added a ton of features. In many ways DotNetNuke is like a pile of Legos. A lot of users get too focused on looking at one single feature and trying to force that feature to do everything they want. The key to getting the most out of DotNetNuke is understanding how to use the many different features together to create something that is greater than the sum of the parts.
For me this is what I really enjoy with DotNetNuke. I love a challenge and seeing how I can use my pile of DotNetNuke Legos to create a new masterpiece.

Background
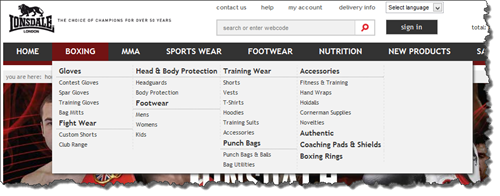
This spring Erik van Ballegoij I had the opportunity to work with the development team at SportsDirect.com to start moving their ecommerce sites over to DotNetNuke. One of the tasks I tackled was how to re-create their existing menus using DDRMenu, which has shipped with DotNetNuke since 6.0. I started with the menu for store.Lonsdale.com since that was the first site of many that was being migrated.
The basic menu structure for SportsDirect websites is a typical mega menu. You have the primary navigation row with each menu represented by one or more lists of links. At first blush it is nothing too fancy. We didn’t have to worry about any fancy icons or other custom graphics which would complicate the layout.

Of course, on further investigation I discovered that things were not so straight forward. Each menu might have a different number of columns and each column in a menu might contain multiple “sub-menus” from the DotNetNuke menu hierarchy. I could have hard-coded some logic into the menu template to deal with this (which is what we did in DNN6 for the Admin and Host menus on the control panel). The downside to that approach is that it is not very flexible.
What I needed was to allow the system to adapt as new sub-menus were created. I also needed to allow SportsDirect to re-use the menu template on multiple websites, where each site will have differing needs regarding how the mega menu is laid out. What I needed was the ability for the SportsDirect staff to apply some meta-data to various pages which would help the menu rendering system determine the appropriate way to display the menu.
Building Menus with DDRMenu
To get started, I first needed to create the basic structures needed for DDRMenu. At its heart most menus consist of a template which will render HTML, a CSS file which contains the styles needed for the menu, and a manifest file for tying everything together.
Before creating any menu with DDRMenu, it is important to know what final HTML structure you want. I typically start with a standalone HTML page which just has an unordered list showing the rough menu hierarchy. It doesn’t have to be exactly the same as your site menu, but it should show several top level menus as well as 2 or 3 levels below the top level. Once you have your menu structure defined and you have the CSS to render it correctly, then you can get down to converting the menu to DDRMenu.
Templates are Key
The DDRMenu is very flexible and offers multiple template types depending on what type of menu you are trying to build. For very simple menus you can use Token based templates. For moderately complex menus you can use XSLT based templates. For the most complex menus you should use Razor templates. You can find examples of all three types in the DDRMenu Templates project
Token based templates use a very simple token based syntax which is very familiar to anyone who has the core framework tokens. Tokens are very limited in their ability to apply logic or branching to your template. If you need anything more complex than a simple “if” statement, then you will want to use another template type.
XSLT based templates are great for the vast majority of menus that you might want to create. XSLT has a couple dozen built-in functions which you can use for building more complex structures. You can do complex evaluations and branching including the ability to do multi-choice processing. The downside is that XSLT is a very quirky language to learn. It can be difficult to learn even for experienced programmers and it doesn’t natively provide you any way to call core DotNetNuke APIs.
Whenever I need to do anything more than what can be handled by simple Token based templates, I resort to Razor templates. They are easier to read than XSLT templates and have far greater capability. Razor templates have full language support in either VB.Net or C# and they have full access to the .NET and DotNetNuke APIs. This makes them very powerful. Of course it does require that your site be at least running .Net 4.0, that the Razor module is installed in your site, and that you know how to program in C# or VB.
Baby Steps
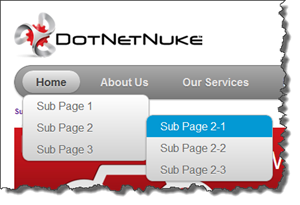
Now that I have outlined the general approach for building advanced menus, I’ll go ahead and build one. I am going to start out with a simple menu using a predefined menu template and CSS. Rather than re-create the wheel, I am just going to use a menu that I found online. There are lots of great CSS based menus available but for my purposes I went with the CCS Dropdown Menu by Web Designer Wall (I chose the variant which didn’t require any images).
The HTML structure for this is pretty straight forward and looks something like this (I trimmed it down as we only care about the basic structure):
 1 <ul id="nav">
 2     <li class="current"><a href="#">Home</a></li>
 3     <li><a href="#">Multi-Levels</a>
 4         <ul>
 5             <li><a href="#">Team</a>
 6                 <ul>
 7                     <li><a href="#">Sub-Level Item</a></li>
 8                     <li><a href="#">Sub-Level Item</a>
 9                         <ul>
10                             <li><a href="#">Sub-Level Item</a></li>
11                             <li><a href="#">Sub-Level Item</a></li>
12                             <li><a href="#">Sub-Level Item</a></li>
13                         </ul>
14                     </li>
15                     <li><a href="#">Sub-Level Item</a></li>
16                 </ul>
17             </li>
18         </ul>
19     </li>
20 </ul>
When combined with the following CSS you get a nice cross-browser CSS3 dropdown menu.
 1 body { font: normal .8em/1.5em Arial, Helvetica, sans-serif; background: #ebebeb; width: 900px; margin: 100px auto; color: #666; }
 2 a { color: #333; }
 3 #nav { margin: 0; padding: 7px 6px 0; line-height: 100%; border-radius: 2em; -webkit-border-radius: 2em; -moz-border-radius: 2em; -webkit-box-shadow: 0 1px 3px rgba(0, 0, 0, .4); -moz-box-shadow: 0 1px 3px rgba(0, 0, 0, .4); background: #8b8b8b; filter: progid:DXImageTransform.Microsoft.gradient(startColorstr='#a9a9a9', endColorstr='#7a7a7a'); background: -webkit-gradient(linear, left top, left bottom, from(#a9a9a9), to(#7a7a7a)); background: -moz-linear-gradient(top, #a9a9a9, #7a7a7a); border: solid 1px #6d6d6d; }
 4     #nav li { margin: 0 5px; padding: 0 0 8px; float: left; position: relative; list-style: none; }
 5     #nav a { font-weight: bold; color: #e7e5e5; text-decoration: none; display: block; padding: 8px 20px; margin: 0; -webkit-border-radius: 1.6em; -moz-border-radius: 1.6em; text-shadow: 0 1px 1px rgba(0, 0, 0, .3); }
 6     #nav .current a, #nav li:hover > a { background: #d1d1d1;  filter: progid:DXImageTransform.Microsoft.gradient(startColorstr='#ebebeb', endColorstr='#a1a1a1');  background: -webkit-gradient(linear, left top, left bottom, from(#ebebeb), to(#a1a1a1));  background: -moz-linear-gradient(top, #ebebeb, #a1a1a1);  color: #444; border-top: solid 1px #f8f8f8; -webkit-box-shadow: 0 1px 1px rgba(0, 0, 0, .2); -moz-box-shadow: 0 1px 1px rgba(0, 0, 0, .2); box-shadow: 0 1px 1px rgba(0, 0, 0, .2); text-shadow: 0 1px 0 rgba(255, 255, 255, .8); }
 7     #nav ul li:hover a, #nav li:hover li a { background: none; border: none; color: #666; -webkit-box-shadow: none; -moz-box-shadow: none; }
 8     #nav ul a:hover { background: #0399d4 !important;  filter: progid:DXImageTransform.Microsoft.gradient(startColorstr='#04acec', endColorstr='#0186ba');  background: -webkit-gradient(linear, left top, left bottom, from(#04acec), to(#0186ba)) !important;  background: -moz-linear-gradient(top, #04acec, #0186ba) !important;  color: #fff !important; -webkit-border-radius: 0; -moz-border-radius: 0; text-shadow: 0 1px 1px rgba(0, 0, 0, .1); }
 9     #nav ul { background: #ddd;  filter: progid:DXImageTransform.Microsoft.gradient(startColorstr='#ffffff', endColorstr='#cfcfcf');  background: -webkit-gradient(linear, left top, left bottom, from(#fff), to(#cfcfcf));  background: -moz-linear-gradient(top, #fff, #cfcfcf);  display: none; margin: 0; padding: 0; width: 185px; position: absolute; top: 35px; left: 0; border: solid 1px #b4b4b4; -webkit-border-radius: 10px; -moz-border-radius: 10px; border-radius: 10px; -webkit-box-shadow: 0 1px 3px rgba(0, 0, 0, .3); -moz-box-shadow: 0 1px 3px rgba(0, 0, 0, .3); box-shadow: 0 1px 3px rgba(0, 0, 0, .3); }
10     #nav li:hover > ul { display: block; }
11     #nav ul li { float: none; margin: 0; padding: 0; }
12     #nav ul a { font-weight: normal; text-shadow: 0 1px 1px rgba(255, 255, 255, .9); }
13     #nav ul ul { left: 181px; top: -3px; }
14     #nav ul li:first-child > a { -webkit-border-top-left-radius: 9px; -moz-border-radius-topleft: 9px; -webkit-border-top-right-radius: 9px; -moz-border-radius-topright: 9px; }
15     #nav ul li:last-child > a { -webkit-border-bottom-left-radius: 9px; -moz-border-radius-bottomleft: 9px; -webkit-border-bottom-right-radius: 9px; -moz-border-radius-bottomright: 9px; }
16     #nav:after { content: "."; display: block; clear: both; visibility: hidden; line-height: 0; height: 0; }
17 #nav { display: inline-block; }
18 html[xmlns] #nav { display: block; }
19 * html #nav { height: 1%; }
20
Now that we have our basic html and css we can begin converting that into a Razor based DDRMenu Template. This basically involves breaking down the HTML into patterns. For this template I have a repeating pattern which looks something like this:
1 <ul id="nav">
2     <!-- Repeat for every Menu item -->
3         <li [someClassList]>
4             <!-- RenderListItem() -->
5             <!-- RenderChildNodes() -->
6         </li>
7     <!-- End Iteration -->
8 </ul>
A basic list item gets rendered like this:
1 <a href="@node.Url">@node.Text</a>
Ultimately, when you put it all together you end up with this Razor Template:
 1 @using DotNetNuke.Web.DDRMenu;
 2 @{ var root = Model.Source.root; }
 3
 4 @helper RenderNodes(IList<MenuNode> nodes)
 5 {
 6     if (nodes.Count > 0)
 7     {
 8          <ul id="nav">
 9             @foreach (var node in nodes)
10             {
11                 var classString = GetClasses(node);
12
13                 <li @classString>
14                     @RenderItem(node)
15                     @RenderNodes(node.Children)
16                 </li>
17             }
18         </ul>
19     }
20 }
21
22 @helper RenderItem(MenuNode node)
23 {
24     if (node.Enabled)
25     {
26     <a href="@node.Url">@node.Text</a>
27     }
28     else
29     {
30     @node.Text
31     }
32 }
33
34 @functions{
35     public HtmlString GetClasses(MenuNode node)
36     {
37         List<string> cssClasses = GetClassList(node);
38         return new HtmlString((cssClasses.Count == 0) ?
39             String.Empty :
40             ("class=\"" + String.Join(" ", cssClasses.ToArray()) + "\""));
41     }
42
43     public List<string> GetClassList(MenuNode node)
44     {
45         var classList = new List<string>();
46         if (node.Selected) { classList.Add("selected"); }
47         //if (isRoot) { classList.Add("root"); }
48         return classList;
49     }
50 }
51 @RenderNodes(root.Children)
52
I added a few additional functions so that I could keep the markup fairly isolated from the actual logic. I was able to use the CSS pretty much as it was since I am generating the same markup (I did make a few tweaks so you will want to see the project at the end of this post for the actual code). This renders the menu just like the one from Web Designer Wall.

A Bit of Magic
Up to now, we could have accomplished this menu with any of the templating options. At this point I want to start linking the menu to some meta-data associated with individual pages. In my example I am going to use a custom taxonomy vocabulary which holds a list of CSS class names that I will define and that I will use in my style sheet for styling the menu. With this approach, I can edit the page settings of any page and just apply taxonomy tags to the page and have it control the rendering. Depending on your needs you could do the same thing by creating a custom Page Header Tags, but I find the taxonomy to be a much cleaner approach.
To make this work I need to make three changes to the functions section of my Razor template:
1) Declare variables to hold the PortalId and a reference to a TabController()
1     public int portalId = PortalController.GetCurrentPortalSettings().PortalId;
2     public TabController tc = new TabController();
3
2) Create a method to read in the Taxonomy terms
 1     public List<string> GetTerms(MenuNode node)
 2     {
 3         var classList = new List<string>();
 4
 5         TabInfo tab = tc.GetTab(node.TabId, portalId, false);
 6         foreach (Term term in tab.Terms) {
 7             classList.Add(term.Name);
 8         }
 9         return classList;
10     }
11
3) Update one method to add our Taxonomy terms to our list of classes to be applied to a list item.
1     public List<string> GetClassList(MenuNode node)
2     {
3         var classList = new List<string>();
4         if (node.Selected) { classList.Add("selected"); }
5         classList.AddRange(GetTerms(node));
6         return classList;
7     }
8
With these few changes in place, and 3 simple lines of CSS
1     #nav ul li.red a:hover { background-color: #d31313; }
2     #nav ul li.green a:hover { background-color: #10a918; }
3     #nav ul li.grey a:hover { background-color: #6d6d6d; }
4
we are left with a menu which now is controlled by the template and by taxonomy tags on the page. In the video below you can see what happens when I apply a simple “red” or “green” taxonomy tag to Sub-Page 1 and 2.
You can take this concept as far as you want. The sky is the limit in terms of how complex you get with your template or which DotNetNuke APIs you use. Just remember that the menu is rendered on each page refresh, so be mindful of the performance implications.
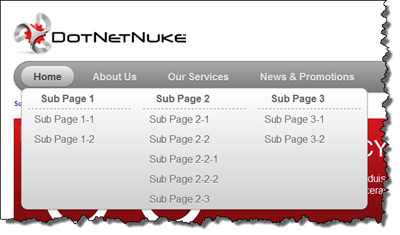
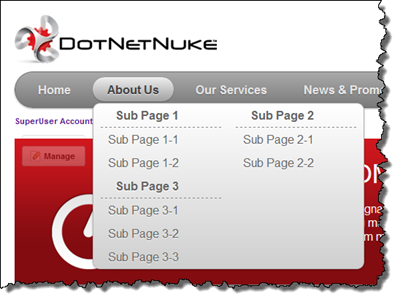
In my case, using the concepts from above and little more logic I was able to create a mega menu solution where I can specify how to render the mega-menu for each top level page. In my case I created three taxonomy terms (col1, col2, col3) and then had my stylesheet adjust the size of the mega menu based on which taxonomy term was applied to the page.


Summary
Hopefully this will give you a good starting point for creating some really exciting menus in DotNetNuke and also getting you to think outside of the box when trying to accomplish something with DotNetNuke. You can download the code for these examples from GitHub.
This article is cross-posted from my personal blog.