Managing File Properties
How to modify the properties of files within Pro including adding file tags, setting file attributes and setting publishing schedules.
All users (including anonymous users) must be granted Manage Settings permissions to the folder where the file is located.
- Navigate to >
 File Management - OR - Go to a Pro module.
- Navigate to the required folder. See "Navigating to and Selecting Folders"
- Select the folder and click the View Folder Properties
 button in the toolbar - OR - Right click on the folder and select View Folder Properties.
- The following properties can be edited:
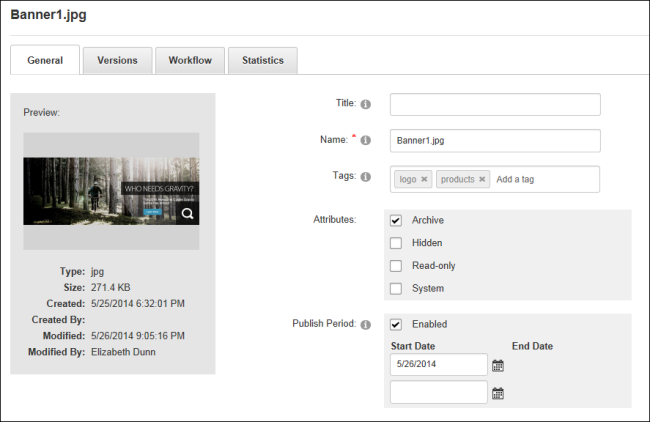
- In the Title text box, enter a title for this file. The title is metadata of the file.
- In the Name text box, enter a new file name. Warning. Renaming a file does not update any references to this file across the site. E.g. If the file is an image that is displayed in the Pro module, renaming the file will break the path to the image and image path will need to be manually updated by editing the module content. Because of this, it is recommended that files are only when they are first uploaded to the site and have yet to be used on the site.
- In the Tags text box, enter one or more tags separated by a comma.
- At Attributes, modify any of the following file attributes:
- At Archive, mark
 the check box to allow the file to be archived by the operating system. This option is enabled by default.
 - At Hidden, mark the check box to hide this file on the site. Hidden files don't display on the site in modules such as the Pro module, they are also not displayed on vendor banners, nor are they displayed for selection from the image or file galleries. This option is disabled by default.
- At Read-only, mark the check box to set the file as read only. This option is disabled by default.
- At System: mark the check box to disable hidden option in file properties (Windows). For fast searching, allow Indexing Service to index this file. This option is disabled by default.
- At Publish Period, select from these options:
- Mark the check box at Enabled to enable publishing of the file between selected dates. This displays the Locked
 icon beside unpublished file and prevents editing of the file until the publish period is reached. This also hides the file in tools such as the Add Media tool on the and the File Link control, thus preventing users from selecting the file when editing modules. Note: If the file is already added to a module before the publish dates are set, the file will not be hidden on the page if the file is located in a standard folder (e.g. Standard - File System) that does not use link click. However if the file is located in a secure folder (e.g. Secure - File System) that does use link click then the unpublished files will be hidden on the page.
 - At Start Date, click the Calendar
 button to edit the start date for this file. The current date, according to the users profile time zone is displayed by default.
 - At End Date, click the Calendar button to select the end date for this file.
- Unmark
 the check box to disable publishing between selected dates. This will remain the Locked icon from the file and enable the file to be edited.
- Click the Save button to save any modifications.
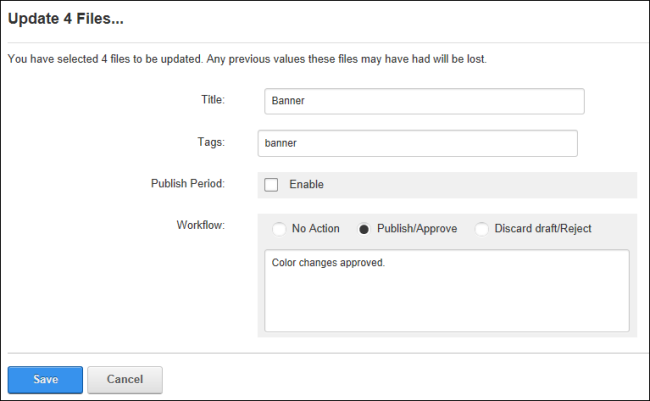
Performing Group Updates
Alternatively, users can modify the Title, Tags and Publish Period of multiple files at one time by selecting multiple files and then selecting Group Updates  from either the drop down menu or the toolbar.
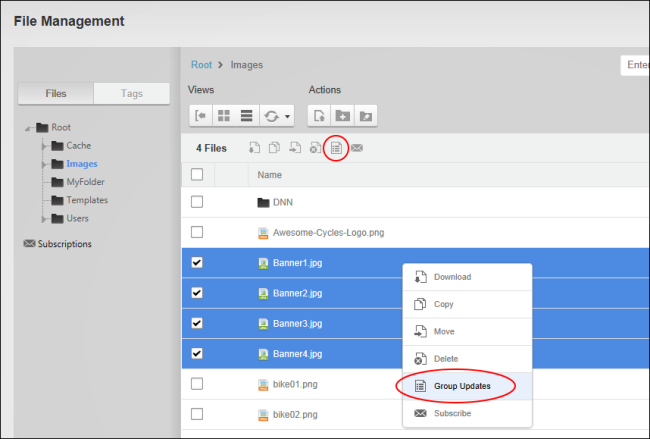
Group updates to the file title and publish period will replace any existing data however group updates to tags will add the new tags to all of the selected files but will not remove the existing tags.
Open topic with navigation